Author: thuy anh
How to Get Google Search Bar Back on Android Screen?
How to customize your start page in Safari on iPhone and iPad
How to customize your start page in Safari on iPhone and iPad
In iOS 15, you can now customize your start page in Safari.

Apple has enabled users to customize their start page in Safari since macOS Big Sur. Despite the fact that this feature was introduced last year, it did not make it to the greatest iPhone or iPad. However, following the release of iOS 15 and iPadOS 15 at WWDC, it appears that this capability will now be available on smaller screens as well.
You can choose a background image to use as well as new sections to display on the start page when you personalize the start page. Your Favorites, Siri Suggestions, Reading List, Privacy Report, and other features are included in this section. You can definitely make Safari on iPhone and iPad feel more like your own with the correct changes.
This’s the way to customize your start page in Safari on iPhone and iPad.
Apple occasionally offers updates to iOS, iPadOS, watchOS, tvOS, and macOS as closed developer previews or public betas. While the betas contain new features, they also contain pre-release bugs that can prevent the normal use of your iPhone, iPad, Apple Watch, Apple TV, or Mac, and are not intended for everyday use on a primary device. That’s why we strongly recommend staying away from developer previews unless you need them for software development, and using the public betas with caution. If you depend on your devices, wait for the final release.
How to choose sections for your start page in iOS 15 and iPadOS 15
1. On your iPhone or iPad, open Safari.
2. If you’re already on an existing page, hit the Tabs button to open a new tab.
3. Scroll to the bottom of the start page and choose Edit.
4. Make sure the toggle for Use Start Page on All Devices is set to ON if you want to use the same start page customization across all of your iPhones, iPads, and Macs (green). This ensures that the appearance and settings of your start page are synchronised via iCloud.
5. Favorites, Frequently Visited, Shared With You, Privacy Report, Siri Suggestions, Reading List, and iCloud Tabs are among the sections. Turn ON the toggles for the areas you’d want to display (green).
6. If you wish to change the order in which these sections display, simply drag-and-drop the handle into the desired position.
How to set a background image for your start page in iOS 15 and iPadOS 15
Adding a backdrop image to your Safari start page is a fun way to liven up your browsing experience. Apple gives you the choice of selecting a preset image or creating your own. Here’s how to do it.
1. On your iPhone or iPad, open Safari.
2. To get to the start page, make sure you’re in a new tab.
3. Scroll to the bottom of the page and select Edit.
4. Press the toggle for Background Image to ON (green).
5. Press on one of the preset photos to select it.
6. Tap the large plus (+) button if you prefer to use your own.
7. Select a picture from your Photo Library.
Questions?
As you can see, customizing your start page in Safari on the iPhone and iPad in iOS 15 is simple. When you start a new tab in Safari, this will provide you a better experience, and it’s a terrific way to personalize the browser.
Do you have any queries regarding how to modify your iPhone’s Safari start page? Leave them in the comments, and we’ll assist you.
How to download and install iTunes on PC (Windows 10/8/7)
How to Record Your Screen Using VLC
How to Record Your Screen Using VLC
VLC Media Player offers a lot of features, but did you know it can also record your screen? Here’s how to use VLC to record your desktop.

You may need to record video of your desktop at some point. Perhaps you want to record the steps of a problem you’re having, or you want to capture footage from a favorite game. There is another technique to record your Windows screen without installing anything.
VLC Media Player, the multi-purpose video player, has a different trick is hidden. It is capable of recording your screen without the use of any additional software. This is how it goes.
How to Record Your Screen Using VLC
1. Search VLC Media Player in the Start Menu and open it.
2. On the toolbar, click the Media tab and choose Convert/Save.
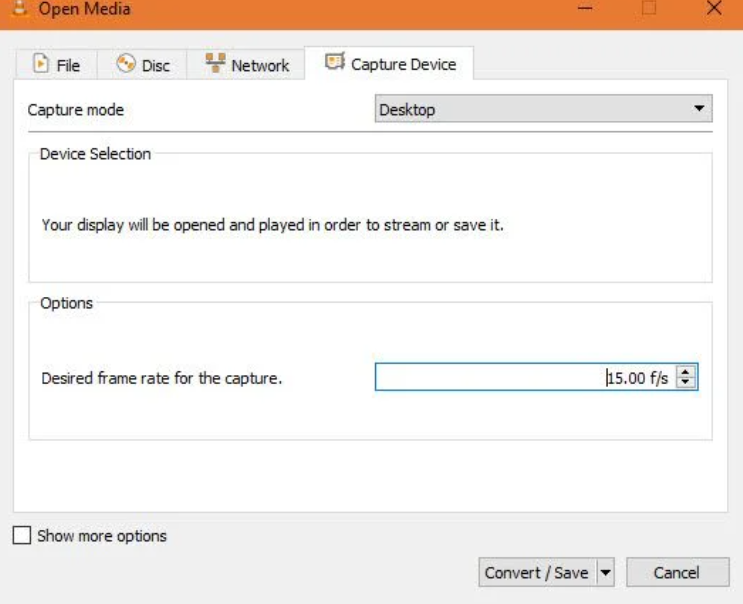
3. Move to the Capture Device tab. Change the Capture mode dropdown box to Desktop here.
4. In the Desired frame rate box, type a number of frames per second. 15FPS should work fine for simple screen recordings. Try 30FPS if you need a high-quality recording. A greater frame rate results in a smoother recording, but it also results in a bigger file size.
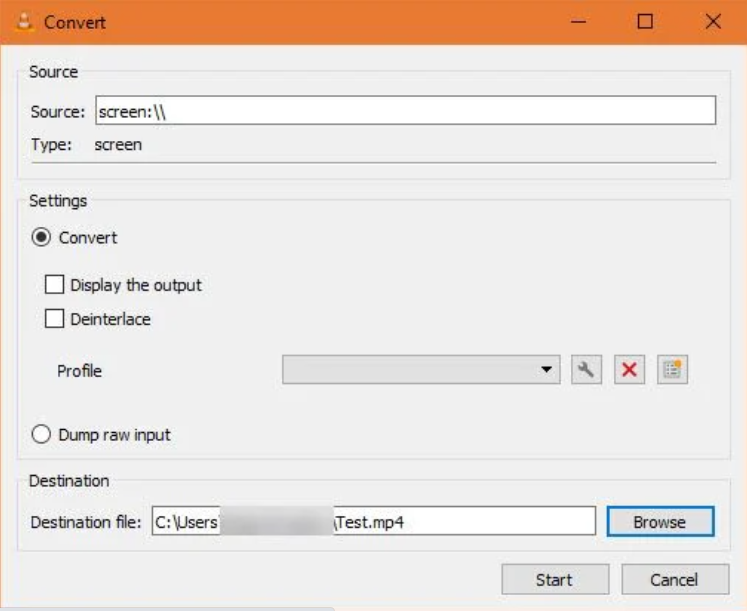
5. To enter the next dialog box, click the Convert/Save button.
6. Choose a location to save the recording by selecting Browse next to the Destination file box.
7. Once you’ve completed this, click Start to begin the recording. VLC will record anything on the screen without giving you any indication.
8. To stop the recording, press the Stop button on VLC’s interface, and the file will be saved automatically. It will be ready for you in MP4 format at the place you indicated previously.
That’s all there is to make a quick screen recording. VLC doesn’t have all things of specialist recorders, but it’s simple to use in a pinch. You may now share whatever is on your screen at any moment without having to use your phone’s camera!
How Do People on Clubhouse Make Money?
How Do People on Clubhouse Make Money?
Have you ever wondered how Clubhouse users generate money? They can accomplish this in three ways.

These days, the clubhouse is all the rage. Many entrepreneurs, activists, and content creators have joined Clubhouse since Elon Musk’s decision to join the audio-based social networking app to share their ideas and establish a fan base.
Clubhouse, on the other hand, is an invite-only platform, which means you can only join the app or a chat room if a buddy provides you a link. Because of the exclusivity, there is a limit to how quickly you can expand your audience.
But that doesn’t rule out the possibility of making a living from Clubhouse. So, how do users earn money on the app?
1. Sponsorships
Sponsorships are one of the main ways to generate money on Clubhouse as a content creator, and they’re a popular business model in the social media age. Companies who want to promote a product look for influencers on Instagram, so it’s only natural that they’ll do the same on Clubhouse.
Sponsored Clubhouse creators are paid a set sum to mention a company’s product or service, similar to YouTubers.
Brands are increasingly going beyond simply paying for shoutouts. Many companies are beginning to pay creators and entrepreneurs to construct entirely new chat rooms on the app, with titles and descriptions dedicated to the company. There are also affiliate links involved.
2. Paid Rooms

Closed Clubhouse chat rooms are occasionally created and monetized by Clubhouse users with a continuously rising listener audience.
An entrepreneur who wants to launch a Closed Clubhouse chat room, for example, will tell their listeners about it and ask them to RSVP ahead of time.
Participants who have been confirmed will be required to pay before the event. Then, they’ll be able to listen in on the day the Closed chat room becomes live.
Some artists or influencers even invite high-profile speakers or moderators to make guest appearances or serve as moderators to gain more exposure. Many CEOs and well-known celebrities have appeared on Clubhouse to discuss a variety of topics.
3. Direct Contributions From Listeners


Some Clubhouse hosts prefer to collect money from their listeners directly. Many users will post links to their Venmo or CashApp accounts, as well as links to crowdfunding sites like Patreon, in their user bio.
Patreon is a prominent third-party service that many authors use when it comes to crowdfunding platforms. There are, however, a number of alternatives to the site.
Nevertheless, this way of receiving funds may not be necessary soon. In April 2021, Clubhouse launched a unique new feature that will allow users to monetize their work on the app.
Payments is a new feature in Clubhouse that allows users to pay money directly to their favorite content creators without having to rely on third-party crowdfunding platforms.
To help a creative, simply go to their profile, press Send Money, and type in the amount you’d like to donate. Clubhouse will not take any cuts and will give the developer 100% of the money.
Payments is still in the early stages of implementation. Clubhouse, on the other hand, plans to make the service available to users all around the world soon.
Making Money On Clubhouse
The audio-only nature of Clubhouse means it is ad-free, unlike many social networking platforms, but it hasn’t stopped people on the app from earning money.
With its first-ever Clubhouse Creator First accelerator program, the app has begun to step up and give help to newcomers.
Join Clubhouse if you have a brilliant idea you’d want to share with the world. After all, who knows? You may be the app’s next great thing.
How to Download All the Data Snapchat Has About You
How to Download All the Data Snapchat Has About You
This post below will show you what you need to know about accessing all the data that Snapchat has collected on you through the app.
Snapchat, like other social media apps, allows you to download your full history as well as the data it has about you.
Fortunately, the procedure is straightforward. Here’s everything you need to know…
How to Request Your Snapchat Data

You’ll need to send a request to get your Snapchat data because it’s not easily available.
Here’s how to make a request for your data:
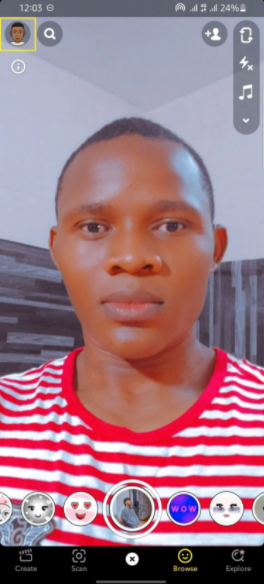
1. Go to the Snapchat app and press on your Bitmoji or profile icon.
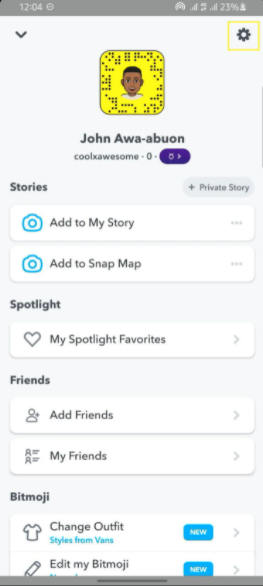
2. At the top right corner of your screen, press the Settings icon.
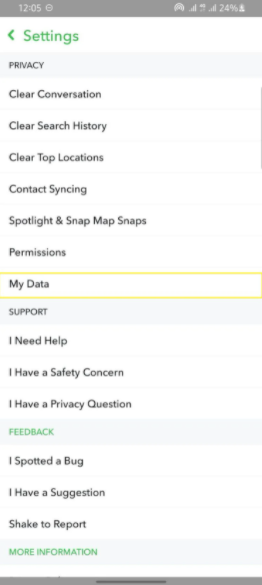
3. Select My Data at the bottom of the page. You’ll be asked to check in to the web view. Sign in with your username and password.
4. Scroll down and tap Submit Request once you’ve logged in.
As soon as your data is ready, it will be delivered to the confirmed email address associated with your account.
How to Download Your Snapchat Data
As soon as it’s ready, you’ll receive an email with a download link. It may only take a few minutes sometimes.
To get your data, click the link in your email. Don’t give out the link because anyone who has it has access to your complete Snapchat history.
Accessing the Actual Data File
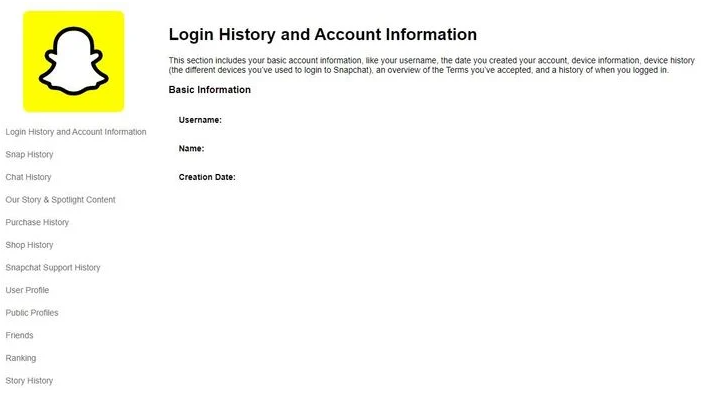
Your profile information, login history, memories, purchase history, friends, location history, Bitmoji, search history, and support history will all be included in your data file.
Your data will be delivered in ZIP format, which will require suitable software to open. Double-click the index.html file once it has been opened, and your web browser will display a page similar to the one below.
With or without an internet connection, you can travel to other pages from there.
That’s how you can get your Snapchat info.
There’s No Such Thing as Being “Too Cautious”
It’s not a bad idea to see what information a social networking platform has about you.
Downloading your Snapchat data to see what the app already knows about you can also help you determine if you’re providing too much information, especially concerning your location and purchase history.
What to do when your iPhone isn’t showing up in iTunes
What to do when your iPhone isn’t showing up in iTunes
Connecting your iPhone to iTunes via a Mac or PC is an important element of maintaining your digital home. Connecting your iPhone to iTunes is often the best — and sometimes is the only — choice for updating it, syncing it with your computer, or transferring some media to it.
However, there are situations when your iPhone does not appear in iTunes. You plug in your iPhone via USB connection, but it doesn’t appear anywhere on your computer, and iTunes doesn’t seem to detect it. In this post, we’ll go over the five most practical solutions for dealing with such situations. In most circumstances, simple restarts or upgrades will solve the problem, but in certain cases, you may need to purchase new cables or contact Apple Support.
What to do when your iPhone isn’t showing up in iTunes
Try a different USB cable or USB port
When your iPhone isn’t showing up in iTunes, the simplest thing you can do is try a different USB cable or USB port. Faulty hardware can sometimes be the cause of your inability to connect properly. Alternatively, if your computer has another USB port, use it. If you have another USB cable for your iPhone, try that as well.
If a new USB cable or port doesn’t work, it’s also worth trying a different computer. If your iPhone is detected by a different computer, you know the issue is most likely with your PC.
Restart your iPhone and computer
If your iPhone is still not showing up in iTunes, you can try rebooting both your iPhone and your computer. This is an apparent step, but it typically helps in these situations since restarts clear your device’s RAM, which is responsible for handling short-term data and processes. For whatever reason, such information may be interfering with the operation of your iPhone or computer. It’s never a bad idea to give it a shot.
Turn on and unlock your iPhone
It should go without saying, but your iPhone must be turned on and unlocked before it will appear in iTunes.
Trust your computer

Another simple thing to remember is to press Trust on your iPhone when the “Trust This Computer?” notice appears. Because your iPhone will refuse to connect to your computer if you don’t do this, iTunes won’t be able to recognize it.
You may have also accidentally tapped Don’t Trust at some point. If you do this, your iPhone will never send data to your computer, which could be why your iPhone isn’t showing up in iTunes. You can alter your settings for trusted computers if you feel this is the case. Open Settings > General > Reset > Reset Location & Privacy to accomplish this.
Update your software
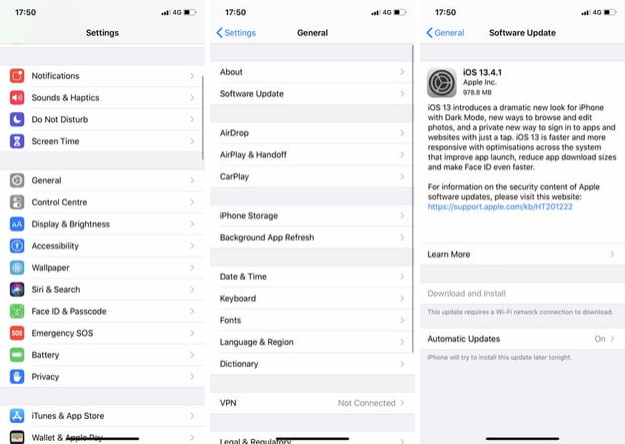
If your iPhone is still not showing up in iTunes, double-check that everything is up to date. Update your iPhone, iTunes, and your computer’s operating system if possible (whether MacOS or Windows).
Open System Preferences and then select Software Update to update your Mac. To update your Windows PC, navigate to Settings > Update & Security > Windows Update after clicking the Start button.
On a Mac, enter the App Store and then select Updates to update iTunes. Click on the iTunes update if one is available.
To update iTunes on a Windows PC, navigate to Help > Check for Updates after opening iTunes.
Update the iPhone driver in Windows PC
If you’re using Windows, you could try updating your iPhone’s driver software. If you do this often enough, your iPhone will begin to appear in iTunes. If you downloaded iTunes via the Microsoft Store, we’ve included instructions below.
1:Unplug your iPhone from your computer. Then, using your USB cable, unlock your iPhone and connect it to your PC.
2: Right-click the Start button, then choose Device Manager. Next, tap Portable Devices so that it expands.
3: Right-click on Apple iPhone (or whatever your PC may call your iPhone). Tap Update Driver. Lastly, select Search Automatically for Updated Driver Software.
This will update the software on your iPhone’s driver. Open iTunes after it has finished installing. It should now be able to recognize your iPhone.
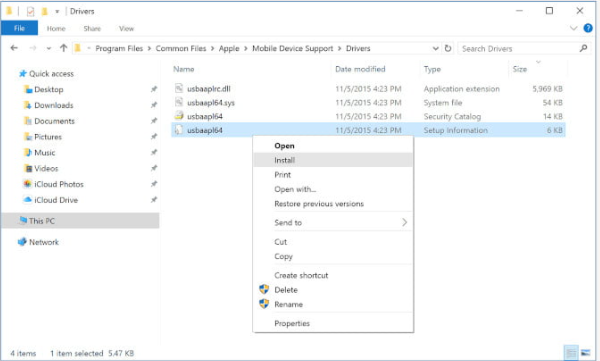
If you downloaded iTunes from Apple’s website rather than the Microsoft Store, you can update your iPhone driver by doing the following:
1: Through USB cable, connect your iPhone to your PC. Unlock it.
2: Tap the Windows + R keys simultaneously, which opens the Run command. In the Run window, enter the following:
%ProgramFiles%Common FilesAppleMobile DeviceSupportDrivers
3: Click the OK. Right-click on either Usbaapl64.inf or Usbaapl.inf. After that, click Install. Finally, before accessing iTunes, disconnect your iPhone, restart your PC, then rejoin your iPhone.
Update the Apple Mobile Device USB Driver in Windows PC
Try upgrading the Apple Mobile Device USB Driver on Windows if none of these methods work. Here’s how to go about it:
1: Press the Windows + R keys at the same time to bring up the Run command. Enter the following in the Run window: devmgmt.msc
2: Select OK. Then, as shown in the screenshot below, tap on Universal Serial Bus controllers to expand its sub-menu. To check for a newer version of the Apple Mobile Device USB Driver, right-click on it and select Update driver.
Click to download a more recent version if one is available. Connect your iPhone once more after the download is complete to see if it appears.
Go to Apple Support
Let’s imagine you’ve exhausted all of your debugging choices and tried connecting to a different machine with no success. Unfortunately, this indicates that you are experiencing a hardware issue. The only option in this instance is to call Apple Support and see what they can do.
It’s possible that you’ll need to make an appointment at your local Apple Store so they can take a closer look.
What Is the Privacy Dashboard on Android?
What Is the Privacy Dashboard on Android?

Smartphone users are increasingly concerned about their privacy. When it comes to stronger privacy features, Apple has been leading this, but Google is improving Android as well. The “Privacy Dashboard” function lays it all out for you.
The Privacy Dashboard is a feature that debuted with Android 12. Google put a lot of attention on privacy in this release, along with a few other things, and the Privacy Dashboard is the focal destination for a lot of it.
Note: Privacy Dashboard is available in beta at the time of this writing. Before the public release in the fall of 2021, screenshots and features are subject to change.
What Does the Android Privacy Dashboard Do?
The Privacy Dashboard is, as its name suggests, a dashboard for all things privacy-related on your Android device. It’s a summary of which apps use specific permissions and how frequently.
There are two different sectors to the Privacy Dashboard, which may be found under the Settings menu. Let’s start with the top-of-the-screen circle chart. This graph shows which permissions have been utilized the most in the last 24 hours in a quick and straightforward way.
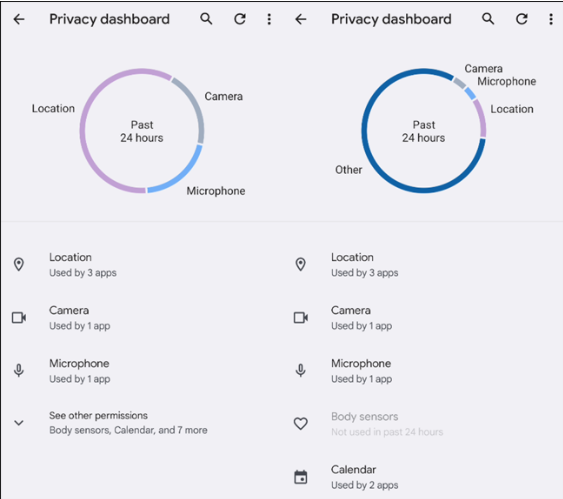
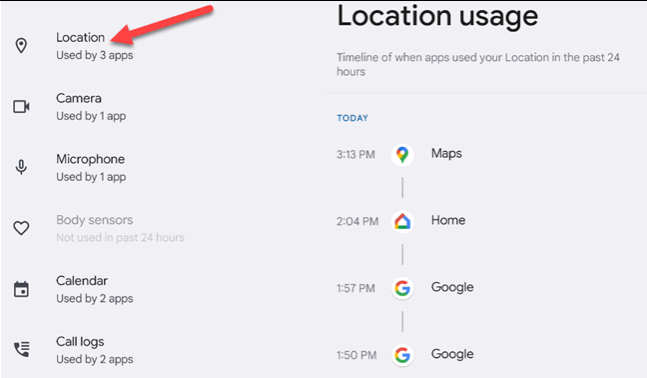
The word “location” was used the most, followed by “Camera” and “Microphone.” This chart corresponds to the permissions listed in the section below, so if you expand to “See Other Permissions,” you’ll see them in the chart as well.
What exactly are we talking about when we say “permissions”? All of the permissions that can be tracked in the Privacy Dashboard are listed below:
- Location
- Camera
- Microphone
- Body Sensors
- Calendar
- Call Logs
- Contacts
- Files and Media
- Nearby Devices
- Phone
- Physical Activity
- SMS
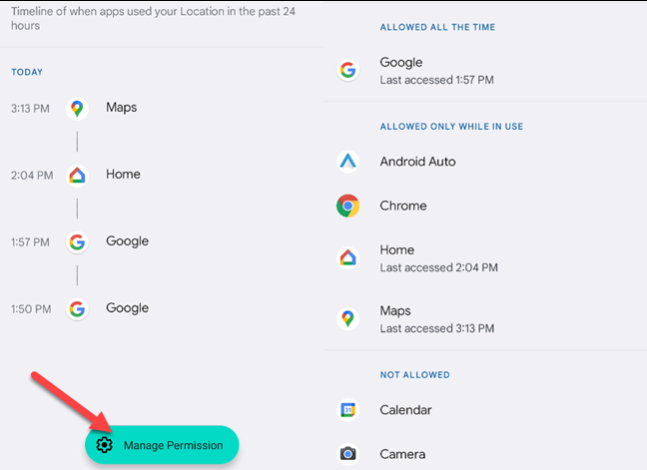
The permissions are listed in the list form underneath the chart. The number of apps that have utilized each permission in the last 24 hours is labeled next to it. To see a quick timeline of that 24-hour period of permission, select that permission.
The “Manage Permission” button opens a menu where you may change how each app can use that permission independently. All of this gives you a lot of insight and control over how your device’s sensors are used.
Where to Find the Privacy Dashboard
As previously stated, Android 12 introduced the Privacy Dashboard. To find the feature, you’ll need an Android 12 or higher phone or tablet.
To access the Quick Settings menu, swipe down twice from the top of the screen, then hit the gear icon.

In the Settings, pull down to the “Privacy” section.
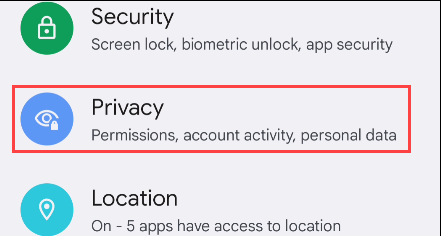
Then, choose “Privacy Dashboard.”
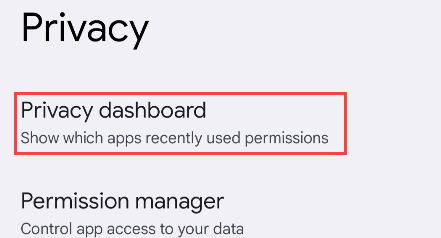
That concludes our discussion. The Privacy Dashboard is what you’re looking at right now.
Will My Phone Get the Privacy Dashboard?
When new Android features are introduced, consumers naturally want to know if they will be available on their devices. At the time of writing, we don’t know exactly which devices will be receiving the Privacy Dashboard. We can, however, glean information from previous features.
The Privacy Dashboard and the Digital Wellbeing app for Android are the same. Digital Wellbeing was introduced with Android Pie in 2018, and for a time, it was only available on Google Pixel phones. It eventually spread to additional devices, and it can now be found on non-Pixel phones.
Based on this, we anticipate the Privacy Dashboard will follow a similar path. It’ll most likely remain a Pixel-only feature for a while, but it could eventually be rolled out to other Android devices—though when that happens is unclear.
How to change Netflix region
How to change Netflix region

Some Netflix content is restricted to specific countries due to broadcasting agreements with movie and television studios. As a result, the episodes and movies available on Netflix vary depending on where you are in the world. Or, to be more precise, where Netflix thinks you are.
Yes, there are techniques to make Netflix believe you’re in a different country. We’ll look at how to change your Netflix region and how to watch Netflix from another country in this article.
Using a VPN to unblock geo-restricted content on Netflix is the simplest solution. It’s also quite easy to do. You’ll be viewing your favorite episodes in no time if you follow our simple step-by-step guide on how to change the country on Netflix.
How can I change Netflix region or country?
- Subscribe to Netflix: Sign up in case you haven’t already.
- Download and install a VPN: Choose a VPN that can unblock Netflix.
- Connect VPN to the right server: Choose the country that has the Netflix content you want to watch.
- Log in to your Netflix account: All the content from the region your VPN is connected to should be available.
- Grab some popcorn, sit back and enjoy!
Netflix country exclusives
Some films and television shows are only available in certain countries. So, even though the content is stored in their cloud, if your IP doesn’t match, you won’t be able to access it. However, by hopping from server to server with a VPN, you can see them all. Here are some of the ones you shouldn’t miss, which are only available in a few countries.
USA: Universal Soldier: The Return, Alexander Revisited: The Final Cut, The Yeti Adventures, My Fair Lady, etc.
Canada: The Upside, Alita: Battle Angel, Bill & Ted Face the Music, Unhinged, John Lewis: Good Trouble, etc.
UK: Prince Philip: An Extraordinary Life, The Sound of Silence, Capone, Saint France, etc.
Greece: Dr. Strangelove, Flashdance, Area 51, The Avengers, Malibu’s Most Wanted
Japan: CODE BLUE the Movie, Kekkaishi, Shinjuku Swan, Syoga Drama Nobunaga Oda, etc.
Do free VPNs work with Netflix?
A free VPN is not a good choice for watching any type of online video content for some reasons:
1. Watching Netflix on freemium VPNs will use up your data allowance: Monthly data restrictions are frequently enforced by freemium VPNs. As we all know, watching video consumes a lot of bandwidth, so you’ll quickly exhaust your free VPN data allowance.
2. It’s quite likely that a free VPN won’t let you access region restricted content: Netflix and other streaming services are improving their ability to detect and disable VPNs on their servers. So much so that many paid VPN providers have abandoned providing dependable Netflix access. As a result, it’s even less probable that a free VPN service will be able to escape being blacklisted.
3. It probably won’t protect your online anonymity: Free VPNs can come at a cost to your online security. Many of them will recoup expenditures by tracking your internet activities and selling your data to third parties. Alternatively, your free VPN provider may inject advertisements and track cookies while you’re online.
While a free VPN for the job is findable, here are three commercial VPNs that will unblock Netflix without a hitch.
Which VPNs unblock Netflix
1. NordVPN
First on our list is NordVPN, and for good reason. NordVPN’s global server network uses more than 5,400 servers across more than 59 countries. So this gives you plenty of choices if you’re looking to change your Netflix region.
It provides reliable access to multiple Netflix locations, including the United States, Canada, the United Kingdom, Japan, the Netherlands, France and Italy.
Not only can you use NordVPN to access region-restricted Netflix content, but you can also access BBC iPlayer, Amazon Prime Video, Hulu, and other streaming services.
NordVPN’s connections are extremely fast, allowing for smooth, buffer-free streaming of HD and even 4K content. You can also stream for as long as you like because NordVPN doesn’t impose any data constraints or bandwidth limits. As a result, you won’t have to worry about exceeding your data limit if you binge-watch an entire series.
In addition, NordVPN provides 24/7 customer support via live chat and email. It also takes cryptocurrency as a payment method.
NordVPN is available on:
- PC
- macOS
- iOS
- Android
- Linux
- Fire TV
- Android TV
With NordVPN’s SmartPlay feature, you can unblock content on devices that don’t support VPN, such as many smart TVs, game consoles, and other gadgets.
2. Surfshark VPN
The VPN service provided by Surfshark is a fantastic solution for streaming Netflix in another region. It boasts over 3,200 servers in 64 countries, providing you a lot of options for streaming region-locked content. And, given that Surfshark just more than doubled its server count, we expect this service to continue to expand until it becomes one of the most competitive on the market.
You may use a Surfshark VPN to watch Netflix, HBO Go, BBC iPlayer, and Amazon Prime Video in addition to Netflix.
Surfshark is as quick as its competitors, has excellent security features, and, most importantly, includes a Smart DNS function that allows you to bypass content restrictions not only on your computer or mobile device, but also on smart TVs, game consoles, and other devices.
But it’s Surfshark VPN’s unlimited simultaneous connections allowance that really sets it apart. This allows you to use a single Surfshark account for your entire family or group of friends.
Surfshark VPN is available on:
- PC
- macOS
- iOS
- Android
- Linux
- Fire TV
3. PrivateVPN
Although PrivateVPN only offers about 150 servers worldwide, it is still a feasible option for watching Netflix from another country. In fact, while having only a fraction of the servers that its competitors boast, these servers are dispersed throughout 60 countries.
It can also let you connect to servers in countries with some of the world’s largest Netflix catalogs, such as the United States, Canada, France, Japan, and the United Kingdom. You may also use it to access Hulu, HBO, Amazon Prime Video, and BBC iPlayer, among other streaming services.
It makes our list because of the combination of fast connection speeds and the ability to unblock content from a variety of countries.
PrivateVPN, as its name suggests, provides government-grade encryption and a VPN kill switch to keep your data safe and secure at all times. It also has a no-logs policy and accepts Bitcoin payments, so you can keep your transaction private.
If you have any problems, PrivateVPN has 24/7 live chat customer support, as well as a Contact Us, form to assist you in promptly resolving your issues.
PrivateVPN is available on:
- PC
- macOS
- iOS
- Android
- Linux
4. CyberGhost
CyberGhost is another wonderful VPN to use if you want to watch Netflix in other countries because it has over 6,800 servers in 90 countries. This includes streaming-dedicated servers are available in major areas like the United States, Canada, Japan, Brazil, India, the United Kingdom, France, Germany, Italy, and Austria.
Streamers will like the fact that CyberGhost provides dedicated servers for Netflix, BBC iPlayer, Disney+, and other streaming services.
But, of course, material quality and quantity aren’t the only factors to consider. CyberGhost, fortunately, provides robust encryption and a VPN kill switch to ensure your online anonymity.
In addition, CyberGhost provides 24/7 live chat customer support, as well as a troubleshooting ticketing system to assist you in resolving any issues you may encounter.
CyberGhost is available on:
- PC
- macOS
- iOS
- Android
- Linux
5. ExpressVPN
ExpressVPN, another fantastic VPN provider for changing your Netflix region or country, combines incredibly fast connection speeds, good app support, and a big global server network to unblock Netflix with ease.
It’s not just Netflix either. Along with other streaming services, EpressVPN can unblock Hulu, Amazon Prime Video, and BBC iPlayer.
ExpressVPN has more than 3,000 servers in 94 different countries. As a result, when it comes to changing your Netflix location, you have a lot of options.
ExpressVPN’s speeds can support HD and 4K HDR streaming, assuming you have a strong connection, so you can get the most out of your Netflix viewing experience. It also has no data constraints or bandwidth limitations, so you may watch as much content as you want.
When using ExpressVPN to watch region-restricted content, you may take advantage of the ExpressVPN MediaStreamer feature, which allows you to experience the service’s benefits even on devices that don’t support VPN. This includes a lot of smart TVs and game consoles, which are likely to be used to view Netflix.
If you’re concerned about security, ExpressVPN’s government grade encryption should ease your mind, as hackers and third parties won’t be able to see your online activities as long as you’re connected.
ExpressVPN is available on:
- PC
- macOS
- iOS
- Android
- Linux
- Routers
- Fire TV
How do I solve the Netflix proxy error?
You’ll probably get a streaming error warning if Netflix detects that you’re using a VPN or proxy service. The good news is that this proxy problem is very simple to resolve. All you have to do is follow our simple step-by-step tutorial to figure out what to do if you see an error message that says, “You seem to be using an unblocker or proxy.”
1. Sign up to a VPN that has the ability to unblock Netflix (if you already have one – just switch the server). We’ve developed a list of our favorite VPNs for watching region-restricted content and included it earlier in this tutorial if you need help choosing one.
2. Open the VPN app or browser extension. Connect to a server in the country where the Netflix content you want to watch is available. If you want to view Netflix in the United States, for example, make sure you connect to a server in the United States.
3. Clear your browser’s cache and cookies.
4. If this doesn’t work, try another server. The procedures outlined above should unblock Netflix and fix the proxy error. If it doesn’t work, try a different server or contact your VPN’s customer service for more personalized assistance.
How to change Netflix region on Android
Do you want to stream geo-restricted films on your phone? On Android, here’s how to change the Netflix region:
1. Install the VPN program of your choice from the Google Play Store (we recommend NordVPN, now 72% OFF)
2. Go to your new VPN account and sign in.
3. Select the country to which you want to connect.
4. Open your Netflix app and it will display your favorite country’s content.
How to change Netflix region on iPhone
If you wish to change the Netflix region on your iPhone, follow these steps:
1. Search for the VPN you require in the App Store and install it on your iOS device (our top choice for iPhone is NordVPN, now 72% OFF, now 72% OFF)
2. To log into your account, enter your username and password.
3. Choose a server in the nation to which you want to connect.
4. Check Netflix to see if the Netflix location has changed.
How to change Netflix region on TV
If you have a modern smart TV, it is almost certainly running on Android OS. Changing the Netflix location on your smart TV is a piece of cake in such instance. Simply follow these steps and you’ll be able to stream Netflix in no time:
Subscribe to a reputable VPN service (i.e., our top-pick for Netflix NordVPN, now 72% OFF)
Find your VPN on the Google Play Store and install it
Log into your existing account and pick the region of your choice
Open Netflix – it should show the content of the country you’ve chosen
Changing the Netflix region is a little more complicated – but not impossible – if your smart TV doesn’t have access to the Google Play Store. For example, NordVPN offers a feature called Smart DNS, that allows you to unblock Netflix libraries even on devices that don’t support VPNs.
How can I change Netflix region without a VPN?
If you don’t want to use a VPN and want to change your Netflix region to watch restricted content that isn’t available in your country, you can utilize a proxy service. However, keep in mind that a proxy does not encrypt your data, making it far less safe. If your online privacy is vital to you, changing your Netflix location should be done with the help of a reliable VPN provider.
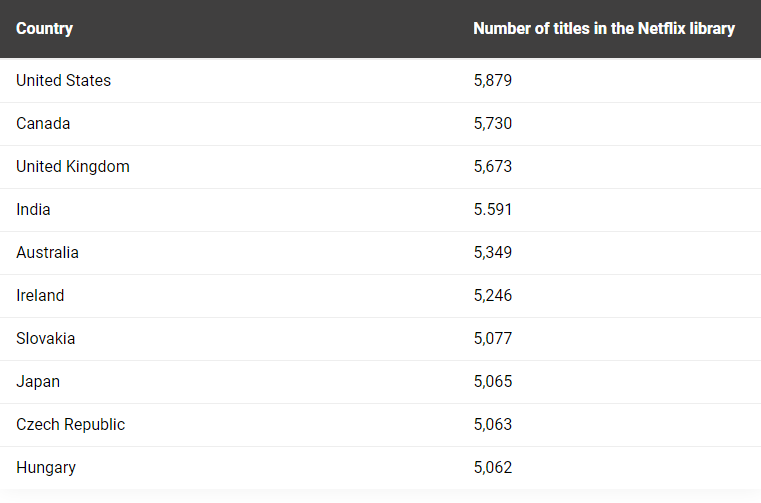
Countries with largest Netflix library
It should come as no surprise to learn that the United States boasts the largest Netflix library in the world. There are more titles available in this region than in any other Netflix region.
If you’re looking for anything to watch now that you know how to get region-restricted Netflix content, here’s a list of the top ten nations with the largest Netflix libraries:
Is using a VPN for Netflix legal?
Sure. In most countries, it’s perfectly legal to use a VPN to watch Netflix. Only if you use it in a nation where VPNs are prohibited, such as Russia, Iran, or China, will this cause you problems.
However, using a VPN to view any website, including Netflix and other streaming services, is lawful.
Using a VPN to stream Netflix content in another country is technically against Netflix’s rules. However, this does not make it illegal. And even if you are caught, there should be no cause for concern. Even after continuous use of VPNs, Netflix does not have a policy of actively taking down accounts. After all, even if the user is accessing content from another nation, they are still paying for a Netflix membership.
Netflix may be able to tell whether you’re using a VPN. If it occurs, you’ll get a message saying you won’t be able to watch any content until you disconnect your VPN. As a result, you won’t be able to watch anything on Netflix’s foreign version, but you won’t face any other major consequences. And if you’re having trouble watching Netflix with your VPN, we’ve got some tips and tricks for you lower down.
If you’re considering about using a VPN to watch Netflix, you might be concerned about copyright infringement. However, you do not need to be concerned about this. While Netflix has agreements in place with copyright holders that limit it to showing certain content in specific places, it is up to Netflix to enforce those agreements. You can still view it regardless of where you are (if you know how).
FAQ
Can Netflix detect if you’re using a VPN?
Yes. Netflix makes a concerted effort to block VPN IP addresses. Netflix will detect that you’re using a VPN if you login using one of these blacklisted IP addresses.
Why does Netflix ban VPN providers?
Because of distribution rights agreements, Netflix works hard to prevent VPN providers from allowing users to access region-restricted material. Netflix, in essence, has the authority to stream content for which they do not hold the copyrights in agreed-upon regions.
Which country has the best Netflix?
With 5,879 items in its catalog, the United States boasts the largest Netflix library. This equates to 4,035 films and 1,844 television programs. Canada, on the other hand, has a larger film library, with 4,043 titles.
It is up to you to decide which library is the greatest.