How To Fix Roblox Not Launching [2021 Tips]
How To Fix Roblox Not Launching [2021 Tips]

Roblox is entertaining, but it’s not entertaining when you can’t even launch it. Roblox not launching is a regular issue, but the good news is that there are some recognized solutions. Continue reading to learn more about them…
Try these fixes…
You don’t have to try all of them; simply work your way down the list until you discover one that works!
3: Reset your Internet options
5: Reinstall Roblox desktop app
Fix 1: Restart your PC
A restart of your computer is the first and easiest thing you should try. Many gamers have reported being able to launch Roblox after restarting their PCs, so it’s worth a go.
If rebooting your computer does not solve the problem, move on to the next step.
Fix 2: Check your browser
When you select a game on Roblox’s website and click to play, a pop-up window should appear, allowing you to launch the Roblox app. If the pop-up window does not appear in your browser or does not allow Roblox to launch with your permission, try using another browser.
Also, check if your browser is up-to-date. If it isn’t already updated, do so and then test the problem. Some players have reported that clear the browser’s cache allows them to load Roblox, so it’s worth a go.
If your browser doesn’t appear to be the source of the Roblox not starting issue, proceed to the next step.
Fix 3: Reset your Internet options
The actions following must be completed in Internet Explorer, but they have been shown to work in other browsers as well. To reset your Internet Explorer options, follow these steps:
1. Start Internet Explorer. If it isn’t on your desktop, use the Start menu or the search box next to the Start button to look for it.
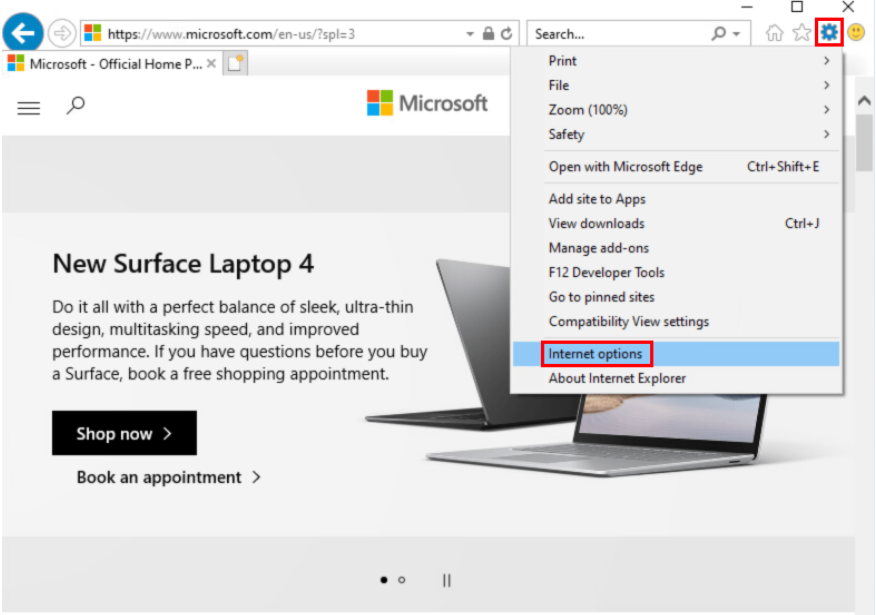
2. Select Internet Options from the gear-shaped icon in the top-right corner.
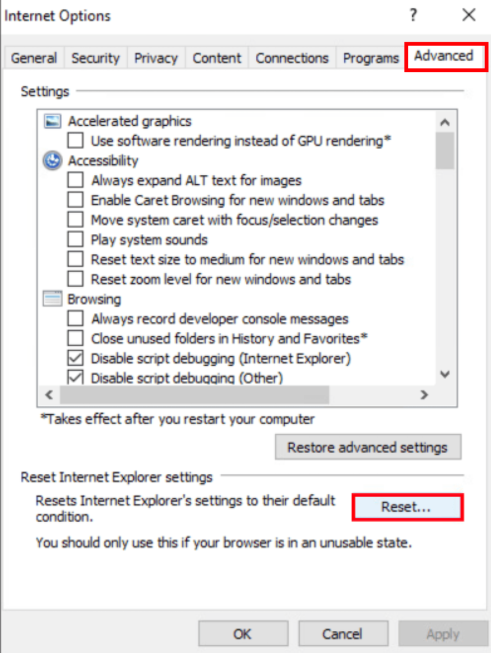
3. Move to the Advanced tab, tap Reset then.
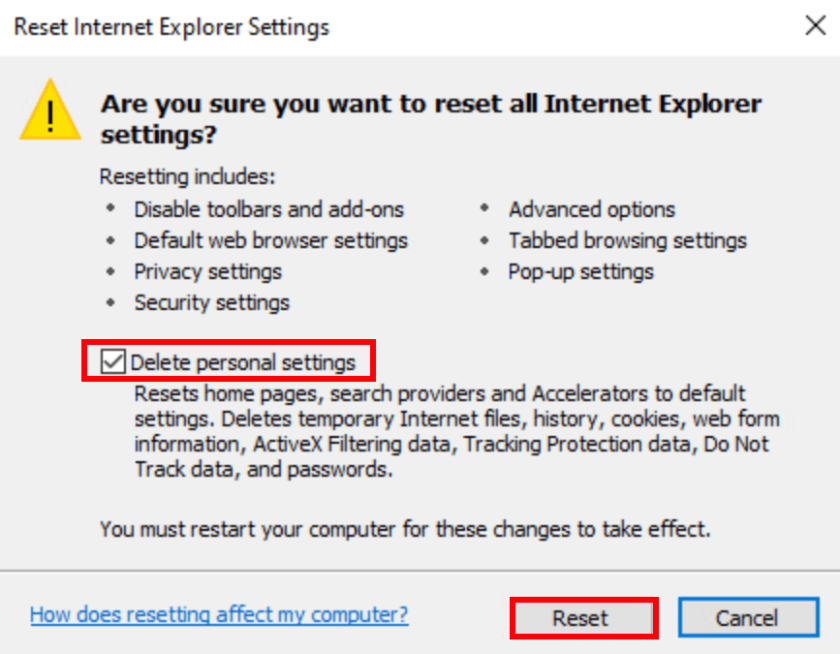
4. Select Delete personal settings, then tap Reset.
5. To make the modifications take effect, restart your computer.
You may now continue to test the issue in your preferred browser and use it. If this doesn’t work, move on to the next step.
Fix 4: Check your proxy settings
Roblox may not launch if your PC is trying to connect through a proxy server. The following steps will show you how to verify and configure your proxy settings:
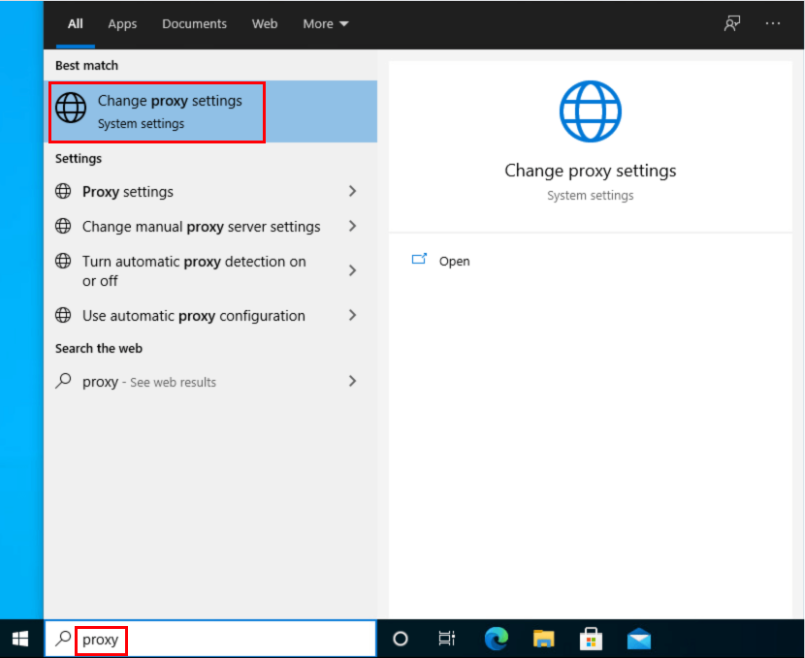
1. Enter proxy then tap Change proxy settings in the search bar next to your Start button (or in the Start menu).
2. User setup script and Use a proxy server should both be turned off.
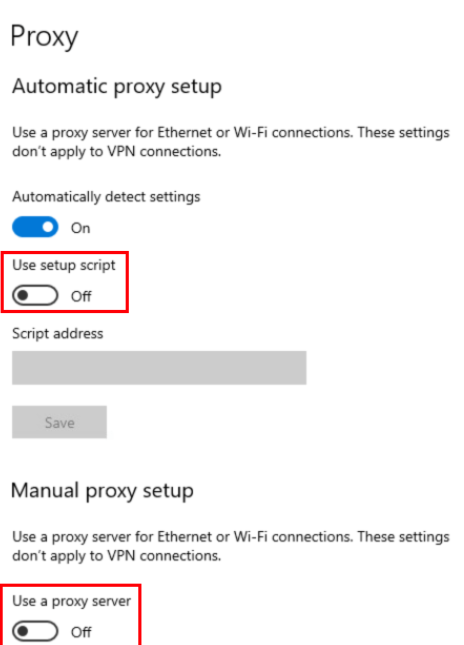
If this doesn’t work, try the last option.
Fix 5: Reinstall Roblox desktop app
Many gamers have found that reinstalling the Roblox desktop software solves the problem of the game not launching. Just make sure you delete the software completely before reinstalling it. All you have to do is follow these steps:
To uninstall the Roblox app:
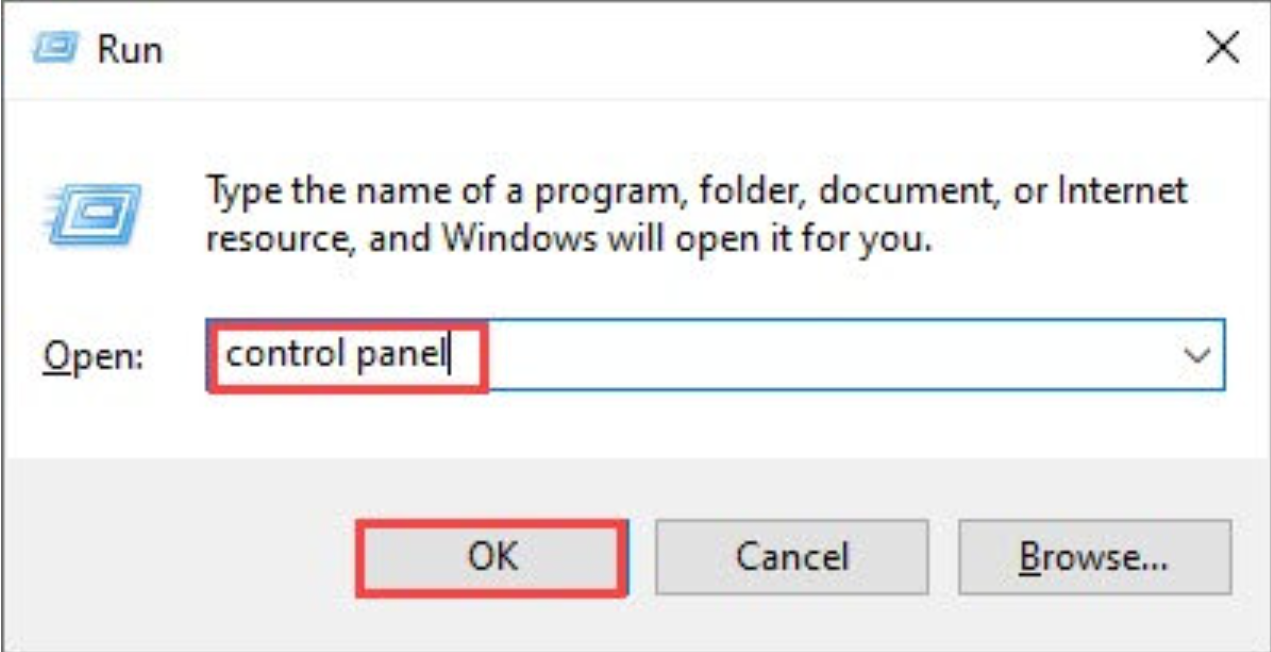
1. To begin, ensure all other programs are closed and not running in the background to avoid anything that could interfere with the reinstallation.
2. Tap the Windows logo key and R on your keyboard to invoke the Run box.
3. Enter control panel, then tap OK.
4. Move to View by: Small icons, then tap Programs & Features.
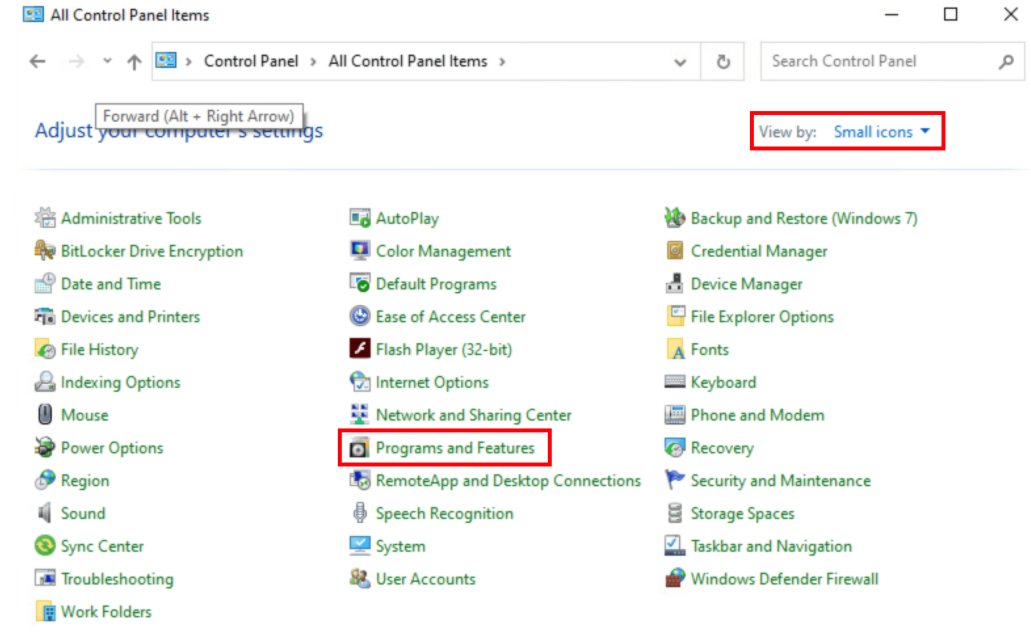
5. Locate Roblox, right-click it then tap Uninstall.
To remove the Roblox folder:
1. Tap the Windows logo key and E to open the File Explorer.
2. Go to C:\Users\(Your Username)\AppData\Local
3. Locate the Roblox folder and remove it.
To reinstall the Roblox desktop app:
1. Log in to your Roblox account on the website.
2. Select a game you enjoy and press the Play button.
3. As the Roblox software is immediately downloaded, a pop-up window will tell you.
4. After you’ve installed the app, you should see the game open and ready to play.
I hope, this guide has helped you address your issue, and you can now play Roblox! If you have any further questions or recommendations, please leave a comment.
How to Schedule the Blue Light Filter on Android
How to Schedule the Blue Light Filter on Android

The human body clock and hormone regulation are both heavily influenced by light. As the amount of light in the room dims at night, our bodies know that night is approaching and it’s time to sleep. We wake up and get energetic as the light levels rise, ready to take on the day.
Sadly, we now live in a world filled with light-emitting devices, making it more difficult for our bodies to tell when we should be sleeping and when we should be awake.
While we may not be willing to give up our cellphones, computers, or television time before night, we can minimize our exposure to blue light.
Using a Blue Light Filter on Your Android Phone
Aside from wearing blue light-blocking glasses, using a blue light filter on your smartphone is one of the simplest ways to decrease your exposure to blue light before bed. Most phones now include a blue light filter as part of their operating system.
On your Android phone, this’s how to set a blue light schedule.
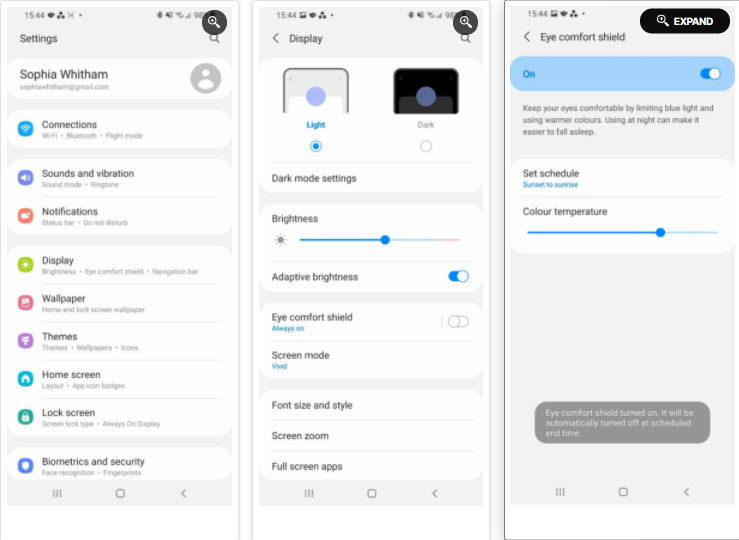
1. Open the Display settings in your phone’s settings.
2. You should see a section entitled Blue light filter, Night shift, or Eye comfort shield, among other things, from here. Depending on which phone you have, the name changes.
3. You can change your screen’s color temperature, turn on the blue light filter permanently, or establish a schedule from here.
4. You can pick between an automatic sunset-to-sunrise plan and a bespoke timetable when creating a blue light program.
5. If you’re utilizing the sunset-to-sunrise schedule, your phone’s location service must be turned on in order for it to know when the sun rises and sets in your region.
6. If you’re using a custom schedule, you’ll be able to choose when the blue light filter turns on and off each day.
Maintaining a Healthy Relationship With Technology
A blue light filter can aid in getting a better night’s sleep. While technology has numerous applications in our lives, it’s vital to remember to put your devices down and give your body a break.
How to Fix YouTube Loading Slow Issue
How to Fix YouTube Loading Slow Issue
Overload server, internet/router difficulties, browser cache, and ip address range difficulties can all cause YouTube buffering. Don’t worry if YouTube is running slowly for you. To solve the problem, follow the steps outlined in this article.
How to Install (or Uninstall) the iOS 15 Beta on Your iPhone
In this tutorial, I will show you how to download and install iOS 15 beta on your iPhone. Yes, Apple just released the iOS 15 developer beta. So developers can help to test and improve the iOS 15 experience.
How to edit videos on your iPhone or iPad using the Photos app or iMovie
How to edit videos on your iPhone or iPad using the Photos app or iMovie

- On your iPhone or iPad, you may cut the beginning or end of videos, crop them, apply filters, and more.
- Open a video in the Photos app on your iPhone or iPad and press “Modify” in the top-right corner to edit it.
- Consider downloading the iMovie app if you want more extensive video editing features.
Almost every iPhone on the market today is capable of shooting high-resolution, high-quality video. As a result, it’s not surprising that the phone has some rudimentary video editing tools right out of the box.
Crop, rotate, trim the video’s duration, add filters, modify the color balance, and more can all be done in the Photos app on your iPhone or iPad. You can also make further adjustments to your film if you download the free iMovie program.
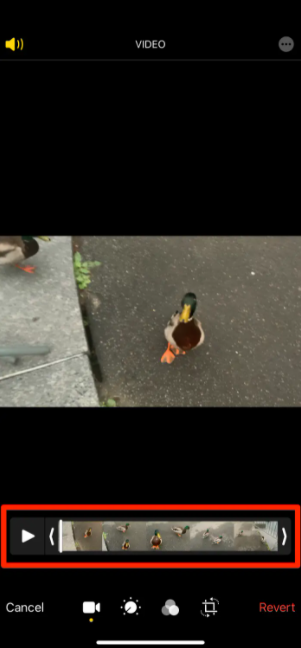
This’s the way to edit videos on your iPhone or iPad.
How to edit a video in your iPhone or iPad’s Photos app
By default, all of your photographs and videos are saved in the Photos app.
1. Find the video you want to modify in the Photos app. If you’re having difficulties finding it amid a sea of photographs, go to Albums and then Videos to see a list of all of your phone’s videos.
2. In the top-right corner, click Edit after opening the video.
3. You have a few alternatives here. The first menu, which should appear automatically, allows you to trim the beginning and conclusion of your video. Drag the left-facing arrow and the right and use the slider at the bottom of the screen to trim the beginning of the video, and the right-facing arrow to the left to trim the end.
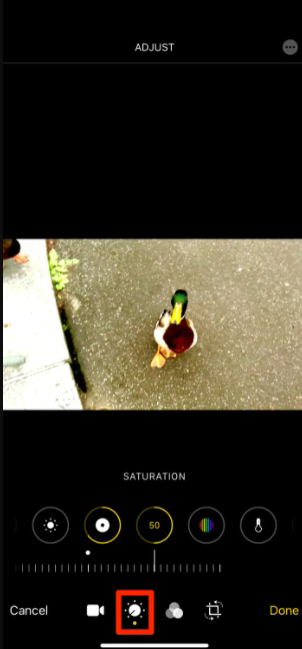
4. You may then modify the color balance and more by tapping the icon that looks like a volume wheel. To see the tools, swipe through the options below the video clip, tap one to select it, and then modify the levels with the slider below that (or on the side of the screen if you’re on an iPad). Your modifications will be immediately visible in the video preview.
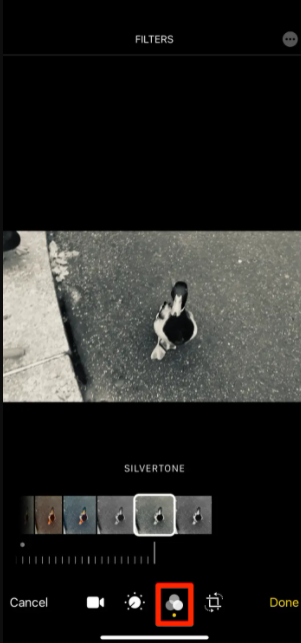
5. . You can add filters by tapping the icon that looks like three overlapping circles. Each of these filters also has a slider that you may use to adjust the filter’s strength.
6. To rotate, crop, or skew the video, tap the square cropping icon. This is the option to use if you mistakenly captured a video in the wrong direction.
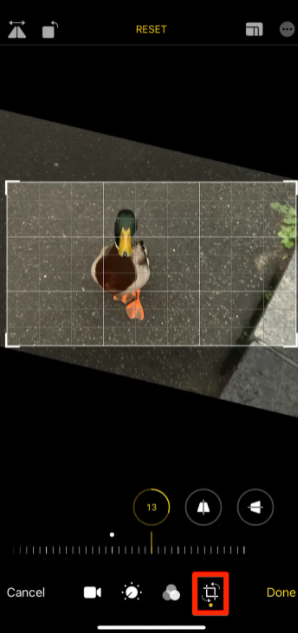
7. Click Done in the bottom-right corner after you’re through editing. You’ll be able to save your changes as a new clip or replace the original video.
Tip: Don’t worry if you accidentally overwrite the original video and later want to remove the changes. To get the original video back, simply edit the video again and tap Revert in the bottom-right corner (or top-right on iPad).
Editing videos with the iMovie app
If you download the iMovie app, you’ll have a lot more video editing possibilities.
You can use iMovie to select various films and photos to mix into a single movie, in addition to all of the options listed above. You can also choose from a half-dozen other transitions (such as dissolves, slides, and wipes) to insert between these pieces. You may also use iMovie to add music and voiceovers to your video.
It’s not a world-class video editor, but it’s perfect for making fast movies straight on your iPhone or iPad.
‘Why isn’t my Apple Watch pairing?’: 5 ways to fix your Apple Watch and iPhone when they aren’t connecting
‘Why isn’t my Apple Watch pairing?’: 5 ways to fix your Apple Watch and iPhone when they aren’t connecting
- There are a few solutions for connecting your Apple Watch to your iPhone if it isn’t pairing.
- To begin, ensure that both devices are Wi-Fi and Bluetooth enabled, and that they are within range of one another.
- Then restart your Apple Watch and iPhone, as well as reset the network settings on your iPhone.
- If everything fails, you can completely reset your Apple Watch, deleting all of your data and almost definitely allowing you to pair it with your iPhone again – just make sure you backup your watch beforehand.
The capacities of an Apple Watch that isn’t connected to an iPhone are severely limited.
If your smartwatch isn’t already connected to your smartphone, you’ll want to do so right now.
Why your Apple Watch isn’t pairing with your iPhone, and how to fix it
The good news is that Apple Watch pairing troubles can usually be resolved in a couple of minutes.
From the simplest to the most complex solutions, here are the best solutions to handle the connectivity problem between your two devices.
Move your phone closer to your watch

It’s possible that your phone is simply too far away from your Apple Watch, or that it’s hidden away in a bag or drawer, blocking clear signal.
Because the watch and phone are connected via Bluetooth, proximity is crucial. So, bring them closer together and see if that helps to solve the problem.
Check the settings on your phone and watch
They won’t be able to pair if your phone’s Bluetooth is switched off, or if either of the devices is in Airplane Mode. To make the connection easier, double-check that all settings are correct.
Turn your devices off and on again
To turn your iPhone off, press and hold the side lock button until the “slide to power off” toggle appears, then slide it to turn it off. To switch the phone back on, press the side button one more.
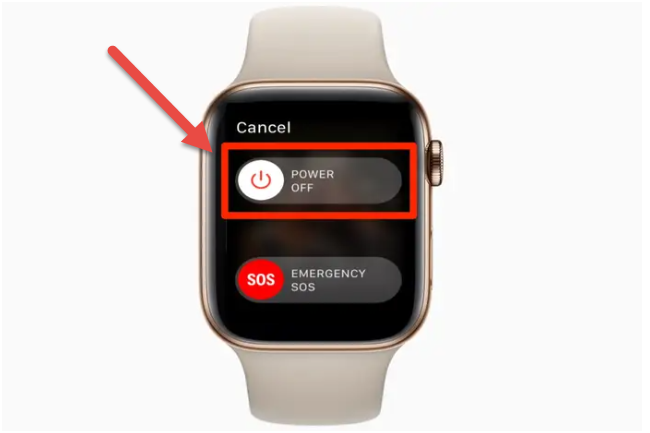
Holding down the side button (not the crown) and swiping to power off will turn off your Apple Watch. To turn the watch back on, press and hold the side button one more
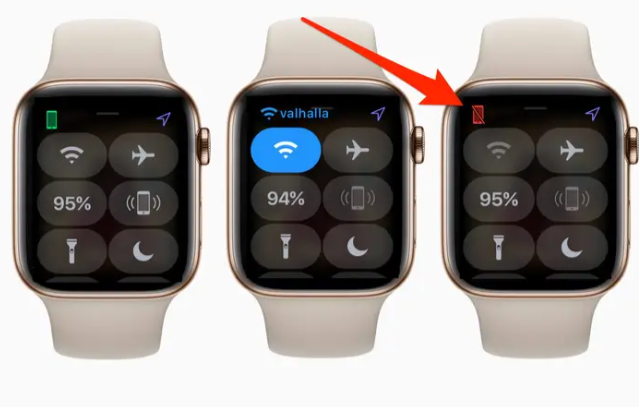
Reset your iPhone’s network settings
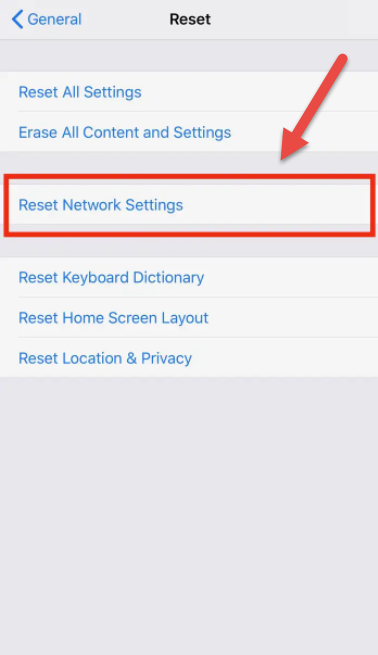
Open the Settings app, then navigate to General to reset your iPhone’s network settings.
Find Reset in General, then hit Reset Network Settings and confirm the action by entering your password. Attempt to re-pair the watch now.
Reset your Apple Watch
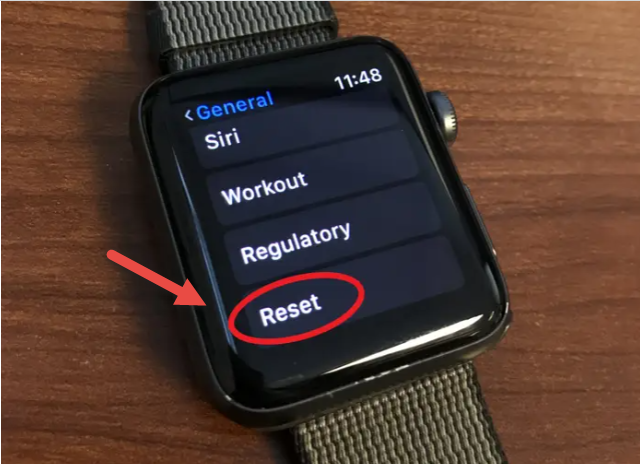
Are you still having problems? Then it’s time to reset the watch. This repair should address the pairing problem, but it will wipe all saved data from the watch, so make a backup before proceeding.
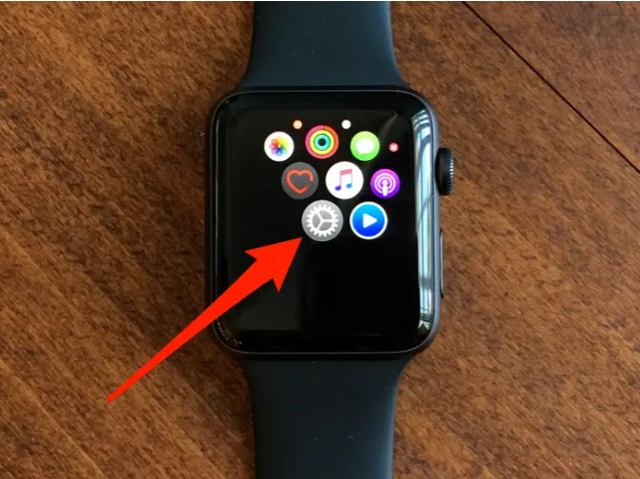
Choose General, then Reset, and then Erase All Content and Settings from the watch’s Settings app.
Next, in your iPhone’s Watch app, click My Watch, hit the information button next to the watch, and select Unpair Apple Watch.
Everything should be as good as new now, and you should be able to sync your Apple Watch with your iPhone.
How to pair an Apple Watch with your iPhone using the Watch app
How to pair an Apple Watch with your iPhone using the Watch app
- Using the Watch app on your iPhone, you can pair an Apple Watch with an iPhone.
- Before pairing your Apple Watch with your iPhone, ensure sure the devices are compatible and that your iPhone is running the most recent version of iOS.
- You’ll be able to utilize all of your Apple Watch’s functions, including on-wrist phone calls and text messaging, once you’ve synced it.
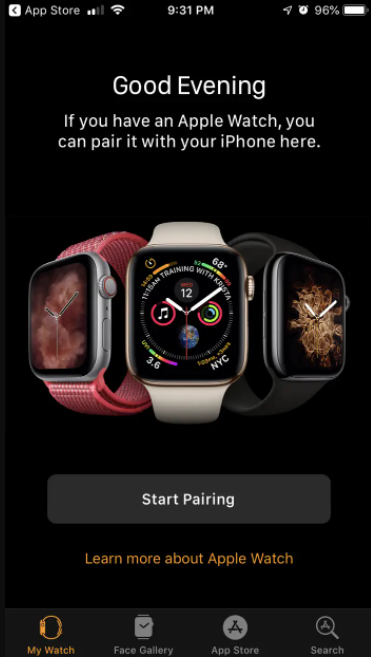
So, you’ve made the decision to buy your first Apple Watch.
Now, in your wrist, you can measure your physical activity, sleep (through third-party apps), and effortlessly access your phone calls and texts throughout the day.
However, you must first pair your watch with an iPhone. Here’s how you can get started.
How to pair an Apple Watch with your iPhone
Check your compatibility
To begin, double-check that your watch is compatible with your iPhone model. If you didn’t do this before buying the Apple Watch, don’t open the package until you’ve double-checked this information.
Here’s a rundown of which Apple Watches are compatible with which iPhones
- Apple Watch First Generation is compatible with the iPhone 5 or later, running iOS 8.2 or later.
- Apple Watch Series 1 and Series 2 are compatible with the iPhone 5 or later, running iOS 11 or later.
- Apple Watch Series 3 has two models, one with a cellular plan like your phone (LTE) and one without (Non-LTE). If you buy a new version of either model, you’ll need an iPhone 6s or later, running iOS 14 or later. If you buy an old version from a few years ago, you might be able to use an iPhone 6 and iOS 13, but it’s not guaranteed.
- Apple Watch Series 4 also has two models, with LTE being compatible with the iPhone 6 or later, and Non-LTE being compatible with iPhone 5s. Both need iOS 12 or later.
- The Apple Watch Series 5 needs an iPhone 6s or later, running iOS 13 or later.
- The Apple Watch SE needs an iPhone 6s or newer with at least iOS 14.
- Finally, the Apple Watch Series 6 needs an iPhone 6s or later, running iOS 14 or later.
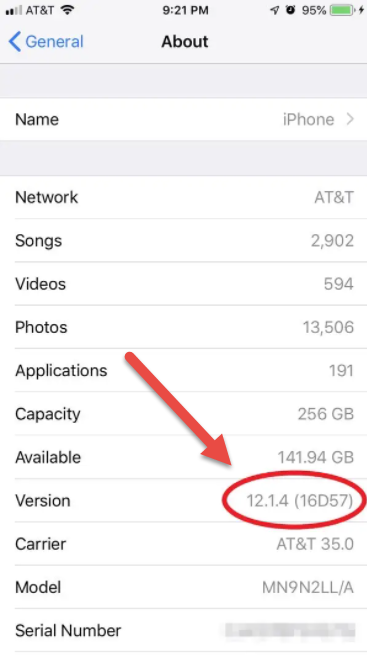
Ensure that your iPhone’s iOS is up to date as well. You can find out what version of iOS you have by navigating to Settings > General > About and scrolling down to the “Version” section.
Pair your Watch and iPhone using the Watch app
Make sure your Bluetooth is turned on and your iPhone is linked to WiFi or a cellular network after you’ve confirmed that your Apple Watch will operate with your iPhone.
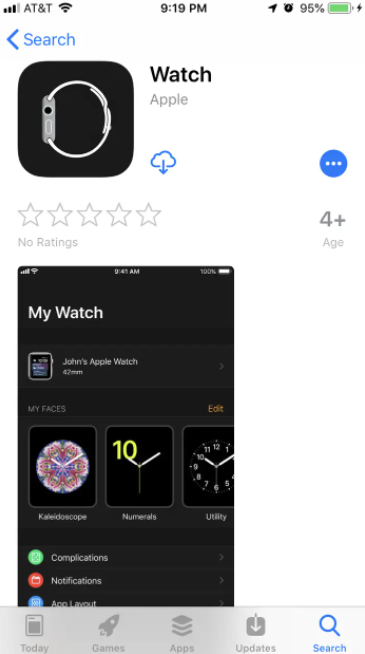
Make sure you have the Apple Watch app installed on your iPhone, and if you don’t, go to the Apple Store and get it.
Now take the following steps:
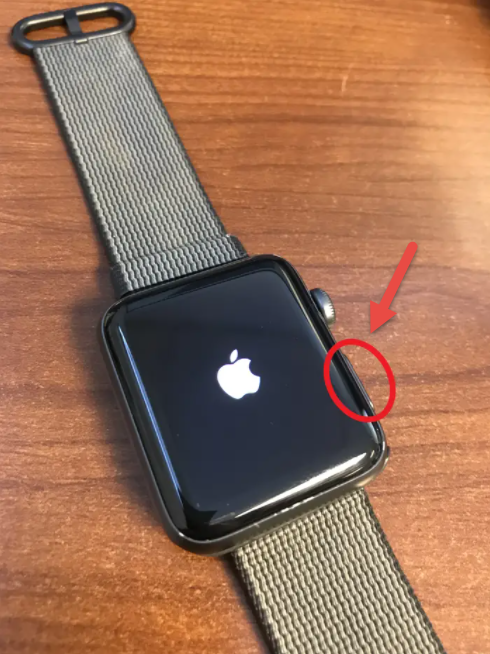
1. Switch on your Apple Watch. Hold down the right-hand button on your Apple Watch until the white Apple logo appears on a black backdrop. It’s possible that it’ll linger on this screen for a while.
2. Choose your language and region.
3. Keep your watch in close proximity to your iPhone. On your iPhone, wait for the message “Use your iPhone to set up this Apple Watch.” On your iPhone, press the “Continue” button, and on your Watch, press “Start Pairing.” If the message does not appear on your phone, open the Apple Watch app and select “Start Pairing.”
4. On your Apple Watch, an animation will show. Center the Watch-shaped window over the Watch’s screen by pointing your iPhone’s camera at it. You’ll get a notification indicating the Watch has been linked. It may ask you to update the Watch OS at this point. Please do so.
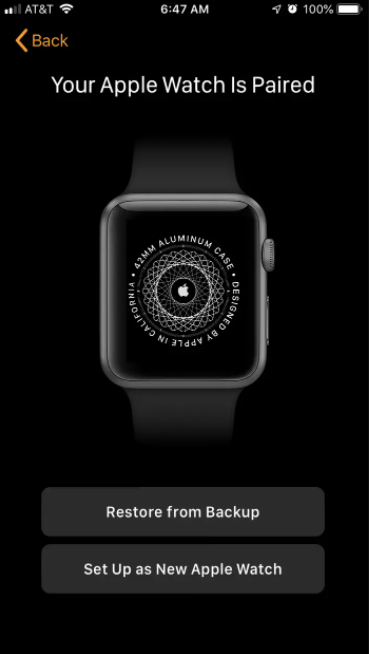
5. On the other hand, it will prompt you to choose between restoring your Apple Watch from a backup or “Setting Up as New Apple Watch.” If you’re using an Apple Watch for the first time, press “Set Up as New Apple Watch.” You can, however, choose to install a previous backup onto your Apple Watch if you have one.
6. Choose whether you’ll put it on your left or right wrist. If you choose the appropriate decision, you’ll have to decide which side the Digital Crown (the wheel that controls the Watch) should be on.

7. Read the Terms and Conditions, and then tap “Agree” to continue.
8. Sign into your iCloud Account. It may automatically log you in. Otherwise, enter your iCloud information on your phone.
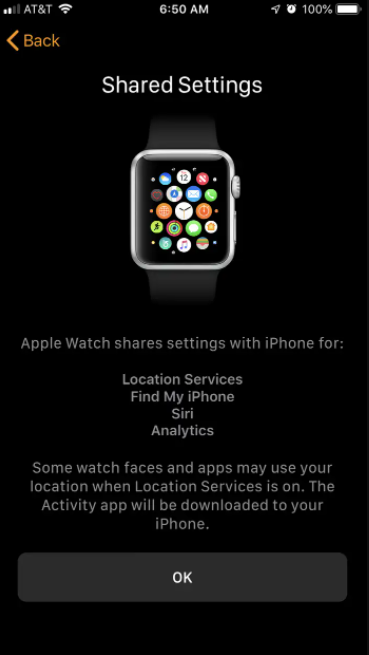
9. You can now pick which settings to enable and which settings to share between your iPhone and Apple Watch. Route tracking, exchanging watch metrics with Apple, Siri access, and the “Find My” app are all included. If your iPhone doesn’t have Find My enabled, you’ll need to enable Activation Lock. This ties your Watch to your iCloud account, making it impossible to reset and use it by anyone else.
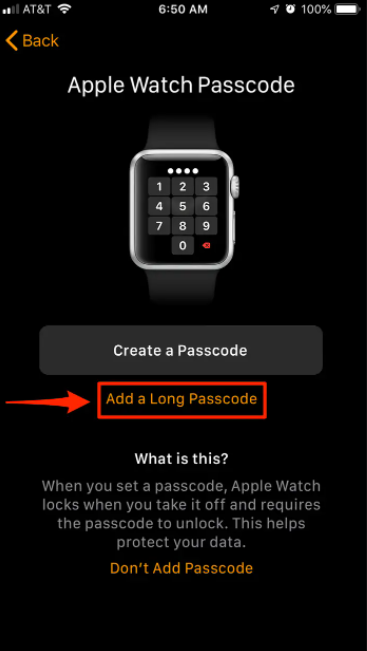
10. You’ll be asked to generate a passcode at this point. You have the option of using a 4-digit or an 8-digit passcode. On your Apple Watch, enter your passcode twice. You can skip this step if you like, but if you want to use Apple Pay on your Apple Watch, you’ll need to set up a passcode.
What’s the good news? When you have Wrist Detection turned on, you won’t have to input your passcode to unlock the watch if you’re wearing it. Once you take it off your wrist, you’ll need a passcode.
11. More functions, such as Heart Health, Apple Pay, and Emergency SOS, will be walked to set up in the app.
12. You’ll set Cellular Plan up next if you have it.
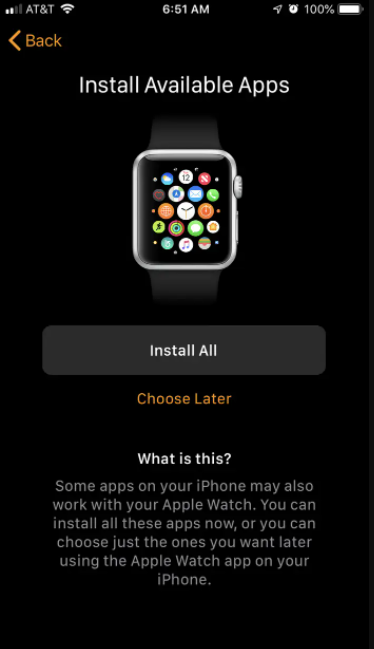
13. Choose which apps to add on your Watch. You have the option of adding all Apple Watch compatible apps presently on your iPhone or skipping this step and manually selecting apps from the Apple Watch App after you’ve completed setup.
14. Allow your Apple Watch to sync before proceeding. This could take some time depending on how much data you’re transferring. Keep the devices as close together as possible. You’ll hear a chime when the sync is complete.
That’s all, hope this helps!
How To Play Bullet Angel: Xshot Mission M on PC – Windows 10/8/7
In this article, we will show you how to play My Hero Academia: The Strongest Hero on Windows PC or laptop.
How to Number Your Microsoft Word Document
How to Number Your Microsoft Word Document

In Microsoft Word, page numbering might be difficult. With these hints, you’ll be able to apply page numbers and personalize your document.
When you need your document to fit a specific formatting standard, page numbering in Microsoft Word can be difficult. Microsoft Word allows you to format your page numbers in a variety of ways, depending on your needs.
You may want to change the numbering format of your pages, change the position of your page numbers, or orient page numbers in a specific way. Let’s have a look at some Microsoft Word page numbering guides to clear up any confusion.
Number the Entire Document
This trick works well for numbering a single document that is not divided into sections. It is also the most expedient method.
On the Microsoft Word ribbon, select the Insert option. Select your preferred page number location in the Header and Footer group by clicking the Page Number option.
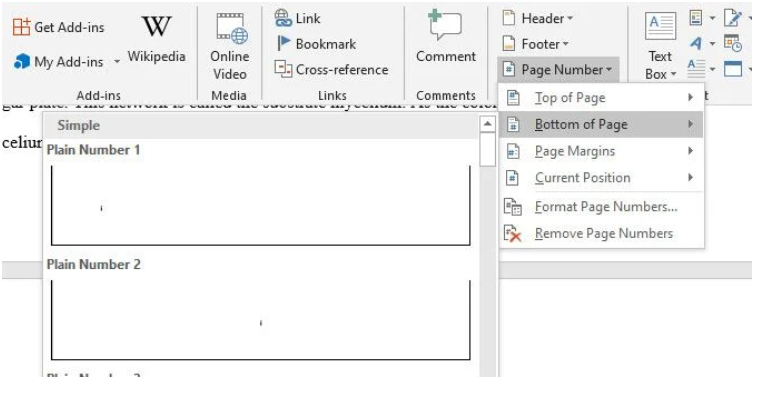
The Top of Page and Bottom of Page options in the dropdown menu feature a number of extra styles that help you customize the location and appearance of your page numbers. By selecting the Page Margins option, you can also insert your page numbers on the document margin.
Place a Page Number Anywhere Within a Page
You may put the page number anywhere on the page by moving your typing cursor to the desired location. To do so, select one of the alternatives in the Current Position option on the Page Number tab.
You can also open a curly brace by pressing Ctrl + F9 if you don’t want to utilize the automated Current Position option. Then, inside the curly brace, type PAGE. To display the page number, right-click on the curly brace and select Update Field.
You can also open a curly brace by tapping Ctrl + F9 if you don’t want to utilize the automated Current Position option. Then, inside the curly brace {}, type PAGE. To display that page number, right-click on the curly brace and choose Update Field.
It’s worth noting that placing your numbers somewhere other than the header, footer, or margin can cause your numbering to become disjointed. As a result, either of these three positions is the appropriate spot to put your page numbers.
Click the Format Page Numbers option if you wish to change the format of your page numbers from integers to alphabets or Roman numerals. You may also specify where to begin your page numbering with this option.
Number Pages in Different Sections
You must number each section separately if you want to break your document into sections. In Microsoft Word, there are a few options.
To begin, position your typing cursor on the line where you want to begin the separation and follow the steps below:
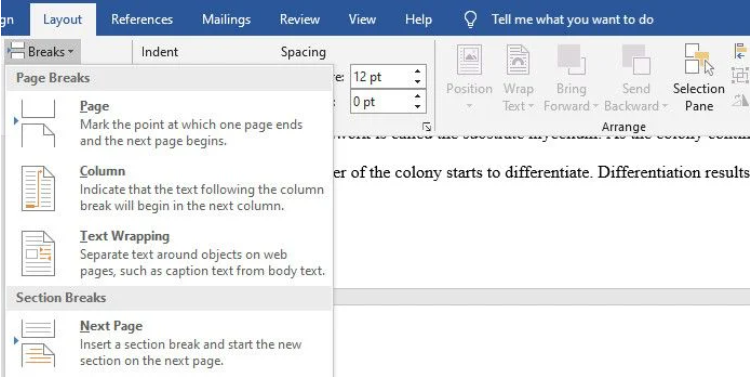
Open the Layout tab of the ribbon.
Tap on Breaks in the Page Setup group, then on Section Breaks, then on the Next Page option in the dropdown menu.
Double-click on the footer or header of the following page that begins the divided section (depending on where you want to place your page numbers).
To unlink the current part from the previous one, go to the Navigation group on the Ribbon and choose Link to Previous.
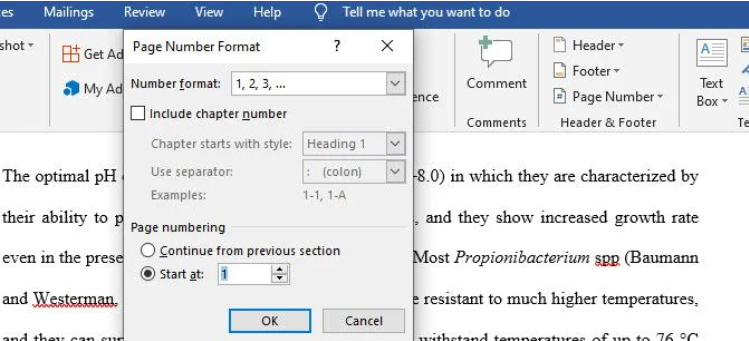
When the unlinking is completed, tap on the Page Numbers in the dropdown menu, then navigate to Format Page Numbers and check the Start at option to start numbering your section pages at your preferred value.
Place your cursor anywhere on the first page of that portion and select the Insert tab to give the upper part an alternative number format.
Then, select Format Page Numbers from the Page Numbers option.
You can alter the number format to numerals, alphabets, or keep the traditional numbering in the format part. However, make sure that the Start at option is set to “1” or whatever character that applies to your format.
Select your favorite page numbering choice when you go back to the Page Numbers dropdown menu.
Any extra blank pages that result from the customization process should be deleted.
Tip: Swap Between Sections to Number Pages Quickly
It’s possible that you’ll need to change the page numbers in some areas. Of course, you can always manually scroll from one page to the next in your document to accomplish this. However, switching between the footer and header of each section automatically is a more convenient option.
To do so, simply double-click on the bottom or header of any section of your document (depending on where you place your page numbers).
Find the Navigation group on the Ribbon. Then press on either Next or Previous to swap sections.

Apply Page Numbers to Chapters in Word
You could choose to separate a part into chapters and number each page in relation to those chapters to modify the look of your Word document. The chapter header becomes a dropdown once this option is applied, allowing you to toggle between hiding and exposing the content of a chapter in a section. It’s also a terrific method to make your Word pages look nicer and more organized.
Go to the Insert tab to use the chapter numbering option. After that, go to the Page Number option and select Format Page Numbers.
To choose your header type, click the Include chapter number box in the Page Number Format dialog box. By clicking the Use separator dropdown menu, make sure you select your desired separator option. Then choose Ok.

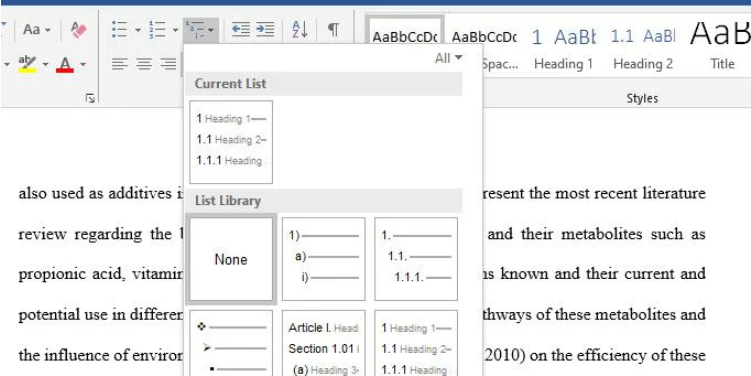
Then, choose a chapter heading you want to highlight. Locate the Paragraph group under the Home tab.
To insert the content in that chapter in a dropdown, locate the Multilevel list option and click on the sixth option inside the List Library. With this option, you can also number your chapter headers and pages in relation to them.
Your chapter headings, on the other hand, maybe on the same page. You can relocate the header of a chapter to a new page to better organize the pagination in this scenario.
To do so, position your typing cursor in front of the header you want to move. Then, under the Break dropdown menu, select Next page from the Page Layout option.
Number Even and Odd Pages in Word
If you want to use distinct page number styles on various pages, treating odd and even pages individually is a great idea. Surprisingly, Microsoft Word also has this feature.
To do so, double-click on a footer to open both the footer and the header to alter.
Then, on the Ribbon, go to the Design tab and look for the Options group. Then check the box for Different Odd and Even Pages. Before you begin, double-check that your pages have been numbered.
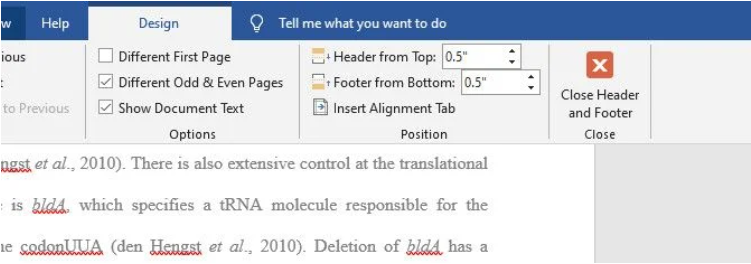
When you tick the box, page numbers on even pages are removed. As a result, only the odd pages with numbers remain. Double-click a footer on any of the even pages and follow the procedures we mentioned earlier to adjust the even page numbers to a different number format.
Remove the Page Number From the First Page
You might want to modify the opening page of each section as well. Removing the numbers off the first page of each section is a reasonable approach to do it.
To do so, go to the Design tab and tick the Different First Page box on any page within a section’s footer. The page number on the first page is removed with this option. After that, you can manually configure the first page to your liking.

By double-clicking on a section’s footer or header, you can troubleshoot mismatched page numbers. Also, make sure it is linked to a previous part by making sure that it doesn’t have “Same as Previous” stated at the top.
Customize Your Word Document Before You Share It
Depending on your goals, the techniques outlined in this article should resolve your page numbering issues. Customizing your document, however, does not end here. Different Word tips can be used to make a slew of other changes.