How to Save One Page of a PDF

How to Save One Page of a PDF


What to Know:

Go to the file, then tap File > Print > choose the page > click PDF > Save as PDF > Save.

Microsoft Word, Chrome, Preview (Mac), and free PDF editors like Smallpdf can all be used to save a single page of a PDF.

The methods listed here will not work on a read-only PDF or a password-protected document.

This tutorial will show you how to save a PDF document using Preview on Mac and Smallpdf. Microsoft Word and Chrome provide similar instructions to Preview.

» Read more

How To Change Your Age On TikTok

How To Change Your Age On TikTok

Social media organizations have a social obligation to protect their younger users from inappropriate content, spam, and other users. You must be at least 13 years old to sign up for TikTok, and you must be 18 years old to send presents to your favorite creators.

If you’re younger than this, you won’t be able to make an account, or your account will be deleted soon. It will occur because children are not permitted to share videos on TikTok, since this would be in violation of the Children’s Online Privacy Protection Act. Because the social media firm is known for deleting accounts with clearly false birthdays, it might be time to update your true information.

If you’re trying how to update your birthday on TikTok, it’s not as simple as you may think. There are no alternatives for changing your date of birth in the app. It may be easier to open a new account relying on your age and the age of your account age.

Changing Your Age on TikTok

Though it isn’t the most straightforward option, there is a way to correct your birthday on TikTok. Because you’re depending on TikTok’s support team to make the modification, you may have to wait a while for your real age to update. Here’s what you should do, as recommended by the TikTok staff.

1. Open Tiktok on your device.

2. Go to your profile.

3. In the upper-right corner, select the three-dot.

4. Swipe to find the Support section.

5. Press on Report a Problem.

You must show your age when reporting a problem with the app, and TikTok will change it.

Unfortunately, for verification purposes, you will need to upload a government-issued ID or a passport. These are the only kinds of identification that the employer has certified as appropriate, but it’s worth asking if a school ID or another means could be used instead.

Although TikTok’s younger audience is unlikely to have this form of identification, it is how the business updates your birthday. Minors can receive a state ID in most states at any age. You can probably get the required identity from your local DMV if you don’t have it already.

What if TikTok Deleted Your Account?

The corporation was obliged to take a stance on young users as a result of lawsuits. Unfortunately, this meant that anyone under the age of 13 who had created an account was erased. These deletions, according to some internet forums, are still happening today.

So, what are your options if your account was removed due to your age?

The first step is to open the TikTok app or go to the TikTok website and click the “Report a Problem” button. You can use this to fill out a form and make a complaint with TikTok. You’ll need to show a government-issued photo ID that proves you’re over the age of 13.

You’ll get an email with your videos attached if your account was deleted because you’re under the age of 13. You can save them to your computer or smartphone. There is a Chrome Extension that can assist anyone having trouble downloading videos from this email attachment.

Although no official word on whether the accounts would be reactivated once the user reaches the age of 13, it is unlikely. Many users had inaccurate birthdays, including the year they started their profiles, because TikTok deletes deactivated accounts after 30 days.

Editing Your Profile on TikTok

We all change, therefore it’s only normal that you’d want to update your social network profile. Maybe you typed in the wrong phone number or birth date, and now you want to update it.

How do you change your TikTok profile information? From your profile photo to your username, you can modify a lot of things. these ways will show you how to do it:

Changing Your Profile Picture or Video

It’s both enjoyable and engaging to change your profile image. You may always change your image in your TikTok account’s Edit Profile area.

The steps are straightforward.

1. Open your ‘Profile’ and press on the Edit Profile option.

2. Choose Profile Photo (or Video).

3. Set a new profile photo by selecting a new photo from your phone or taking a new photo.

Changing Your Username

If you want to establish a devoted audience, don’t alter your username because it’s something people will know you by. You can, however, do it if you want to.

1. Go to your Profile and open Edit Profile.

2.  Before changing your new username, delete your current one.

                NoteFor the next 30 days, you won’t be able to modify it.


Changing Your App Language

Using social media to practice your language abilities might be beneficial. Here are the actions you should take if you want to change the language of your current app.

1. Go to your Profile.

2. Select the Settings icon.

3. Locate and open the Language tab.

4. Choose the App Language option and choose a desired language from the list.

At the time of writing, there were 39 languages accessible.

Deleting Your Account

You might be tired of making modifications and wish to deactivate your account entirely. The procedure is straightforward, and you’ll be done in about a minute. However, think about it first to ensure that you want to do it before losing all of your data and material.

1. Open your Profile.

2. Tap on the three-dot icon in the upper right corner to open Settings.

3. Locate Manage My Account and choose it.

4. Choose the Delete Account option.


               NoteIf you’ve made a purchase within the app, you won’t obtain a refund.


Add an Account

Thankfully, TikTok allows you to have many accounts. This implies that if you want, you can establish a new profile without deleting your existing one. Follow these steps to create a secondary account (with the correct birthday) using a diffrerent login ID:

1. In the bottom right-hand corner, click ‘Me’.

2. In the upper right-hand corner, choose the three horizontal dots.

3. Pull down to ‘Add Account’.

4. Sign up with the right birthday, just like you did with your previous account.

Although this does not solve your birthday puzzle, it does allow you to preserve your existing account while creating a new one.

Double-Check the Info

Make sure you don’t make any blunders when registering on a platform, an app, or anything similar. You can see how a small typo can result in your account being erased — you lose access to all of your stuff and must start over. Take your time, double-check everything, and don’t create an account if you’re in a rush.

What modifications have you made to your TikTok account? Please share your thoughts in the comments box.

How to Insert a Horizontal or Vertical Line in Microsoft Word

How to Insert a Horizontal or Vertical Line in Microsoft Word

Lines, both horizontal and vertical, are essential text formatting components. Let’s have a look at all of the different ways to insert a line in Microsoft Word.

Lines are an important part of every design. A horizontal or vertical line in Microsoft Word can be used to divide a document and control the text flow. In Word, you can insert a line and format it in a variety of ways to transform a plain line into something more beautiful.

You are aware of how to insert a line in Word. After all, it’s so simple. This primer is for you if you’re not sure how to accomplish it all,

Now, let’s look at how to make a horizontal and vertical line in Word, as well as how to insert them.

The Quick Way: How to Insert a Line in Word With the Keyboard

You might know that typing a few characters in Word may instantly add a line. Word’s AutoFormat feature automatically formats your text as you type it. You may have already seen it in action when it generates bulleted lists automatically.

Not only can you enter a line, but you can also add lines with various designs.
The following will show you how it works:

Next, for any of the line styles shown in the screenshot below, type three characters. Tap Enter.

To draw a dotted line, for example, type *** and tap Enter.

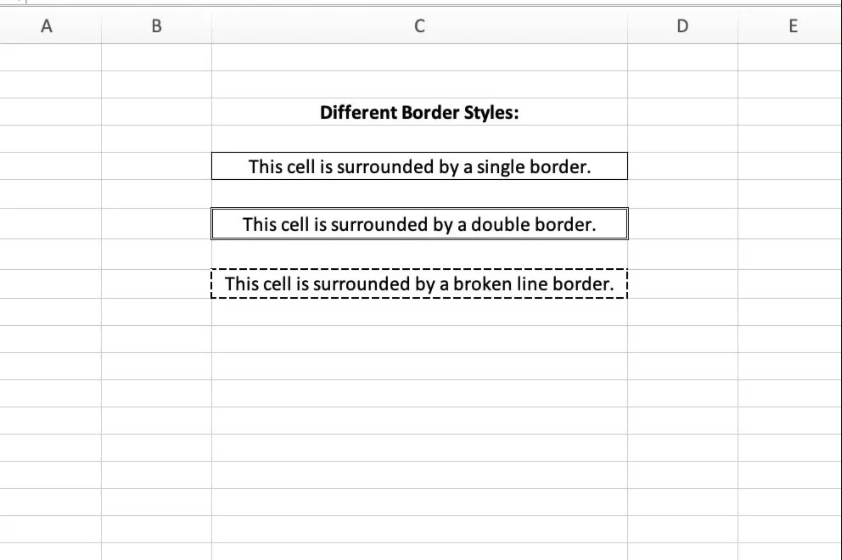
As you can see, there are six different versions of the standard horizontal line.

  • Plain single line with three hyphens (—)
  • Broken or dotted line with three asterisks (***)
  • Plain double line with three equal signs (===)
  • Bold single line with three underline symbols (___)
  • Triple line with a thick center with Three number signs (###)
  • Wavy line with three tildes (~~~)

You know that the line occupies the entire page’s width. When a line is inserted inside a column, it is sized to fit the column’s width. Put your cursor where you want the text to appear above or below the line and start typing.

A tiny AutoCorrect Options button will also appear next to the line. This is a shortcut that allows you to undo, stop, or join the AutoFormat options dialog when you don’t need the automatic line.

The AutoFormat options dialog allows you to permanently disable these lines.

Launch AutoFormat As You Type select > Apply as you type section > uncheck Border lines.

Insert a Horizontal Line From the Ribbon

If you’ve deactivated AutoCorrect because you find it annoying, there’s another easy way to create a horizontal line.

1. Put your cursor where you want the line to display.

2. Open the Home tab, choose the dropdown arrow next to the Borders option in the Paragraph group

3. On the menu, choose Horizontal Line.

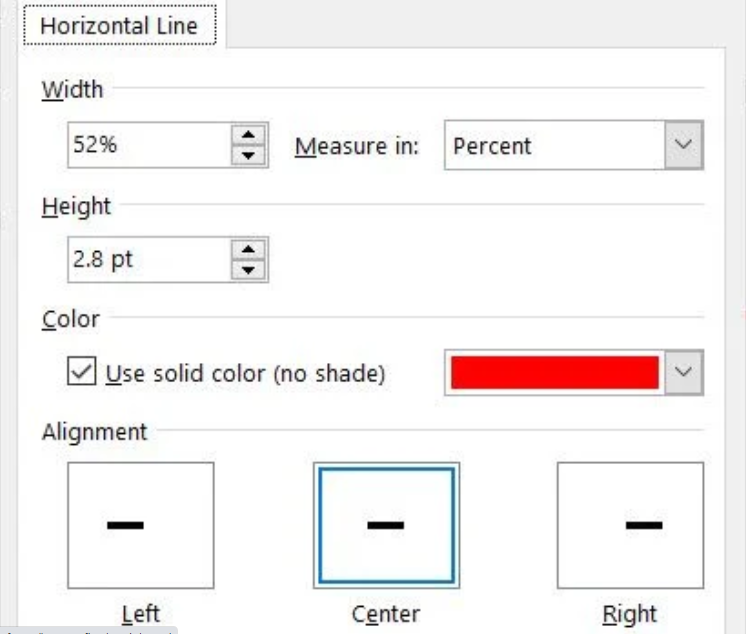
4. Double-click the horizontal line to change its appearance. You can change the line’s width, height, color, and alignment using the Format Horizontal Line dialog box.

5. To change the length or width of a line, select it with a double click and then drag any of the resizing points.

6. Pick the line and tap Delete on your keyboard to delete it.

Use Borders to Add Horizontal and Vertical Lines

You can also use the Borders option in the Paragraph group to insert a top or bottom border in the document that looks like a horizontal line.

1. Select the paragraph of text where you want the line to appear by tapping on it.

2. Open Home and the Paragraph group. Select the Border icon. The default border is usually the bottom one. This adds a line below the text you’ve chosen on the page, or the paragraph if no text has been chosen.

3. To access a list of other options (such as a vertical border), tap the tiny dropdown arrow on the Borders icon.

4. Press on Borders and Shading to change the appearance of any border. Adjust the border’s style, color, and width using the dialog.

5. It may not be obvious how to delete this horizontal line in your Word document, but it is simple enough.

Use Shapes to Insert a Horizontal or Vertical Line in Word

There are several line options in the Shapes menu. These line shapes differ in one important way: they can be drawn at various angles. You can then customize the color and appearance of the line to make decorative horizontal or vertical lines anywhere in the document after you’ve drawn it.

1. Put the cursor where you’d like to insert a line.

2. Launch Insert > Illustrations group > Shapes dropdown arrow.

3. Select the shape of the line in the Lines group.

4. With the cursor pressed, click and drag across the document until you reach the endpoint. (Tip: Hold down the Shift key to insert a horizontal or vertical straight line.)

5. Use the Shape Format tab on the Ribbon to alter the appearance of the line while it is chosen.

6. Change the color, use a different line style, or apply effects in the Shape Styles tab.

7. You can also right-click on the line and select Format Shape from the context menu to access further styling options.

How to Add a Vertical Line and Separate Text into Columns

A simple layout method is to organize text into columns. Any block of text can be divided into many columns and insert a vertical line between them as well.

1. Choose the text.

2. Launch Ribbon > Layout > (Page Setup group) Columns. Tap on the desired number of columns from the dropdown menu.

3. The text has been divided into columns. Tap any column and launch  Layout > Columns > More Columns.

4. Check the Line Between box in the Columns dialog box and tap OK.

This dialog also allows you to modify the number of columns and the spacing between them.

Use a Bar Tab to Add a Vertical Line

In Word, tab stops are used to align lines and paragraphs. The bar tab, on the other hand, has no effect on the tab stop. It adds a vertical line to your paragraph and divides it into columns.

1. Choose the paragraph where you want the vertical line to appear.

2. Open Ribbon > Home. Tap the tiny arrow in the Paragraph group to open the Paragraph Settings.

3.  Tap the Tabs icon at the bottom of the dialog.

4. Enter the place where you want to add the vertical line in the Tab stop position box. To gauge a value to enter, use the ruler at the top of the screen.

5. In the Alignment section, tap the Bar icon. Press on Set and OK.

I’ve set it to “-0.2” to make it appear just to the left of the first paragraph, as you can see. Delete the bar tab to remove the vertical line.

In addition, do you want to leave some blank lines for the reader to fill in? In Microsoft Word, tabs can be used to quickly create empty lines in forms.

Draw a Line in Your Word Document

Horizontal lines are more visible and prevalent than vertical lines. Adding vertical lines in the right places, on the other hand, can improve the visual appeal of your text. Lines aren’t only for adornment; when used subtly, they can bring your eye to the most significant area of a page.

Consider lines and use these tips the next time you use Microsoft Word to prepare a professional report.


How to Copy and Paste on Facebook

How to Copy and Paste on Facebook

What to Know:

To copy and paste on the Facebook screen, tap Ctrl + C and Ctrl + V

Except for videos, you can copy and paste something from Facebook.

Before a paste, Facebook uses the clipboard of device to temporarily store copied objects.

This article explains how to copy and paste on Facebook using both your desktop browser and the Facebook app.

» Read more

How to Add Add Borders in Excel

How to Add Add Borders in Excel

What to Know:

Choose the cells, tap and keep Ctrl + Shift + &

Another way, you can choose the cells, launch Home tab > Font > Borders, then choose a border type.

In addition, You can launch Home > Borders arrow > Draw borders. Choose line color and style. Tap Draw Border and draw around cells.

Borders in Excel will help you emphasize or isolate details in your Excel spreadsheet, making it easier to read and use. This post will show you how to do it with keyboard shortcuts and ribbon options in Excel versions 2019, 2016, 2013, and 2010.

» Read more

Facebook Dating Not Showing Up 2021 | Here Is How to Fix It!

Facebook Dating Not Showing Up 2021 | Here Is How to Fix It!

Isn’t Facebook Dating showing up for you? We’ve discussed the probable causes and solutions for gaining access to Facebook Dating.

Facebook does not sigh and “never fails to deliver us something we did not even realize we so desperately desired.” On a similar topic, some users may be experiencing issues with Facebook Dating not appearing. If you’re having trouble tackling this problem, you’re not alone. Allow us to assist you. Today, we’ll learn everything there is to know about Facebook’s new dating feature.

Let’s not waste time looking for a related article because this post is your one-stop-shop for resolving your Facebook dating problems. Bring it on.

» Read more

How to Download Twitch VOD Videos

How to Download Twitch VOD Videos

Summary: 

Choose Settings > Channels and Videos, then turn on Store saved broadcasts to have Twitch automatically save your broadcasts.

When a stream has been stored, launch the Video Producer page and click the More button beside a video and pick Download.

With a third-party app like Twitch Leecher, you can download other streams’ broadcasts.

Twitch streamers and spectators frequently download videos of their favorite broadcasts to store locally or publish to a third-party website like YouTube. This post will show you how to save Twitch videos on demand (VODs) to your computer.

» Read more

How to Make Facebook Private

How to Make Facebook Private

What to Know:

Open Settings & Privacy Settings Privacy. Under Who Can See Your Posts, alter Public to Friends, or another selection.

Launch Privacy > Who can see your friends list and pick Friends or Only Me to make your Friends list private.

Go to your profile page and select Edit Details to make your profile private. Toggle off the information you don’t want others to see.

This post shows how to make your Facebook posts, Friends list, profile information, and albums private by changing your Facebook settings. The instructions are specific to the desktop version of Facebook.

» Read more

4 Best Free Video Editors for YouTube in 2021

4 Best Free Video Editors for YouTube in 2021

You won’t be able to make deep modifications to your videos without a good YouTube video editor before. You might be able to get by with the editing tools provided by YouTube, but other projects require more.

However, there is a variety of editing applications to choose from which are different from Youtube. There are several free video editing apps available, and among them are apps that are specially designed for editing YouTube videos.

Editors are available for Windows, Mac, iOS, Android, and other platforms. You are allowed to do all things like Add text, combine clips, overlay filters, create fade effects, import music, eliminate unnecessary video parts, display a watermark, run macros, and more to your videos with these programs.

01: HitFilm Express: A Free Video Editor That You Can Upgrade

Advantages:

  • A simple user interface.
  • There are many different ways to customize it.
  • Improvements/features are added frequently.

Disadvantages:

  • It may take some time to download the large setup file.
  • System requirements are really high.
  • Many functions are purchased through add-ons.

HitFilm Express comes with a slew of features that any YouTuber would appreciate. Some of the more complex features, such as chroma key and picture-in-picture, you have to cost, but they’re reasonably priced. Plus, even if you never buy an add-on, there’s a lot to admire about this free YouTube video editor.

The ability to auto-save as often as every minute, hundreds of keyboard shortcuts, colored labels (for 3D effects, text, models, composite shots, photos, and more), and the capability to crop and animate a video to control which part is viewable are a few of HitFilms Express’ top features. You can also customize your maximum undo level, choose from a variety of preset template settings, including 1080p Full HD, mix and balance audio, utilize a handy select tool to gather everything before or after the playhead, and add an unlimited number of video and audio tracks.

On 64-bit versions of Windows 10 and Windows 8, as well as macOS 10.13 High Sierra and newer, you can use this free video editor for YouTube.

NoteBefore you can download HitFilm Express, you must first create an account with FXhome, then log in with that account to get the download link and finally activate the program.

02: Clipchamp: Online YouTube Editor for Simple Projects

Advantages: 

  • No software download.
  • Quick signup process.
  • Intuitive editing.
  • Free video and audio files to utilize.

Disadvantages:

  • Only exports in 480p.
  • Some of the choices you see are not free.

If you merely need a quick editor for your YouTube video, Clipchamp has you covered. It’s fully online, so there’s no need to download any software. It’s also quite simple to use.

Although this free YouTube video editor does not make HD videos, it does convert to MP4 and allows music, video, and images. You may also use it to make voiceovers by just typing in text, modify the pace of any video clip, resize or crop videos to fit the screen, rotate and flip videos, apply around a dozen filters, fade in and out any video/audio file, and employ transitions between files. You can add content to your video by uploading files from your phone or PC to the Clipchamp website, importing them from Box or Google Drive, or recording your screen or webcam. To arrange the files and cut out what you don’t need, drag them onto the timeline.

Because this YouTube editor is only accessible via the internet, it is compatible with all OS systems. You can use your email address, as well as your Google or Facebook accounts, to log in.

03: Lightworks: An Easy-to-Use YouTube Video Editor

Advantages: 

  • Directly upload to YouTube.
  • While rendering or exporting, keep editing.
  • Video tutorials are available for free.

Disadvantages: 

  • It is not possible to export to UHD 4K.
  • Collaboration features are not available in the free version.
  • Updates frequently.

Lightworks is an award-winning video editor that’s completely free. One significant drawback is that you don’t get support for all of the export formats available in Lightworks Pro.

Add your voice straight to the timeline, import videos in batches, create macros for faster editing, preview fonts in real time, export videos up to 720p, and publish directly to your YouTube account are a few of the features that make this free video editor ideal for YouTubers.

Drag-and-drop support, “fit to fill,” full-screen mode, adjustable layouts, precise cutting via the keyboard, multicam clip switching, auto-sync on import, transitions and filters, batch export, and playback comparison of two sources are a few of other Lightworks’ capabilities.

They have multiple free video tutorials and an active community forum if you need help utilizing it.

Lightworks is compatible with Windows (7 and above), Linux, and Mac systems (10.11 and higher).

04: FilmoraGo: Feature-Rich YouTube Editing App

Advantages: 

  • There are a few useful features.
  • Free music and other add-ons are included.
  • There are no advertisements.
  • Updates frequently.

Disadvantages:

  • Forces a watermark at the bottom.
  • Few built-in themes and media files.

FilmoraGo is yet another free video editing app for YouTube. It manages to be both user-friendly and feature-rich, with a built-in library of music, video transitions, and rudimentary video editing tools.

Export to 720p, add your own voice directly from your phone, overlay another video for a picture-in-picture effect, send the video directly to YouTube when finished, quickly apply a theme to the entire video, use your own music, the presets, or the free downloadables, and add clip transitions  (bounce, distort, roll, push, etc.), Files from Facebook/Instagram or Google can be imported. Modify the speed of a clip, rotate videos, and modify brightness, temperature, vignette, contrast, and more. Crop clips 16:9 or blur/cut the edges, overlay things like leaves and hearts, add titles with amusing styles, modify the speed of a clip, and adjust brightness, temperature, vignette, contrast, and more are all features that YouTube editors will like.

FilmoraGo is available for Android and iOS. Filmora also has a desktop version, however, it leaves a giant watermark in the middle of the video unless you pay to remove it.

Tip: KineMaster and Videoshop are two additional great free YouTube video editors for mobile devices, but we didn’t include them because they both add a watermark to your video unless you pay to remove it. The watermark on FilmoraGo is simply on the bottom, and you may spend a few dollars to get it removed.

1 2 3 4 7