Facebook Dating Not Showing Up 2021 | Here Is How to Fix It!

Facebook Dating Not Showing Up 2021 | Here Is How to Fix It!

Isn’t Facebook Dating showing up for you? We’ve discussed the probable causes and solutions for gaining access to Facebook Dating.

Facebook does not sigh and “never fails to deliver us something we did not even realize we so desperately desired.” On a similar topic, some users may be experiencing issues with Facebook Dating not appearing. If you’re having trouble tackling this problem, you’re not alone. Allow us to assist you. Today, we’ll learn everything there is to know about Facebook’s new dating feature.

Let’s not waste time looking for a related article because this post is your one-stop-shop for resolving your Facebook dating problems. Bring it on.

» Read more

How to Download Twitch VOD Videos

How to Download Twitch VOD Videos

Summary: 

Choose Settings > Channels and Videos, then turn on Store saved broadcasts to have Twitch automatically save your broadcasts.

When a stream has been stored, launch the Video Producer page and click the More button beside a video and pick Download.

With a third-party app like Twitch Leecher, you can download other streams’ broadcasts.

Twitch streamers and spectators frequently download videos of their favorite broadcasts to store locally or publish to a third-party website like YouTube. This post will show you how to save Twitch videos on demand (VODs) to your computer.

» Read more

How to Make Facebook Private

How to Make Facebook Private

What to Know:

Open Settings & Privacy Settings Privacy. Under Who Can See Your Posts, alter Public to Friends, or another selection.

Launch Privacy > Who can see your friends list and pick Friends or Only Me to make your Friends list private.

Go to your profile page and select Edit Details to make your profile private. Toggle off the information you don’t want others to see.

This post shows how to make your Facebook posts, Friends list, profile information, and albums private by changing your Facebook settings. The instructions are specific to the desktop version of Facebook.

» Read more

4 Best Free Video Editors for YouTube in 2021

4 Best Free Video Editors for YouTube in 2021

You won’t be able to make deep modifications to your videos without a good YouTube video editor before. You might be able to get by with the editing tools provided by YouTube, but other projects require more.

However, there is a variety of editing applications to choose from which are different from Youtube. There are several free video editing apps available, and among them are apps that are specially designed for editing YouTube videos.

Editors are available for Windows, Mac, iOS, Android, and other platforms. You are allowed to do all things like Add text, combine clips, overlay filters, create fade effects, import music, eliminate unnecessary video parts, display a watermark, run macros, and more to your videos with these programs.

01: HitFilm Express: A Free Video Editor That You Can Upgrade

Advantages:

  • A simple user interface.
  • There are many different ways to customize it.
  • Improvements/features are added frequently.

Disadvantages:

  • It may take some time to download the large setup file.
  • System requirements are really high.
  • Many functions are purchased through add-ons.

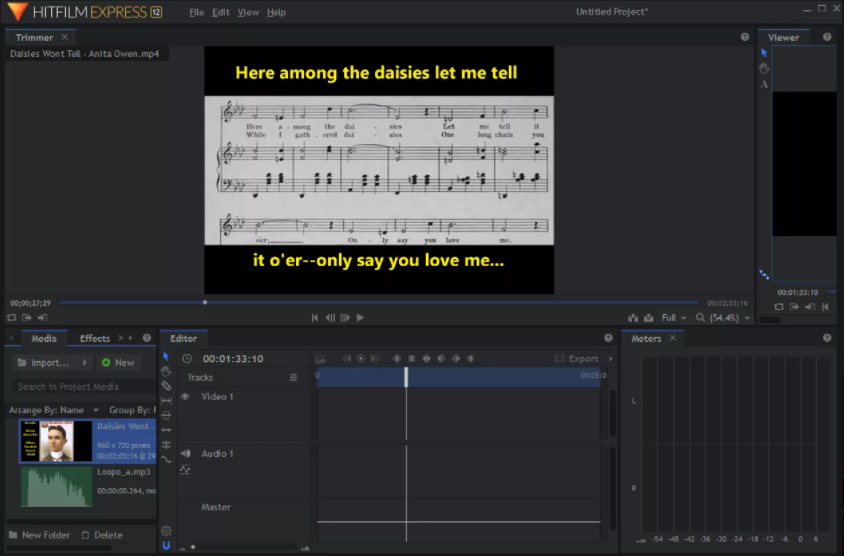
HitFilm Express comes with a slew of features that any YouTuber would appreciate. Some of the more complex features, such as chroma key and picture-in-picture, you have to cost, but they’re reasonably priced. Plus, even if you never buy an add-on, there’s a lot to admire about this free YouTube video editor.

The ability to auto-save as often as every minute, hundreds of keyboard shortcuts, colored labels (for 3D effects, text, models, composite shots, photos, and more), and the capability to crop and animate a video to control which part is viewable are a few of HitFilms Express’ top features. You can also customize your maximum undo level, choose from a variety of preset template settings, including 1080p Full HD, mix and balance audio, utilize a handy select tool to gather everything before or after the playhead, and add an unlimited number of video and audio tracks.

On 64-bit versions of Windows 10 and Windows 8, as well as macOS 10.13 High Sierra and newer, you can use this free video editor for YouTube.

NoteBefore you can download HitFilm Express, you must first create an account with FXhome, then log in with that account to get the download link and finally activate the program.

02: Clipchamp: Online YouTube Editor for Simple Projects

Advantages: 

  • No software download.
  • Quick signup process.
  • Intuitive editing.
  • Free video and audio files to utilize.

Disadvantages:

  • Only exports in 480p.
  • Some of the choices you see are not free.

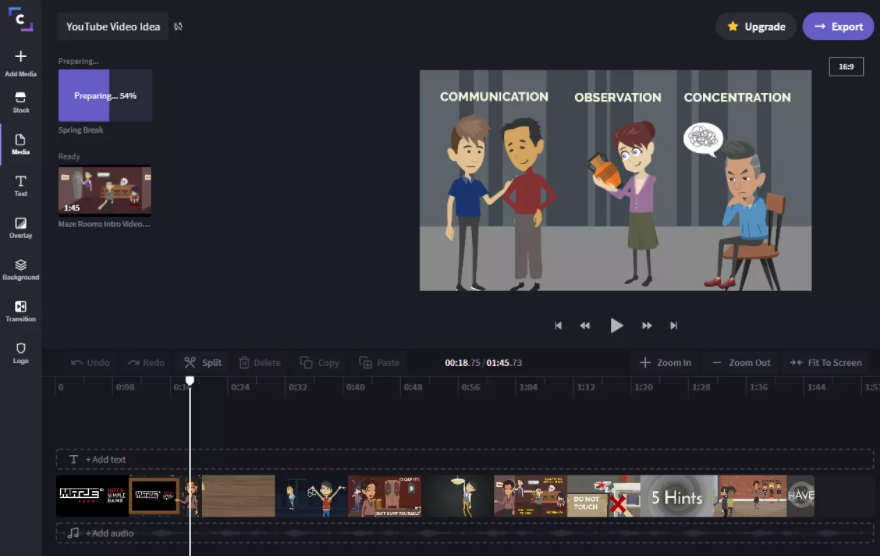
If you merely need a quick editor for your YouTube video, Clipchamp has you covered. It’s fully online, so there’s no need to download any software. It’s also quite simple to use.

Although this free YouTube video editor does not make HD videos, it does convert to MP4 and allows music, video, and images. You may also use it to make voiceovers by just typing in text, modify the pace of any video clip, resize or crop videos to fit the screen, rotate and flip videos, apply around a dozen filters, fade in and out any video/audio file, and employ transitions between files. You can add content to your video by uploading files from your phone or PC to the Clipchamp website, importing them from Box or Google Drive, or recording your screen or webcam. To arrange the files and cut out what you don’t need, drag them onto the timeline.

Because this YouTube editor is only accessible via the internet, it is compatible with all OS systems. You can use your email address, as well as your Google or Facebook accounts, to log in.

03: Lightworks: An Easy-to-Use YouTube Video Editor

Advantages: 

  • Directly upload to YouTube.
  • While rendering or exporting, keep editing.
  • Video tutorials are available for free.

Disadvantages: 

  • It is not possible to export to UHD 4K.
  • Collaboration features are not available in the free version.
  • Updates frequently.

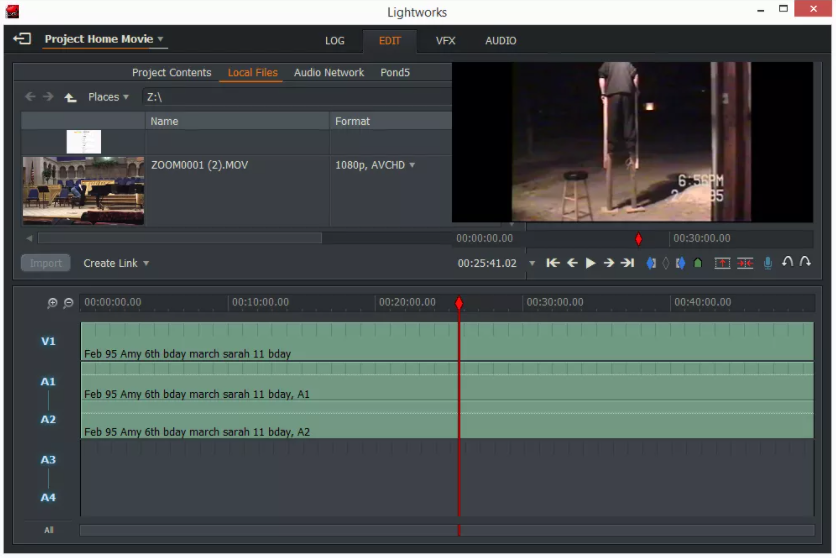
Lightworks is an award-winning video editor that’s completely free. One significant drawback is that you don’t get support for all of the export formats available in Lightworks Pro.

Add your voice straight to the timeline, import videos in batches, create macros for faster editing, preview fonts in real time, export videos up to 720p, and publish directly to your YouTube account are a few of the features that make this free video editor ideal for YouTubers.

Drag-and-drop support, “fit to fill,” full-screen mode, adjustable layouts, precise cutting via the keyboard, multicam clip switching, auto-sync on import, transitions and filters, batch export, and playback comparison of two sources are a few of other Lightworks’ capabilities.

They have multiple free video tutorials and an active community forum if you need help utilizing it.

Lightworks is compatible with Windows (7 and above), Linux, and Mac systems (10.11 and higher).

04: FilmoraGo: Feature-Rich YouTube Editing App

Advantages: 

  • There are a few useful features.
  • Free music and other add-ons are included.
  • There are no advertisements.
  • Updates frequently.

Disadvantages:

  • Forces a watermark at the bottom.
  • Few built-in themes and media files.

FilmoraGo is yet another free video editing app for YouTube. It manages to be both user-friendly and feature-rich, with a built-in library of music, video transitions, and rudimentary video editing tools.

Export to 720p, add your own voice directly from your phone, overlay another video for a picture-in-picture effect, send the video directly to YouTube when finished, quickly apply a theme to the entire video, use your own music, the presets, or the free downloadables, and add clip transitions  (bounce, distort, roll, push, etc.), Files from Facebook/Instagram or Google can be imported. Modify the speed of a clip, rotate videos, and modify brightness, temperature, vignette, contrast, and more. Crop clips 16:9 or blur/cut the edges, overlay things like leaves and hearts, add titles with amusing styles, modify the speed of a clip, and adjust brightness, temperature, vignette, contrast, and more are all features that YouTube editors will like.

FilmoraGo is available for Android and iOS. Filmora also has a desktop version, however, it leaves a giant watermark in the middle of the video unless you pay to remove it.

Tip: KineMaster and Videoshop are two additional great free YouTube video editors for mobile devices, but we didn’t include them because they both add a watermark to your video unless you pay to remove it. The watermark on FilmoraGo is simply on the bottom, and you may spend a few dollars to get it removed.

How to Live Stream on YouTube

How to Live Stream on YouTube.

YouTube features a built-in live streaming capability that allows you to make live videos from your computer or smartphone using the YouTube app. Going live on YouTube and sharing real-time videos with your subscribers is simple. Here’s all you need to know to start broadcasting on YouTube.

» Read more

How to Deactivate Facebook on Android

How to Deactivate Facebook on Android

What to Know:

To begin the deactivation process, launch Settings & Privacy Settings Account Ownership and Control Deactivation and Deletion.

Select Continue to Account Deactivation > answer questions > Continue Deactivate My Account.

Note: You can reactivate your Facebook account at any moment after deactivating it. The deletion of Facebook is

changeless.

On an Android, there are two ways to temporarily deactivate your Facebook account. What happens to your account

when you deactivate it is covered in more detail.

» Read more

How to Make a GIF From a YouTube Video

In this tutorial, learn how to make a gif from a Youtube video.

What to know:

Select a Youtube video, write gif in the URL just before Youtube. Tap Enter > Pick Start Time > Confirm End TimeCreate GIF.

Copy the video URL and paste it into Giphy’s GIF Maker > Install the duration. Tap Continue to Decorate Continue to Upload > Upload to GIPHY.

Using gifs.com and Giphy, this post shows you how to make a GIF from a YouTube video.

» Read more

How to save Snapchat videos to your Camera Roll

How to save Snapchat videos to your Camera Roll

The limited-time existence of the updates you share on Snapchat distinguishes it from other social media platforms.

As a result, when you send a photo or video to a friend, they only have a limited amount of time to access it. And once

they notice it, it disappears.

What if you want to save a video to your iPhone, though? If you continue reading, this post will show you how to do

just that.

Before you save any Snapchat videos

Even if you’re ready to start saving Snapchat clips, there are a few things you should do first.

Make room for the videos on your iPhone

Videos can use up a lot of space on your iPhone, so before you go crazy downloading and saving videos from

Snapchat, go through your phone and delete the ones that are taking up the most space.

Gemini Photos is one of the easiest ways to go through all of your videos. This app not only scans for duplicate or

fuzzy photos, but it also finds the videos that are taking up the most space and helps you uninstall them easily.

To remove your old, unused videos, download Gemini Photos from the App Store and use these steps:

1. Launch Gemini Photos and allow it to scan your photo library.

2. Select Videos.

3. Gemini Photos will allow you to preview one of the videos when you choose it.

4. To hold the video, swipe up on it. To delete a video, swipe down on it.

5. The next video will be shown by Gemini Photos.

6. Choose Empty Trash when you’ve finished watching your videos.

7. Choose Delete to confirm your decision to delete the videos.

8. Go to the Photos app on your Iphone.

9. Press Albums > Recently Deleted > Select > Delete All.

Desktop banner: Download Gemini Photos to sort out all the Snapchat videos you've saved

Get the author’s permission

Always reach out to the creator of a video sent to you on Snapchat and ask for their permission before downloading

it. Since saving a video without the owner’s permission is unethical, Snapchat does not allow you to import another

user’s content natively inside the app. As a result, it’s best to double-check that the person who created and

submitted the video agrees to you saving it.

How to download your own Snapchat videos

Depending on whether you’ve already uploaded your Snapchat videos or not, there are a few options for saving them.

If you’ve just finished recording your video and haven’t yet posted it, you can save it to your Camera Roll by following

these steps:

1. Tap the Save button after you’ve finished filming your video (which looks like a downward-facing arrow

at the bottom of your screen). There will be a pop-up window.

2. Select Memories & Camera Roll.

3. Select Save.

4. Your video will then appear in the Photos app on your iPhone.

Don’t worry if you’ve already shared your video with friends but forgot to save it. You can still keep it if you follow

this way:

1. Go to the Snapchat, pull up to see your memories.

2. Select the clip you’d like to save.

3. In the top-right corner, choose three dots.

4. Select Export Snap > Save Video.

How to save a Snapchat video from someone else

As previously said, it is possible to save someone else’s video on Snapchat, but it is not as simple as downloading

your own content because the software does not allow it.

Can you save other people’s Snap videos?

It’s important to remember that downloading and then sharing another person’s Snapchat video is a copyright

violation. It’s also legally a breach of Snapchat’s terms of service. So, if you plan to save or download someone’s

video, make sure it’s only for your own personal use.

How to record a Snapchat video

Since Snapchat doesn’t have a feature that lets you save other people’s videos, you’ll have to use the screen recording

feature on your iPhone. This is how to allow screen recording if you don’t already have it:

1. Open the Settings app.

2. Select Control Center > Customize Controls.

3. Select the green (+) button next to Screen Recording.

So now Screen Recording has been applied to your Control Center,  here’s what to do to record a Snapchat video:

1. Launch Snapchat.

2. Swipe down the top-right corner to bring down the Control Center.

3. Select the Screen Record button, then wait for it to begin.

4. Pull up on the Control Center to return to Snapchat.

5. Press on the video you’d like to save and allow it to play.

6. When the video is over, press the red bar in the top-left corner over the clock..

7. Select Stop.

Your video will appear in the Photos app once you’ve finished filming your screen.

Does someone know if you screen-record their Snapchat story?

Snapchat does send a message to the other person when you use the screen recording function on your iPhone to let

them know you’ve captured their video. As a result, it’s best to simply ask the video’s author for permission before

recording it. In any case, they’re going to find out.

How to edit a Snapchat video you’ve downloaded

After you’ve taken a Snapchat video, you may want to crop it or trim some of it. Thankfully, you can do all of this

with only the Photos app.

This is the way to trim your Snapchat screen recording:

1. Launch the Photos app.

2. Press on the screen recording.

3. Select Edit in the top right.

4. To trim the beginning or end of your video, drag the box around it from the left or right sides.

5. Select Done.

This is the way to crop the screen recording from Snapchat:

1. Launch the Photos app and select your screen recording.

2. Select Edit in the top right.

3. Choose the Crop button (it’s the fourth icon on the bottom).

4. Drag the box to the location of the video in your recording where you want to crop.

5. Select Done.

Even though Snapchat posts are supposed to be temporary, you can find yourself wanting to save your memories

from time to time. You can save and relive the moments you shared with your Snapchat friends, thankfully. And

hopefully, this article has shown you how to save and possibly edit the videos you’ve already saved.

Snapchat Sound: How to Add Music to Your Snaps

Snapchat Sound: How to Add Music to Your Snaps

What to know :

Before or after taking a picture or video, tap the music note icon in the right vertical menu.

To preview a featured sound, tap the play button icon next to it, then tap Next to connect it to your snap.

In another way, to record your own sound, tap + Create Sound at the top of the Featured Sounds page.

In this post, we will show you how to add sounds to your Snapchat photo or video snaps using the built-in featured

sounds or by recording your own.

How to Add Featured Sounds to Your Snaps

You can automatically insert song clips into your picture or video snaps using Snapchat’s song clips feature. Unlike

other apps like Tik Tok, Snapchat’s featured sound library is currently very restricted, and it lacks a search function

for finding specific songs or sounds.

1. Move to the snap tab in the Snapchat app by clicking the Camera icon in the bottom menu.

2. If you want to add a sound to your snap before or after you take it is a personal choice. If you want to add it

later, take a picture or record a video now.

3. Tap the Music icon in the vertical menu on the right side of the screen.

4. A new tab called Featured Sounds will appear, with a list of songs, each with a thumbnail picture, track

name, and artist name. To listen to a sample, select the play button icon to the right of any playlist.

5. Tap the blue Next button at the bottom once you’ve previewed and settled on a track to use as a sound for

your snap.

Tip: If you don’t need to see the track before adding it to your snap, simply pick it.

6. Click the Sound Timeline at the bottom of the screen to move it around and select the correct section to

include, then tap the checkmark icon to confirm on your snap preview.

 NoteIf you don’t like how your snap looks or sounds, tap the X icon to choose a different sound or

cancel your snap to start again.

7. Over your snap, a sound graphic sticker with the track name and artist name will appear. You can switch it

out of the way by dragging and dropping it anywhere on the screen; however, if you drag and drop it into the trash

icon at the bottom, your sound will be lost.

8. Continue to edit or add features such as stickers and filters as normal, then click the blue arrow button to

submit it to your friends and/or share it with your stories.

How to Add Your Own Sounds to Your Snaps

You can record your own sound in Snapchat and have it automatically added to your snap if you don’t find one you

like among the app’s built-in featured sounds.

1. Steps one through three are the same as in the previous steps.

2. Select + Create Sound at the top from the Featured Sounds site.

3. Tap the Record button to begin recording while your sound is playing, whether on your smartphone, in

another app, or in your surroundings.

4. To stop recording the sound, press the Record button once more.

5. A sample of your sound will begin to play. To make your sound clip more widely available, type a name in

the Sound Name area, then optionally tap the Make this sound public? button. Finally, slide the caps at the

beginning and end of the Sound Timeline to trim your sound clip.

6. Select the blue Save Sound button.

7. To add a saved sound to your snap, select it and preview it. Click the Sound Timeline at the bottom of the

screen to move it around and choose the right section to include, then tap the checkmark icon to confirm.

Tip: When you tap the music note icon to enter the Featured Sounds tab, a new tab called My Sounds will

appear, containing all of your saved sounds. By long-pressing on one of your saved sounds, you can edit or erase

it. Then choose Edit to change the name or privacy setting, or Delete to get rid of it.

8. Continue editing or adding features as usual, then click the blue arrow button to submit it to your friends and/or

share it on your stories.


1 39 40 41 42 43 110