Download Windows 11 ISO File (Leaked News, Features & Release Date)
If you’ve been keeping up with the news, you’re probably aware that Microsoft is set to release Windows 11, the next version of Windows, on June 24. However, a near-final version of Windows 11 was leaked on a Chinese forum website yesterday.
What’s the Best Way to Back Up My Computer?
What’s the Best Way to Back Up My Computer?

At some point in their life, everyone loses data. Your hard drive could fail tomorrow, ransomware could encrypt your information, or a software glitch could wipe out all of your crucial files. If you don’t back up your computer on a regular basis, you risk losing those files permanently.
Backups, on the other hand, don’t have to be difficult or perplexing. You’ve certainly heard of a variety of backup options, but which one is best for you? And which files do you actually need to keep a backup of?
It’s All About Your Personal Data
Let’s begin with the obvious: what should you backup? First and foremost, you must make a backup of your personal files. If your hard disk crashes, you can always reinstall your operating system and redownload your apps, but your personal data is irreplaceable.
Let’s back up any personal documents, images, home movies, and other data on your computer on a regular basis. Those are irreplaceable. If you’ve spent hours painstakingly ripping audio CDs or video DVDs, you should back up those data as well so you don’t have to repeat the process.
You may also back up your operating system, apps, and other settings. You don’t have to back them up, but it can make things easier in the event that your entire hard drive crashes. If you prefer to mess with system files, alter the registry, and update your hardware on a regular basis, having a full system backup can save you time if something goes wrong.
The Many Ways to Back Up Your Files
You can back up your data in a variety of ways, including utilizing an external hard drive or uploading your files to a remote server over the Internet. Here are the advantages and disadvantages of each:
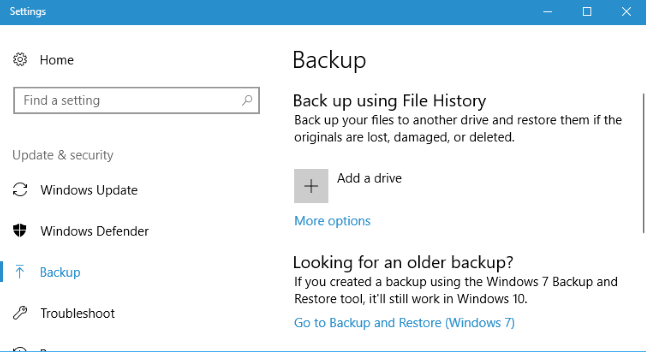
- Back Up to an External Drive: If you have an external USB hard drive, you may simply use your computer’s built-in backup tools to back up to it. Use File History in Windows 10 and Windows 8. Use Windows Backup on Windows 7. Use Time Machine on a Mac. Connect the drive to your computer every now and then to use the backup tool, or leave it plugged in all the time and it will back up automatically. Pros: Backing up is inexpensive and quick. Cons: If your house is robbed or burns down, your backup could be lost along with your computer, which is extremely inconvenient.
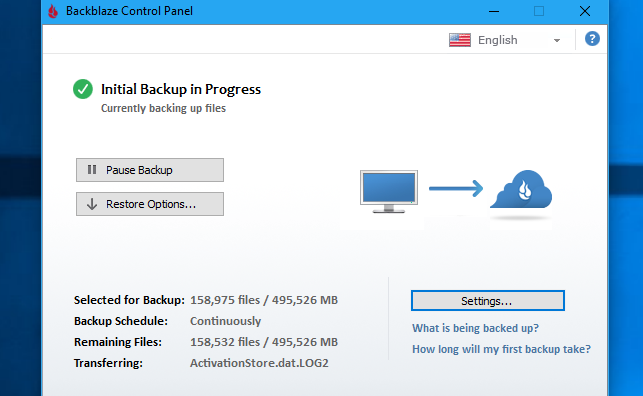
- Back Up Over the Internet: If you want to make sure your files are safe, use a service like Backblaze to back them up to the internet. Since CrashPlan is no longer available for residential customers, we enjoy and suggest Backblaze, a well-known online backup solution (although you could pay for a CrashPlan small business account instead.) Carbonite is a competitor; we previously mentioned MozyHome, but it is now a part of Carbonite. These apps run in the background on your PC or Mac for a reasonable monthly price (about $5), automatically backing up your files to the service’s web storage. You can restore those files if you ever lose them and need them again. Pros: Online backup safeguards your data from a variety of threats, including hard drive failure, theft, natural disasters, and everything in between. Cons: These services are usually cost money (for more information, see the next section), and the initial backup can take a long time–especially if you have a lot of files.
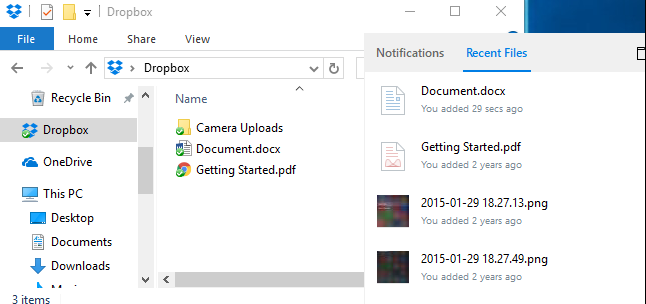
- Use a Cloud Storage Service: Although backup purists will argue that this isn’t really a backup method, it serves a comparable purpose for most individuals. Instead of saving your data on your computer’s hard drive, you can use a cloud storage service such as Dropbox, Google Drive, Microsoft OneDrive, or another comparable service. They’ll then sync with your internet account and other PCs. You’ll still have copies of your files stored online and on other machines if your hard drive fails. Pros: This approach is simple, quick, and in many cases, free, and it protects you against all forms of data loss because it is online. Cons: Most cloud services only provide a few gigabytes of free storage, so this only works if you only have a few things to back up or are prepared to pay for additional storage. This method might be either simpler or more complex than a straight-up backup tool, depending on the files you wish to back up.
While online backups such as Backblaze and cloud storage services such as Dropbox are both online backups, they operate in quite different ways. Dropbox is for syncing files between computers, whereas Backblaze and comparable services are for backing up enormous amounts of data. Backblaze will save numerous copies of various versions of your files, allowing you to restore the file to its original state at any time in its history. And, unlike Dropbox, which is free for limited quantities of storage, Backblaze’s low pricing is for as much storage as you need. One may be less expensive than the other depending on how much data you have.
Backblaze and Carbonite both have one major drawback that you should be aware of. If you delete a file from your computer, after 30 days it will be removed from your online backups. After this 30-day period, you won’t be able to recover a deleted file or a previous version of a file. So, if you want those files back, be cautious when removing them!
One Backup Isn’t Enough: Use Multiple Methods
So, which one should you go with? At the very least, you should use two of them. Why? Because you need offsite as well as onsite backups.
Onsite backups are those that are kept in the same physical location as you. So, an onsite backup is when you back up to an external hard drive and store it at home with your home PC.
Offsite backups are kept in a separate place. Backing up to an online server, such as Backblaze or Dropbox, is considered an offshore backup.
On-site backups are more convenient and faster, and they should be your first line of defense against data loss. You can rapidly restore files from an external disk if you lose them. However, you shouldn’t rely just on onsite backups. All of your files would be lost if your house burned down or if all of the hardware in it was stolen by burglars.
Offsite backups don’t have to be stored on a server connected to the Internet, and they don’t have to be paid for on a monthly basis. You could, for example, back up your files on a hard drive and keep it at your office, a friend’s residence, or a bank vault. Although it would be more inconvenient, this is technically an offsite backup.
Likewise, you may keep your data in Dropbox, Google Device, or OneDrive, then back them up to an external drive on a regular basis. You could also back up online with Backblaze and build a local backup with Windows File History. There are numerous ways to combine these services, and the method you choose is entirely up to you. Just make sure you have a robust backup system in place, with both onsite and offshore backups, to ensure you never lose your files.
Automate It!
All of this may seem confusing, but the more you automate your backup system, the more often you’ll be able to back up and the more likely you’ll keep to it. That is why, rather than moving files to an external disk by hand, you should use an automated tool. You only have to set it up once and then forget about it.
One of the reasons we favor online services like Backblaze is because of this. If it’s backing up to the internet, it can do it on a daily basis automatically. If you have to plug in an external drive, you’ll have to put in more work, which means you’ll back up less frequently and possibly quit doing it altogether. Keep everything automated is definitely worth.
Consider using a file-syncing service like Dropbox, Google Drive, or Microsoft OneDrive to synchronize your essential files online if you don’t want to pay anything and want to rely on local backups. That way, if your local backup is ever lost, you’ll have an online backup to fall back on.
Finally, consider about where your files are and make sure you have several copies on hand at all times. Ideally, the copies should exist in multiple locations. You should be well ahead of the majority of folks if you’re truly considering what you’ll do if your computer fails.
How to Download Facebook Photos and Videos
How to Download Facebook Photos and Videos
Do you want to save images or videos from Facebook? There are a few different methods for downloading Facebook images and videos.

You may wish to download Facebook images and videos to your computer or phone because Facebook is a treasure mine of memories for you and your friends.
We’ll teach you how to download your images, as well as photos and videos from your friends, using both official and third-party Facebook photo downloader tools.
How to Download Facebook Photos
Don’t bother with third-party apps or websites if you just want to save a single photo on Facebook. Facebook itself has a simple downloader.
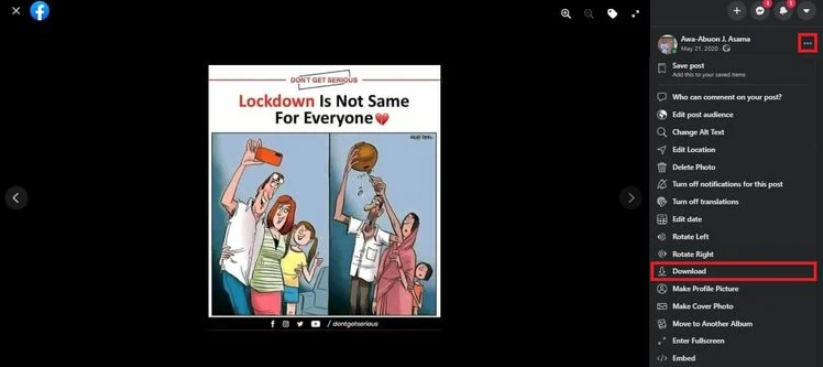
- On a desktop, open the photo and choose Menu (the three-dot icon) > Download.
- On a mobile device, open the photo in the Facebook app choose Menu (the three-dot icon) > Save to Phone.
This approach can be used to download Facebook photographs. That’s all there is to it.
Nevertheless, you should be able to download your friends’ Facebook images if their Facebook photo privacy settings allow it.
How to Download Facebook Albums
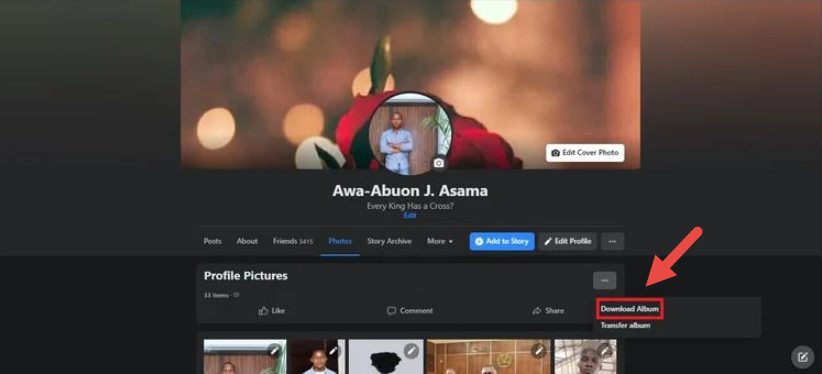
Facebook provides an easy technique for downloading a Facebook album from your own profile. Again, no third-party downloading programs are required for this.
- Click your own name to go to your profile.
- Open Photos > Albums.
- Navigate to the album that you want to download.
- Tap the three-dot icon in the top-right corner and choose Download Album.
Facebook will begin compressing all of the images. This may take some time, depending on the size of the album. When it’s finished, you’ll receive an email notification that the album is ready to download.
The album is downloaded as a ZIP file. To see the photos, you’ll need to unzip them.
How to Download All of Your Facebook Photos
There’s also a simple way to download all of the images you’ve ever submitted to Facebook. You’ll even find them in the right album subfolders. The names of the files, on the other hand, can be a little weird.
Here’s a simple Facebook photo downloader provided by Facebook:
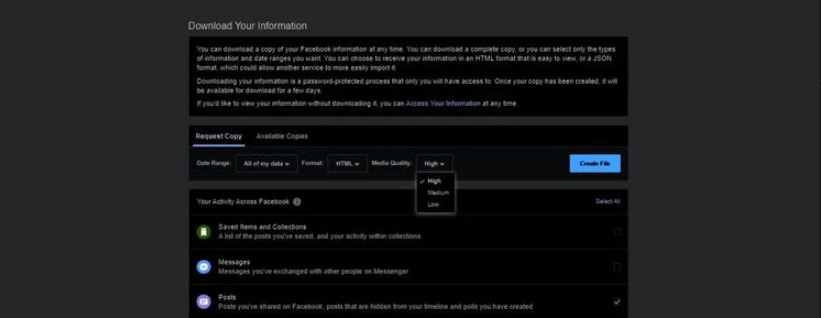
1. Navigate to Facebook settings on your desktop browser, or go to Facebook.com/Settings.
2. In the sidebar, tap Your Facebook information.
3. Choose Download your information.
4. Choose Deselect all, then choose only the Posts box.
5. You can select the image file quality. If you want full-resolution copies, switch from Medium to High. The size of the file will be determined by the setting you select. If you have a lot of photos, the file size will grow, as will the time it takes to prepare it will increase.
6. Choose Create File.
Depending on how many photographs and videos you have on Facebook, it may take some time for Facebook to prepare the ZIP file. This could also be many gigabytes. When it’s finished, you’ll be prompted to download it from Available Files.
To see all of your posts and photographs, download and unzip the file, with albums as sub-folders.
The Best Facebook Photo Downloader App
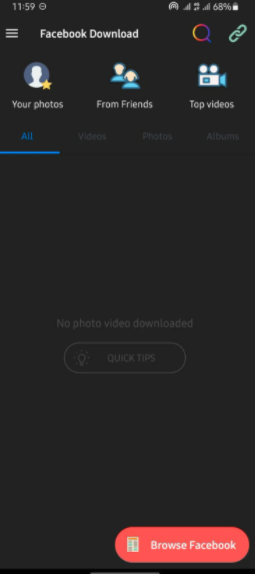


VNHero Studio’s Download Videos and Photos: The best Facebook picture downloading program is Facebook and Instagram. It’s free, simple to use, and works with videos as well.
You may download your personal images and albums, as well as your friends’ Facebook photo albums, with this program. You may also utilize the search function to find users or Pages, and then download their photographs and videos.
The app menu includes quick links to Pages you’ve liked, movies and photographs you’ve saved, and bookmarks.
Tap “Your Photos” to see your own photos, “From Friends” to find someone from your friends list, or “Top Videos” to see Facebook Watch’s recommended videos.
How to Save Facebook Videos to Your Computer or Phone
On Facebook, Photos have a simple Download button. However, there is no convenient way to download videos. FBDown.net is one of the most user-friendly web applications for saving Facebook videos. It may be used on both desktop PCs and mobile devices.
Here’s how to put it to use:
1. Go to the Facebook video and copy its link.
2. Navigate to FBDown and paste the link. Click or press the Download button.
3. Tap Download Video in HD Quality or Normal Quality, and start downloading.
4. Return to the previous page if the video plays in your browser window instead of downloading. Right-click on Download Video in HD Quality, choose Save link as…, and save it to your preferred place.
It should work flawlessly. The file will be downloaded in MP4 format, which is perfect for most users. The approach is also compatible with mobile browsers.
iOS users, on the other hand, will have to use Firefox because Safari and Chrome aren’t supported.
On the desktop, FBDown has a useful add-on for Google Chrome. Click the extension icon when watching a Facebook video to save it to your PC.
Other Facebook Download Tools
Aside from images and videos, Facebook has a wealth of other data about you. The firm is also known for its data collection practices.
Although the solutions listed above make it simple to download images and videos, you should consider backing up your Facebook history and learning about additional download and data management options.
How to Download & Install Windows 11 On PC/Laptop (Leaked Build)
How to Downgrade to an Older Version of Android
How to Downgrade to an Older Version of Android
Have you installed a new version of Android on your phone and wish to revert to an older version? Here’s how to downgrade once more.
It’s advisable to keep your devices up to date in general. Updates, on the other hand, can sometimes break software, change features in unintended ways, or introduce flaws that the manufacturer may or may not repair.
It’s not a good idea to revert to an older version of Android, but it’s not impossible. Here’s how to go about it.
Before Downgrading Your Device
Downgrading is not an official practice recognized by manufacturers. It’s not simple to do, and you risk voiding your warranty and bricking your device. You should only attempt this if you’ve previously modified the software on your device.
If you can unlock the bootloader, you’ll be able to downgrade your device at all. Unlocking Google or OnePlus devices is simple, however unlocking Huawei, Samsung, or Nokia devices can be complex or impossible.
You’ll have to do your own research on your device, especially if you purchased it via a carrier. Some carriers need you to first obtain an unlock token from them, or they will not allow you to unlock the bootloader at all.
Your internal storage will be wiped if you unlock the bootloader. Before you begin, make sure you have a complete backup of your data.
Things You’ll Need Before You Can Downgrade
You’ll need to download an Android factory image of the version you want to go back to once you’ve backed up all of your data, and it must be particularly created for your device.
Google supplies a list of factory images to Pixel customers. If you utilize other phone carriers, you’ll have to look for an approved factory picture for your phone makers. If you can’t locate them on the manufacturer’s website, the XDA Developers forums are a fantastic place to look.
To utilize the ADB and fastboot tools, you’ll also need to download and install the Android SDK.
Finally, you’ll need to connect your phone to your computer through USB, so make sure you have the original USB cable. Use a high-quality cable alternative if you don’t have the original.
How to Downgrade Your Android Phone
To demonstrate, we’re utilizing a Pixel phone. Most phones that can be downgraded should be able to work the process, but each device is different. Some require different tools or follow a distinct set of instructions.
Before you go any further, double-check that this is the case with your device. This information may be found on the XDA Developers forums, which we discussed earlier.
Step 1: Enable USB Debugging
The first step is to enable Developer options on your phone by heading to Settings, finding the About phone section, and then clicking the Build number until you see “You are now a developer!” written on the screen.
Next, enable USB debugging and OEM unlocking under Developer settings.


Step 2: Connect Your Phone to Your Computer
Use a USB cord to connect your phone to your computer.
Navigate to the Android SDK folder on your PC and drop the Android factory image you downloaded into it. Factory images are normally delivered as ZIP files containing IMG files; simply unzip the factory image in the Android SDK folder.
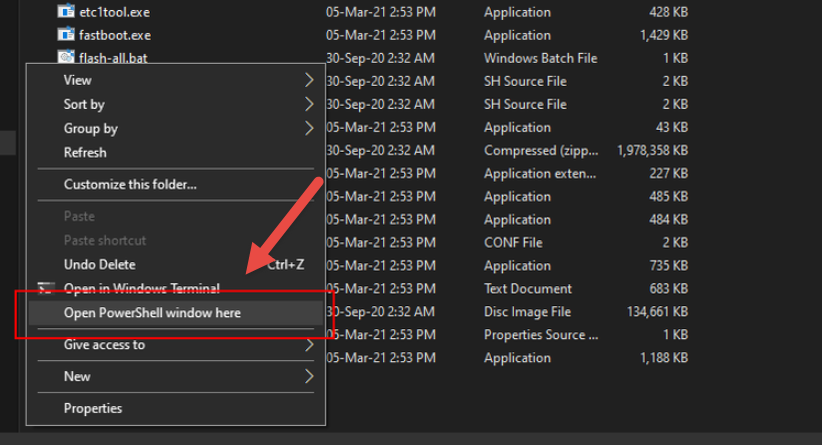
Hold Shift and right-click inside the window while remaining in the Android SDK folder, then choose Open PowerShell window here.
Type adb devices in the PowerShell box that appears to see if your phone is being detected. If it is, the serial number should be listed. If that doesn’t work, try an alternative USB cable.
Now you must launch fastboot mode on your device. In PowerShell, enter adb reboot bootloader to accomplish this.

Step 3: Unlock the Bootloader
We’ll unlock the bootloader once your device is in fastboot mode.
Type fastboot oem unlock, and if that doesn’t work, try fastboot flashing unlock, depending on your device. If everything goes properly, you should receive confirmation that the bootloader has been unlocked on your smartphone.
Step 4: Install the Older Version of Android
Some manufacturers include a “flash-all” script in the factory image download that will automatically flash everything for you. If this is the case, the script, along with the IMG files you extracted, should be in the Android SDK folder.
Double-tap the flash-all.bat script. A box should appear, displaying the flashing process as it works. DURING THIS PROCESS, DO NOT UNPLUG YOUR PHONE!

You’ll have to manually flash everything if you don’t see a flash-all script. To do so, type the commands in the following order:
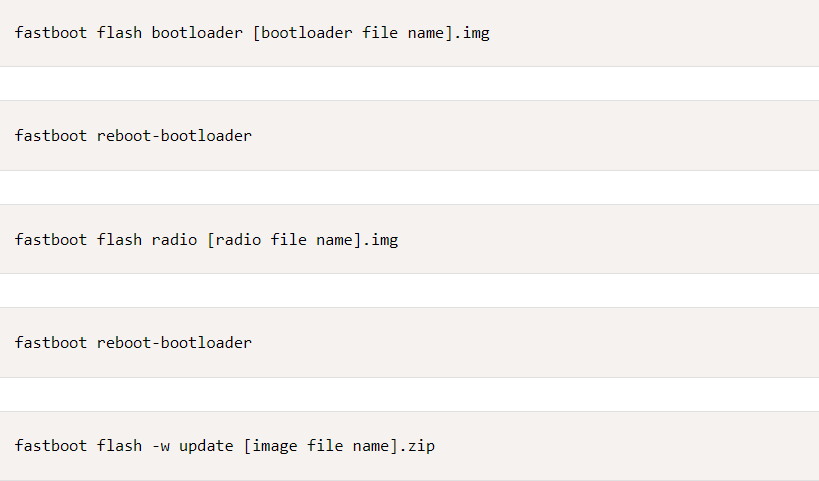
Now your phone should reboot. You should now be running a downgraded version of Android if everything went correctly. You’ll have to reset your phone from the beginning.
Alternatives to Downgrading You Should Consider
Because unlocking your device’s bootloader entails erasing all of your data, you might want to opt for a factory reset instead.
It’s a lot less complicated and riskier than downgrading, and any bugs or performance issues you’ve had are sure to go away following a factory reset. Moreover, you may also take advantage of all the latest Android features.
You might try installing a custom ROM if you’re dead set on downgrading to an older version of Android though. Custom ROMs frequently include enhancements over your device’s original software, and developers will occasionally keep older versions updated with security fixes.
If your phone’s manufacturer doesn’t give you with pictures of older Android OS, this is an option worth considering.
Going Back to the Past by Downgrading
While a factory reset should normally solve any issues, if you have no other choice than to revert to an older version, you now know how to do so.
Please keep in mind that the method we describe may or may not work with your device. This procedure always has the danger of bricking your phone, so make a backup of everything!
How to Turn Off “This Tweet might include sensitive content” on Twitter
How to Enable the Disappearing Messages Feature on WhatsApp
How to Enable the Disappearing Messages Feature on WhatsApp
WhatsApp allows you to delete messages that you don’t want to be remembered. Here’s how you can turn it on.

Because not all WhatsApp messages are vital, they shouldn’t be kept around indefinitely. You may delete unimportant or compromising messages on WhatsApp, just like you would in real life, so you can move on from your conversations once they’re finished.
WhatsApp has joined the likes of Signal in allowing you to delete messages that you no longer want to be a part of your life. The feature has a number of advantages, like cutting your digital trace, providing a sense of anonymity, and more.
How WhatsApp’s Disappearing Messages Feature Works
You can establish an option for each individual chat, whether it’s an individual or a group chat, to automatically erase messages seven days after they’ve been delivered, using this feature.
However, unlike some of its competitors, WhatsApp does not allow you to choose the length of time that messages are saved. Furthermore, the service will delete any photographs or videos submitted through the chat.
To use this function, make sure you have the most recent version of WhatsApp on your iOS or Android device. To get the latest version of your app, go to the App Store or Google Play and select Update.
How to Enable Disappearing Messages in Individual Chats


The procedure for enabling disappearing messages in your WhatsApp chats is outlined below.
1. Tap on the contact’s name at the top of the chat to enable the Disappearing Messages function for that contact after opening that contact.
2. Now pick Disappearing Messages by scrolling down.
3. When you enable the feature for the first time, you’ll get a pop-up notice explaining how it works. After you’ve finished reading it, click Continue. Off will be set as the current status.
4. Press On to enable the feature.
How to Enable Disappearing Messages in Group Chats


Follow the steps outlined below to enable disappearing messages within group chats.
1. Press on the contact’s name at the top of the chat to enable the Disappearing Messages function for that contact after opening that contact.
2. Now pick Disappearing Messages by scrolling down. Off will be set as the current status.
3. Tap On to enable the feature.
How to Disable Disappearing Messages in Individual and Group Chats
To turn off the Disappearing Messages feature in both individual and group chats, follow the same steps as you did to enable it, but in the penultimate step, hit Off instead of On.
The screenshots below demonstrate how to accomplish this.


When the Disappearing Messages Feature Won’t Work
Messages sent or received prior to the Disappearing Messages feature’s activation will not be affected. If you forward a vanishing message to someone else, it will not disappear from their conversation unless they have the functionality turned on as well.
If the recipient of a disappearing message responds to it directly by swiping right to quote it, the message may be accessible after the seven-day limit has passed.
A Word of Caution
Remember that the Disappearing Messages tool only removes messages and media (such as photographs and videos) from within the chat. It has no effect on the recipient’s forwarded messages or media.
While any messages and media you may have sent will be deleted from the chat, they will still exist wherever they were forwarded. Furthermore, if the receiver has downloaded the media you sent, it will remain in their gallery.
This function, like everything else in technology, has flaws. It’s possible that after you send something, you won’t be able to control how far it spreads. This is why you should only share information and media that you don’t mind being shared.
Not All Conversations Have to Last Forever
Your WhatsApp conversations will no longer have to go on indefinitely. The Disappearing Messages function gives you the assurance that anything you texted a week ago won’t be available for you to revisit if it’s no longer needed.