How To Fix TikTok Notifications Not Working

How To Fix TikTok Notifications Not Working

TikTok’s growing popularity has made it one of the most popular video-making apps on Google Play and the App Store. It’s popular because it’s simple to use, entertaining, and allows you to express yourself through short, amusing videos.

The software notifies you whenever one of your videos receives a new like or remark. What if you have a favorite TikToker whose updates you can’t miss? You can be notified whenever they make a new post. If this feature isn’t functioning for you, we have a few suggestions.

What Notifications Does TikTok Offer?

Notifications are one of the many services and features available on TikTok. Unlike other social media sites, you can choose which activities you want to be notified about and turn off notifications for those you don’t want to hear about.

Let’s start by reviewing TikTok’s notifications:

  • Likes
  • Comments
  • New Followers
  • Mentions
  • Direct Messages
  • New videos from those you’re following
  • Suggested videos
  • LIVE Video recommendations

How to Turn TikTok Notifications On

To begin, make sure your TikTok notifications are turned on. There are a couple of locations to check. We’ll start by showing you how to make sure notifications are turned on in the TikTok app. Then, on your Android or iOS smartphone, we’ll teach you how to make sure they’re turned on.

Follow these instructions to use the TikTok application:

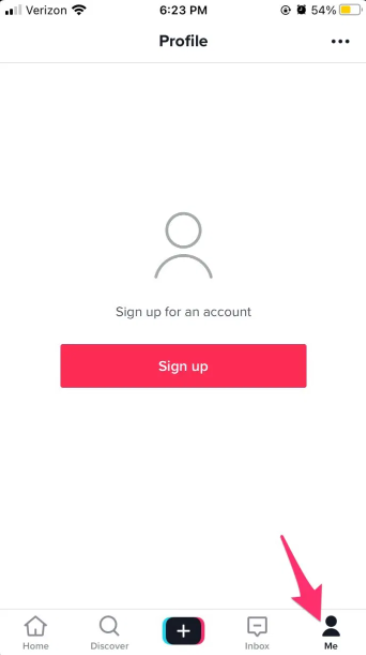
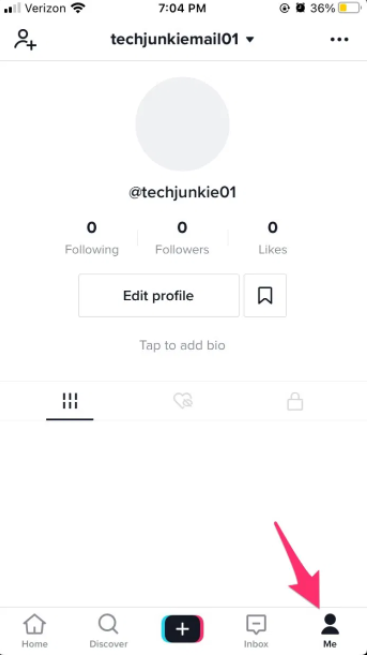
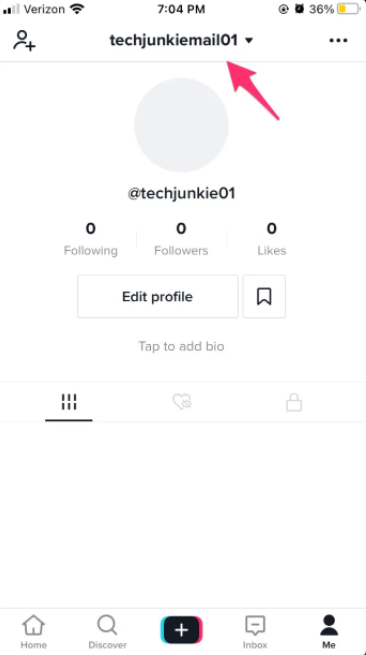
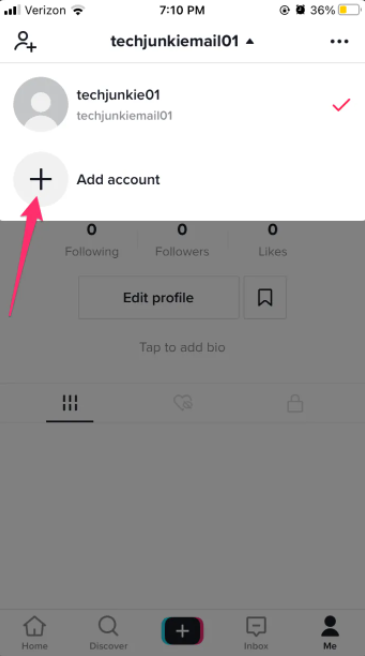
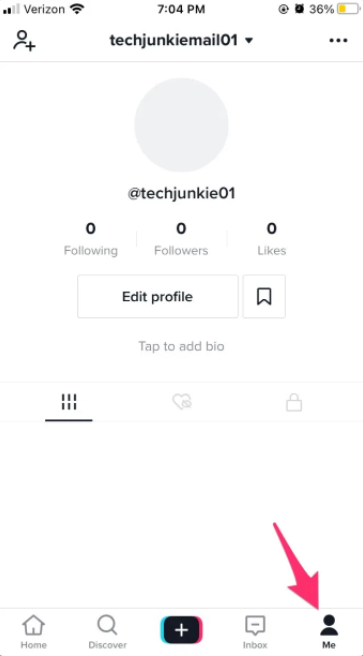
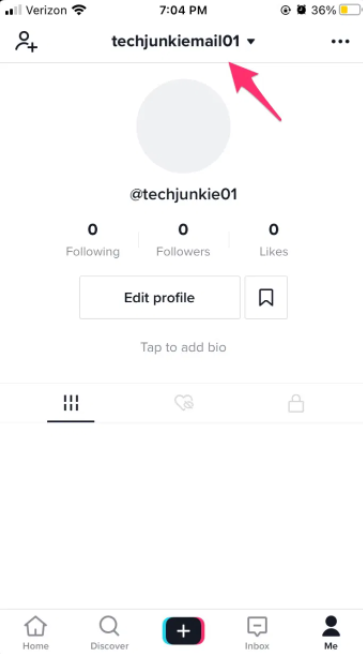
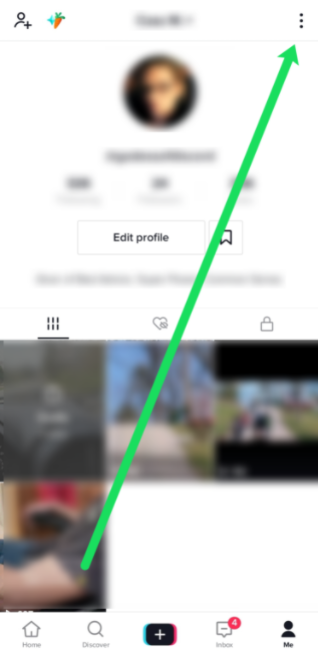
1.  In the lower left-hand corner, press on “Me” icon. Then, in the upper right-hand corner, press on the three vertical dots.

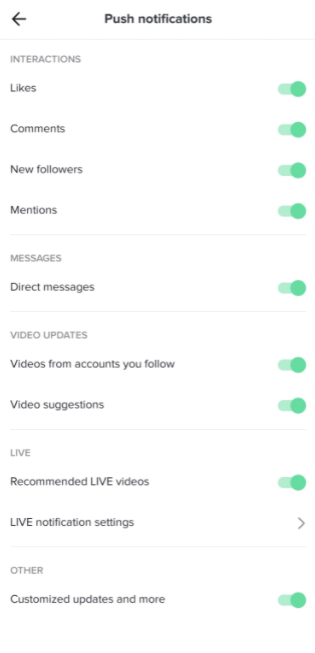
2. Press on ‘Push notifications.’

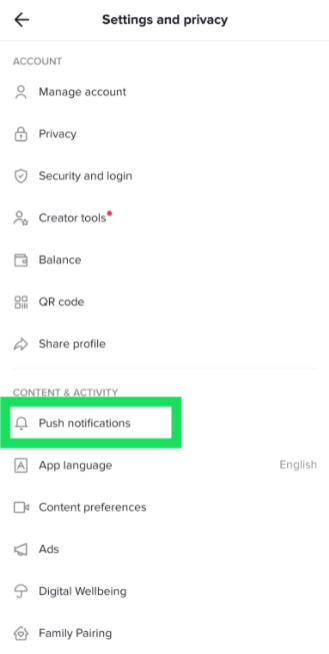
3. Turn on the notifications.

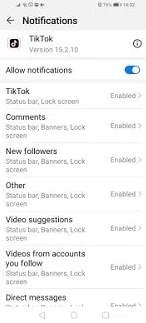
You’ll want to check your phone’s notifications if all of your notifications are turned on. Android users can access the ‘Apps’ option by swiping down from the top of their screen. Then, in TikTok, scroll down and tap on ‘Notifications.’ Check to see if it reads ‘Allowed.’

TikTok notifications may also be viewed in the Settings app for iOS users. After tapping on ‘TikTok,’ go to ‘Notifications.’ Toggle the ‘Allow Notifications’ switch to the green position.

What If Notifications Are Not Working?

You’ll be notified whenever this user uploads a new video from now on. But what if you enable this functionality and it doesn’t work?

Here are a few alternative solutions.

1. Pending Updates

For pending updates, go to the Google Play Store or the App Store. When you miss a few updates, an app may begin bugging.

2. TikTok Notifications Not Allowed

Make sure your push notifications are turned on in the app’s notification settings.

3. Phone Notifications Not Allowed

Check your phone’s notification settings to determine to see if they allow TikTok to send you notifications.

4. Turn Off the Feature and Try Again

Move to the desired user’s profile and turn off the post notifications feature, then turn it back on. It could have been a temporary bug. To make sure this feature is working, try it with some other profiles.

5. Reinstall the App

In some circumstances, reinstalling the TikTok app can assist. It’s possible that a bug occurred during installation, causing some of the app’s functions to malfunction.

6. TikTok May Be Down

You should be patient if this is the case. Because every feature requires frequent updating, any issues with post notifications or other functionality may only be temporary.

Checking the Notification Settings in TikTok

Here’s a brief tip on how to see if your notifications are turned on. Start with the app’s notification settings before moving on to the next step of troubleshooting. Follow these easy steps to get started:

1. On the device, open the TikTok app.

2. In the bottom right corner of the Home screen, press on Me.

3. Press the three-dot icon in the top right corner when you’ve opened your profile.

4. Select Push notifications in the General section.

5. Move the toggle for all the interactions you want to receive notifications for. The toggle becomes green when it’s turned on.

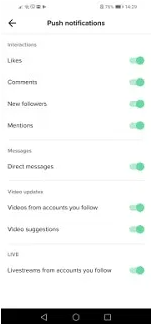
You can select what you want to be notified about in this section, such as new Likes, Comments, Followers, Mentions, Direct Messages, and more.

If you change your mind and want to turn off the notifications, repeat the steps above, but switch the toggle to the opposite side in the final step.

Allow Notifications on Your Smartphone

It’s not always the app that’s messing with your notifications; sometimes it’s an issue with your phone. If TikTok notifications are enabled, do the following:

1. Select Settings from your Home screen.

2. Pull to find Apps and press to open.

3. Press on Apps or Manage Apps, depend on which phone you are using

4. Pull to find TikTok on the list or you can type TikTok in the search bar.

5. Press to open TikTok details and select Notifications.

6. Ensure to flip the toggle button next to Allow notifications to on.

Stay up-to-Date

If you don’t want to miss any information from your favorite accounts, post notifications are a valuable function. When they don’t work, it’s inconvenient, but these fixes will help you remedy the problem.

Have you made your favorite video creators’ TikTok post notifications enabled? Are they effective? Let us know what you think in the comments area.


How To Log Into Multiple TikTok Accounts On Your Phone

How To Log Into Multiple TikTok Accounts On Your Phone

TikTok has developed a massive user base since its inception in 2016. However, as a result, it is becoming increasingly difficult to “trend” on the network. As a result, having many TikTok accounts would be fantastic.

People had been complaining for a long time until the TikTok staff finally listened. Thankfully, you can now have many TikTok accounts. There are a couple caveats, though, which aren’t widely known.

Read on to learn everything there is to know about them, as well as how to create several TikTok accounts without using any third-party programs.

Create a TikTok Account

Let’s pretend you don’t have a TikTok account and walk you through the full procedure from scratch. First and foremost, get TikTok for your device from the official app store. Use the Google Play Store if you’re an Android user. Use the App Store instead if you’re using an iPhone. Even if you already have an account, make sure you have the most recent TikTok update. You won’t be able to have numerous accounts if you don’t do so.

Lastly, to log into TikTok (for the first time), follow these instructions:

1. Go to the TikTok app on your phone.

2. In the lower right-hand corner of the home page, tap the button that says Me. This will open the Sign Up window for you.

3. At the bottom of the window, choose Sign Up.

4. You can sign up using your email address, phone number, or any of your social network accounts (Twitter, Instagram, or Facebook). Choose any approach you ưant, but keep in mind your decision. It’ll help you in creating your future account next time.

5. Please provide a valid birthday (you need to be 13 or older).

6. Once you’re done, press Next.

7. Verify your account by entering your email or phone number. Check your inbox for an email from TikTok, and click the link to confirm your account. (Or, if you used a phone number, check your SMS for a verification code)

8. Once you’re finished, create a password and confirm the prompt.

9. Lastly, you must complete a simple Captcha to prove that you are a human.

How to Log Into Multiple TikTok Accounts

It was simple to create your first account, wasn’t it? Before continuing, make sure you have the most recent version of TikTok if you skipped the first section. When you’re ready, go through the following steps to set up your second TikTok account:

1. Log into your TikTok account (your first account). Simply open the app on your phone and enter your login information. They’ll be saved, and future logins will be automatic.

2. In the bottom-right corner of TikTok’s main screen, tap on your profile symbol (Me).

3. In the top center of your screen, press on your account name.

4. To add an account, press the Plus icon.

5. The signup process will remain the same as before. Instructions can be found in the previous section. Now comes the crucial part: make sure you use a different email address or mobile phone number when signing up. It doesn’t really matter how you sign up as long as you don’t use the same information like the last time.

Important Tips

You should now have two TikTok accounts that work on the same device if you followed our advise. As previously stated, don’t use the same phone number or email address, and you’ll be fine. Because you may easily create free email accounts, we recommend using an email to join up for the second time.

The process will be significantly easier if you already have many email accounts. It’s important to note that you can only have five accounts at a time (at the moment of writing).

If you create several accounts on the same device, your profile will be recognized as a business account. This means your account will be deprioritized, which can only be avoided by gaining more traction. If you pay for adverts on your profiles, that won’t happen.

If you don’t run a business or aren’t an entrepreneur, make sure you use numerous devices if you want to create various TikTok profiles (separate accounts on each device).

How to Log In Your Other TikTok Accounts

Lastly, you can use this method to access your additional TikTok accounts. It’s very simple; just follow these steps:

1. Launch TikTok on your device.

2. Press on Me (profile).

3. At the top of the screen, press your account name.

4. This will switch you to a dropdown menu with all your accounts. Choose to which one you want to log in.

5. You can edit your profile to change your username when you log into the other account. To validate your email, hit the three dots in the top-right corner of the page and select Manage Account.

That should suffice to get you up and start with several TikTok accounts.

More Is Always Better Than One

I Hope, you found this article to be useful and that it supplied you with all of the information you required. Always remember to keep your accounts on distinct phone numbers or email addresses, and if possible, on separate devices.

Do you have a lot of TikTok accounts? Are you utilizing them for pleasure or for work? Please share your thoughts in the comments box.


This PC can’t run Windows 11 – How to solve this error

This PC can’t run Windows 11 – How to solve this error

  • Several customers have reported encountering difficulties while attempting to determine whether their PC is compatible with Windows 11.
  • Despite the fact that machines respect the minimal hardware requirements, Microsoft’s utility returns an error.
  • The key is to have a TPM 2.0 on the motherboard that is turned on.
  • Enabling Secure Boot in the BIOS will also solve the problem.

When testing if their computer is compatible with the next version of Windows, many people are receiving the This PC can’t run Windows 11 problem.

Regrettably, this occurs even on machines that adhere to Microsoft’s minimum system requirements.

When you are actually surfing with your machine on Microsoft’s official system requirements page, the error notice will also appear as This PC will not run Windows 11 after scanning.

We tested this on a cutting-edge Dell XPS 17 machine with massive system needs and can confirm that the reports are correct.

The PC Health Check tool indicates Windows 11 is not compatible, despite the fact that the PC has enough hardware to move mountains.

The issue is usually not with the machine’s hardware, but with the inclusion of a TPM 2.0 chip on the motherboard and a BIOS feature called Secure Boot that must be enabled.

How to fix This PC will not run Windows 11 error?

To begin, double-check that your motherboard has a TPM 2.0 chip. This component is normally present on most machines, however, it may not be on yours if it is genuinely antique. Here’s a quick guide to assist you with the process:

To open the Run dialog, press Windows + R, type tpm.msc, and then click OK.

This should open the Trusted Platform Module (TPM) Management console.

Check the value of the Specification Version in the TPM Manufacturer Information screen. As shown in the screenshot below, this should be set to 2.0.

If you don’t see this console screen and instead get an error instead of compatible TPM not found, that means the TPM chip isn’t installed on your motherboard or is disabled in BIOS.

The TPM state chip must be turned on straight from the BIOS.

Download and change the appraiserres.dll file

1. You must first obtain the appraiserres.dll file from an external source or a Windows 10 ISO image.

2. Mount the Windows 11 ISO.

3. Go to the Sources folder after mounting or extracting the ISO.

4. Locate and delete the appraiserres.dll file from the folder.

5. Copy the received appraiserres.dll file from step one and paste it into the Windows 11 ISO.

6. Reinstall Windows 11 on your computer.

Because the Windows 10 operating system does not check if a computer has a TPM 2.0 chip, replacing the file with the one from Windows 11 forces it to skip this step.

Check if Secure Boot is enabled

Microsoft states that Windows 11 requires a Secure Boot-capable system, but in reality, this functionality must be turned on. Not that simple, right?

To enable Secure Boot, restart your computer and go to the Boot menu. Before booting into Windows, press F2, F11, or the Delete key, depending on the device.

Now look through the Boot menu for the Secure Boot option and turn it on. Explicit instructions differ from one BIOS version to the next, but I’m confident you’ll figure it out.

You can check the PC Health Check Utility again at the end of the procedure, and you should now receive a confirmation message similar to the one below:

Additionally, the message on Microsoft’s official requirements page will now be changed:


How to Recover Deleted Photos from WhatsApp

How to Recover Deleted Photos from WhatsApp

Learn how to recover deleted images from WhatsApp using a variety of approaches, as well as whether this is a viable option for you.

It’s simple to erase photos in WhatsApp by accident, therefore you might be wondering how to recover WhatsApp photos you accidentally lost.

Let’s look at how to get images back from WhatsApp that has been deleted. We’ll go over the many options for obtaining your images back and what you should be aware of in this situation.

Recover WhatsApp Images That Were Saved Automatically

WhatsApp will automatically download photographs from your chats to your smartphone on both Android and iPhone by default. As a result, the first place to look for deleted images from WhatsApp is your phone’s photo app.

Look into the Gallery app or Google Photos on Android. Look in Photos if you have an iPhone. Switch to the Albums tab and seek for WhatsApp to help focus your search. If you know the time the photograph was sent, you can utilize the search tools in your gallery app to see when it was sent.

You’re in luck if you can find your deleted WhatsApp photo! You still have a copy, which you can send or share wherever you choose.

There’s still hope if you don’t see the photo here but utilize cloud storage on your phone. If you utilize your cloud storage app’s camera upload feature, there’s a potential WhatsApp may automatically downloaded the image, which will subsequently be updated by your cloud storage app.

You might be able to find the image in your cloud storage’s Camera Uploads, Camera Roll, or similar folder.

Recover WhatsApp Images From Someone Else

It may still be easy to recover a deleted picture from WhatsApp. Next, see if the individual (or people) with whom you were speaking has a copy of the message with the missing media attached. If you submit an image and then delete it for yourself, it’s possible that it’s still in the hands of someone else in the group chat (or your chat partner).

Request that the person looks through their WhatsApp chat for the photo. If they have it, they can forward you the photo, or they can store it on their phone and send it to you via email or another messaging service.

It’s not true that just because you tapped Delete For Me on a photo on WhatsApp, it’s gone for everyone. The Delete For Everyone option is only visible for roughly an hour after you send a message, making it more difficult to accidentally hit.

We urge that you request image recovery as soon as feasible. The longer you wait, the more likely it is that the other person will delete the image, lose it when they move phones, or something similar.

Restore Deleted Photos From a WhatsApp Backup

If no one else has a copy of your deleted photograph, a backup is the next best option for recovering lost WhatsApp photos. Backups are available in both the Android and iOS versions of WhatsApp (to Google Drive and iCloud, respectively). If you haven’t lost the photo(s) for a long time, restoring your most recent WhatsApp backup is your best hope.

Of course, before removing the photograph, you must have enabled WhatsApp’s backup feature. This won’t work if you haven’t backed up in the past.

Go to Settings > Chats > Chat Backup first. You’ll find details here, such as when the most recent backup occurred and how frequently you’ve set your data to be backed up. If you accidentally erased photos since the last backup, you can restore the backup and recover your photos by uninstalling and reinstalling WhatsApp.

Simply remove the program from your device and reinstall it from the App Store or Google Play. You’ll be asked to authenticate your phone number once more, after which you’ll be given the option to restore your data from a backup, if one exists. Accept this, and WhatsApp will restore all of your messages at the time of backup.

You’ll lose any WhatsApp messages you’ve exchanged since your previous backup if you do this. As a result, before restoring the old backup to get your photographs back, make sure you save any essential messages. Time is the second importance. You’re probably out of luck if a backup was created after you erased the photos.

Recover Deleted WhatsApp Photos From Your Phone’s Storage (Android)

WhatsApp stores every image you send and receive by default on Android and saves it to a designated folder. As a result, you can delete an image from a chat and keep it in this folder on your phone. Drill down to the following folder using a free Android file explorer tool, such as Files by Google:

Internal Memory > WhatsApp > Media > WhatsApp Images

You’ll find all of the photographs you’ve received on WhatsApp in this folder. This one has a Sent folder that contains photographs you’ve sent out. Check it out to check if any of your WhatsApp photos are missing.

If you’re looking for something more than images, you’ll find WhatsApp Video and other files here, which you should check out.

Unfortunately, iPhone users are unable to take this step. This is because the Android Files app allows you to view much of the device’s local folder hierarchy, whereas the iOS Files app only allows you to browse a few cloud folders.

Try Dedicated Recovery Solutions for WhatsApp Photos

When you search for help recovering WhatsApp photographs on Google, you’ll likely come across dozens of tools that claim to be able to help. While they may appear to be a good idea, the reality of recovering WhatsApp images in this manner is bleak.

The great majority of these “recovery” tools, like restoring deleted WhatsApp conversations, aren’t going to help you. Although retrieving WhatsApp photos differs from recovering standard text messages, these tools all have the same major flaws: they either demand root access (on Android) or don’t work unless you pay, or both.

All of these recovery programs have a lot in common. They say that by installing software on your computer and connecting your phone, they can recover your messages. After that, you’ll either get no results, notice that the app requires root access, or be forced to pay to really do the recovery. These include programs like dr.fone, Johosoft, iMyFone, and others.

They’re also not inexpensive. A license can cost anything from $20 to $50, and even if you pay, there’s no guarantee that the program will recover anything.

The WhatsApp Photo Recovery Truth

Unfortunately, having a proper backup before deleting media from WhatsApp is the only method to recover it. WhatsApp does not store your communication history on its servers because the software is end-to-end encrypted by default. You are unable to contact the company in order to retrieve messages or files.

You can’t utilize file recovery apps like Recuva either, in case you were wondering. These programs can’t retrieve files from newer cellphones since they don’t use the USB Mass Storage standard.

Once you’ve deleted a message, the only way to get it back is to use your phone’s backup file or your cloud account. If you have a backup, the reinstall and restore technique outlined above is the best approach to recover it.

You won’t be able to recover those messages without a backup. Deleted photographs won’t appear out of anywhere though you use a recovery app. This is why, in order to avoid such a data loss, it’s critical to back up everything ahead of time.

If you do decide to pursue one of the rehabilitation programs (which we do not encourage), make sure you get started quickly. When you delete a file from your phone, it isn’t immediately erased. Instead, the operating system flags data as safe to delete. When fresh data arrives, it replaces the data that has been marked for deletion.

That means you have the best chance of restoring data as quickly as possible after it has been deleted.

Trying to Get Deleted WhatsApp Images Back

We’ve outlined several options for recovering deleted WhatsApp photos. Unfortunately, most of the solutions rely on planning ahead of time before the situation arises, but there’s still a chance you’ll be able to recover your photos.

Otherwise, you’ll know what to do in the future to keep your photos safe.


How to set up a VPN on Android, Windows, and other platforms

How to set up a VPN on Android, Windows, and other platforms

Are you trying to set up a VPN account on your phone or tablet? It’s honestly not that difficult. We’ll take you step by step through the procedure!

As we do more online, especially now when practically everyone is stuck at home, it’s more critical than ever to keep your activities secure and confidential. Some of these issues can be addressed with the use of a reliable VPN (virtual private network). Want to set up a virtual private network (VPN) on your phone, laptop, or tablet? Here’s how to do it.

Set up a VPN on Android smartphones

Because VPN support is built into Android, you can easily set it up without having to download an app from the phone’s Settings menu.

How to manually set up a VPN on Android

1. Open the phone’s Settings menu. Keep in mind that the steps below may differ based on the device you’re using.

2. Select Wi-Fi & Internet or Wireless & Networks. Navigate to the network settings page.

3. Select VPN. On some smartphones, you may need to touch More first to broaden the selections.

4. In the top right corner, tap the + sign. If you don’t see one, go to the advanced options menu and look for it (usually by tapping on the three vertical dots icon).

5. Fill in the required details, such as the server address, username, and password. The network administrator will give you with this information.

How to manually connect to OpenVPN networks on Android

An Android phone’s built-in VPN capability supports PPTP, L2TP, and IPSec protocols. None of them are really secure, and PPTP in particular is quite old. If you absolutely must, or if the OpenVPN protocol isn’t available for the private network you want to connect to, use this method.

1. You’ll have to use a third-party program like OpenVPN Connect to connect to OpenVPN. OpenVPN’s official app is compatible with any Android device running version 4.1 or higher.

2. The Google Play Store is where you can get the app. The essential information should be provided by your network administrator. You can import a profile from a URL or from a.ovpn file on your phone using the app.

3. A proxy connection can also be added manually.

4. You can choose the protocol, enable a kill switch (called Seamless Tunnel), and set up a power saver mode in the settings area.

Set up a VPN on Apple devices

VPNs can be set up directly on all iPhones, iPads, and Macs. On macOS, you’ll need to do a few extra steps, but it’s simple on iOS.

How to manually set up a VPN on iOS

1. Unlock your iPhone or iPad and launch Settings.

2. Press on General and choose VPN.

3. Press on Add VPN Configuration.

4. The essential information will be provided by your network administrator. The VPN protocol, VPN settings (remote ID, server), and authentication login information are all included.

5. To save the profile, tap Done once it’s finished.

6. Using the slider toggle on the VPN tab, you can now enable or disable the VPN connection.

Manually setting up a VPN on macOS

1. Tap on the Apple menu (Apple icon) and navigate to System preferences > Network.

2. Tap on the “+” icon.

3. Select VPN on the Interface menu that pops up.

You’ll need to go over each area and fill in the blanks with the necessary information.

1. First, choose VPN Type, then VPN Protocol, give it a name, and then choose Create.

2. The server address, authentication and login information, as well as any additional settings that the network administrator might have.

3.  Choose Apply, then choose OK.

4. Launch System Preferences > Networktap on the VPN service name and tap on Connect to connect to the VPN.

5. You might choose Show VPN status in the menu bar and use the status icon to connect to the VPN network quickly also.

How to set up a VPN on Windows 10

Before you can quickly and simply connect to a VPN on Windows 10, you’ll need to create a VPN profile.

Manually set up a VPN on Windows 10

1. Launch Settings > Network & Internet and choose VPN.

2. You might tap on the Windows 10 search bar and enter VPN, and choose VPN Settings also.

3. Tap on Add a VPN connection

4. Fill up the rest of the form using the network administrator’s information and change the VPN Provider section to Windows (built-in).

5. In the Wi-Fi area, the VPN is now available. Select the created VPN connection by clicking on the Wi-Fi icon in the system tray.

Setting up a VPN on Chrome OS

On Chrome OS, Google has made it quite simple to set up a VPN. The only other alternative is to use a VPN provider that includes a Chrome browser extension, but there aren’t many.

How to set up a VPN on Chrome OS

1. Tap on your account photo in the bottom-right corner of the screen.

2. Go to Settings and choose Add connection in the Network section.

3. Choose Add OpenVPN/L2TP.

4. Enter the info required into the form that pops up and choose Connect.

Before you can manually set up a VPN, you may need to install server and user certificates. The network administrator or VPN provider should have all of the necessary information.

Get a VPN service!

Everything discussed above is for anyone working remotely who wants to connect to a business VPN network. If you’re looking for a VPN for personal use, signing up for a third-party VPN is the simplest solution.

These companies work with a variety of devices and platforms. The apps are simple to set up and use, making them a delight to use. After you’ve signed up, all you have to do now is download the appropriate app and you’re ready to begin.

Our VPN recommendations

ExpressVPN comes highly recommended by me. It’s one of the most user-friendly VPNs available, with compatibility for a variety of platforms and devices as well as fast connection speeds. It is, however, on the more pricey side, which not everyone will like.

NordVPN is just as good as ExpressVPN. In reality, it has a number of things working in its favor. Nord has a large number of servers and a variety of additional security mechanisms. It is also incredibly affordable due to its long-term ambitions. However, I found the connection speeds to be faster with ExpressVPN. Although your experience may vary, you can’t go wrong with either of these solutions.

Another popular choice is Cyberghost, which is ideal for individuals who wish to eliminate the guesswork out of it. It simplifies things by categorizing everything into modes and categories. Positives include a large number of servers, excellent security features such as virus filtering, and a cheap price tag. Although connection speeds were a concern, that’s also improved time.

More services, such as BullGuard, SaferVPN, StrongVPN, PureVPN, VPN Unlimited, and IPVanish, have also been reviewed. Many more are in the works, including one about which I’ve only heard wonderful things – SurfShark.

iPhone Ear Speaker Not Working? Here’s The Fix!

iPhone Ear Speaker Not Working? Here’s The Fix!

Is it difficult for you to hear your buddy on the other end of your iPhone? Is your iPhone’s ear speaker not working properly? In this post, I’ll explain how to fix your iPhone ear speaker when it just won’t cooperate!

Turn Up The Volume When Making A Phone Call

When making a phone call, I recommend bumping up the volume before trying anything else. Keep in mind that you’ll have to modify the volume during the call because these settings are separate from the rest of your iPhone’s volume settings.

Remove The Case and Clean Out All The Speakers And Microphones

If adjusting the volume doesn’t work, take the case off and clean out all of the speakers and microphones. Consider how much dirt and dust particles your iPhone acquires on a daily basis. It’s probably overdue to clean your iPhone if you haven’t done so in a while.

Make sure to thoroughly clean each speaker and microphone. One microphone is in the earpiece, one is near the charging port on the bottom, and one is on the back of your iPhone near the camera lens. The best instrument for the job is an anti-static brush or a fresh new toothbrush. And don’t forget to be gentle!

Turn Off Phone Noise Cancellation

Phone Noise Cancellation is a useful feature, but it can occasionally cause more harm than good. While it’s designed to block out background noise, it can make your calls seem a little choppy at times.

Follow these procedures to switch off Phone Noise Cancellation:

1. Go to Settings.

2. Click Accessibility.

3. Press Audio/Visual.

4. Turn off Phone Noise Cancellation.

Reset All Settings

It can be difficult to pinpoint the source of some software issues. As a result, we recommend that you reset all of your iPhone’s settings. Everything in the iPhone Settings app will be reset to factory defaults.

You’ll need to reinstall your wallpaper, re-enter your Wi-Fi passwords, reconnect your Bluetooth gadgets, and so on. It’s a tiny fee to pay to have your iPhone back in working order.

Go to Settings and click General -> Reset -> Reset All Settings to Reset All Settings.

Comparing Your Repair Options

If the ear speaker on your iPhone is still not working, it’s time to look into some repair possibilities. The Apple Store is always ready and willing to assist you with your iPhone requirements. The Apple Store should be your first stop if you have AppleCare+. Just make sure to set up a meeting first!

You can also rely on Puls, a technology-focused maintenance firm that comes to you. Either business will undoubtedly resolve your iPhone issue.

Check Out The UpPhone Comparison Tool

If everything else fails, it may be time to upgrade to a new phone. If that’s the case, the UpPhone comparison tool might assist you in your search. This comparison tool makes phone shopping simple and straightforward!

I Can Hear You Now!

Your iPhone’s ear speaker is now operational, allowing you to make phone calls again. You’ll know what to do the next time your iPhone’s ear speaker stops working. Do you have any other questions? Leave a comment!

1 3 4 5 6 7 15