5 easy ways to repost (regram) on Instagram

5 easy ways to repost (regram) on Instagram


1. Using repost apps

The simplest approach to reshare Instagram photos is to make a new post with the same image or video, although this can be time-consuming. Using third-party software is one of the most traditional methods for resharing photos. For both iOS and Android users, there are numerous options.

These programs are somewhat intuitive — for example, here’s how to use Repost on Instagram:

1. Open the Instagram app and look for the post you want to share again.

2. Choose “Copy Link” from the three-dots icon in the top-right corner of the post.

3. Go to Repost for Instagram and paste the link.

4. When you’re ready, simply tap on the post, make any changes you desire, and then tap “Repost.”

2. Share the post’s link 

You’ll receive these three options if you click the menu icon on someone else’s Instagram post:

  • Report
  • Copy Link
  • Share on Messenger

You can either copy the post’s direct link or share it using Facebook Messenger.

You’ll receive a few more options if you tap the same menu on one of your own Instagram posts:

Click “Share,” then add a caption to your Instagram post and share it on Twitter, Facebook, or Tumblr. Of course, Instagram is conspicuously absent from this list. So, what’s the way to reshare something on Instagram? There are a few workarounds, thankfully.

3. Share the post as your story

You can share other people’s posts as your Instagram Story, but not as a solo post. This is a brand-new feature that debuted in May 2018 and appears to be here to stay — at least for the time being.

To share someone’s post as part of a story:

1. Under the post you wish to share, click the paper aircraft (sharing icon).

2. Choose “Add Post to Your Story.”

4. Take a screenshot

You can always utilize the screenshot if you don’t want to download another program (or deal with switching between two apps):

  • To share a photo, take a screenshot of it.
  • Make a new Instagram post with that screenshot as the image.

After you’ve taken your screenshot, select it from your gallery and repost it on Instagram. (Either indicates the author’s username in the image or ask permission to repost.)

5. Use A Post’s Embed Code

Using the embed code from a post, you can repost an Instagram photo on your website. Go to Instagram and look for the post you’d like to share. Choose Embed from the three-dot icon in the bottom-right corner of the post.

If you don’t want the original caption to appear in your Instagram repost, uncheck the box. Tap the “Copy Embed Code” button.

Paste the embed code wherever HTML is allowed on your website or blog. The sample below demonstrates how the code would appear in HTML view on Blogger’s Compost post page. When you return, the placeholder for the post should be filled in automatically.

How to repost a story on Instagram


You can repost an Instagram story in two ways. The first option is once you are tagged in a story and the second one is to repost a story on Instagram when you aren’t tagged. The first way is a piece of cake.

How to repost a story o Instagram when you are tagged

You’ll get a notification when someone mentions you in their tale, with the option to ‘Add this Post to your Story.’

You’ll be able to edit the story if you select that option. This is where you should credit the creator of the original content.

How to repost a story o Instagram when you are not tagged

This approach requires you to either take a screenshot of the tale, download it using any third-party story-downloading tools, or request permission from the original poster to accept and send to you that actual tale so that you can repost it as your own.

In either case, you must obtain the permission of the original poster to avoid any repercussions or complaints.


Everything about Location Tags on Instagram

Everything about Location Tags on Instagram

Geotagging is the process of adding “Geographical information metadata” to a media, such as location data (longitude, latitude, and so on), such as to photos taken with our phones. This is the purpose of Instagram geo-tagging.

I’ll show you how to use Instagram location tags to increase engagement on your Instagram account in this post.

How to add a Geotag to your Instagram post?

You arrive at the screen where you add a caption, tag usernames, and add a location after editing and filtering your Instagram post.

Instagram will show you “Location” around you where you were when you took the photo! If you can’t find the right location among the options, touch “>” to expand your search. Simply pick your place and post as usual.

How to add location tags to your Instagram photos after it has been posted?

If you have an iOS device, you may enable the location service so that the geotag metadata is automatically added to every photo you take. You can do so by following the instructions below:

1. Launch your iPhone settings

2. Press on the privacy site.

3. Open your location services and turn it on.

4. Make sure that any camera app you use, including Instagram, has the location service switched on.

When you upload a photo with location tags on Instagram, the platform should be able to understand the information and recommend the place when you search for it. Although it is not always accurate, you can write in your location’s name and Instagram will look for it. The issue is that we often neglect to set the location while posting on Instagram, resulting in a blank location section on our post.

Don’t worry; we’ll show you how to solve it quickly.

You can change the location tags on your Instagram posts by adding, editing, or removing them. Simply follow the steps below:

1. Navigate to your Instagram post (photo or video) to which you want to add the location.

2. At the top right of the screen, tap the Three-dot icon.

3. Click Edit on the menu.

4. Now you are led to the edit page, where you may update your caption, username tags, and add a location. Press on “Add location,” search for your location, or use the arrow to search automatically.

5. You are done.

How to add location tags to your Instagram stories?

A location sticker can be used to add a geotag to your Instagram story.

1. Add a photo or video you want to share.

2. Press on the sticker icon.

3. On the menu, select the location sticker.

4. Type your location.

5. You are done.

Having your business as a location option

For location-based enterprises, this can be extremely useful. Instagram has based on the Foursquare app’s API for location results in the geotag list of companies. The platform has the option of transferring this information to Facebook’s location data. If your business is registered as a location on either of these systems, it will appear in the geotagging search results. Keep in mind that if you establish a custom location, it will only be viewable to you. It will not make it available to the general public. Having your brand labeled as a location, on the other hand, allows Instagram users to “check-in” to your business. This is why it’s so beneficial. To begin with, anyone who clicks on that geotag location can see all of the other posts that have been uploaded to that area. This can be beneficial not just in terms of promoting your services or products, but also in terms of reaching out to a new audience. Travelers and newcomers to the area can use the geotags to determine whether or not they wish to buy from you.

These geotagged photos also make it possible to collect user-generated material (UGC). All of these posts from your audience (if they have public accounts) will appear in the geotag search, which you may share with your followers. This demonstrates to your audience that you are aware of and value your current clientele, as well as giving them a different viewpoint on your business.

How to add a custom location on Instagram?

This is how to add a custom location to Instagram step by step:

#1 Make sure your Facebook location services are turned on.

To begin, make sure your mobile Facebook app’s location services are turned on. You won’t be able to establish a new custom location unless you do so. The majority of people will have it switched on by default, so double-check it in your settings.

#2 Create a Facebook check-in status update

Create a check-in status update after logging into your Facebook app. Simply press the location button and then choose a selection from your nearby locations.

#3 Type your custom location title in the search box

To add a custom location to Instagram, tap the search box and type it in exactly how you want it to look. But keep in mind that the initial letter should be capitalized, and symbols and emojis aren’t allowed in your custom location.

#4 Tap “add” to create your custom location

Make sure everything is written correctly, then tap the “Add” button and write down the name of your custom place. The next step is to select a Category and a Location. You can choose your present location by using the “I’m here right now” button, or you can search for another area and select it instead.

To add your new custom location to the Facebook database, hit the “Create” button in the upper right-hand corner of the screen.

Hope this helps!


How to Know if Someone Blocked You on Instagram?


How to Know if Someone Blocked You on Instagram?

A person may have blocked you for a variety of reasons. People may block others to protect themselves, but it can be difficult to tell if someone has blocked you on Instagram.

Whatever the case may be, you may be unsure whether someone has blocked you or closed their account. Everyone already knows that there are numerous tools available on the Internet for growing an Instagram account or learning about other topics such as block status or unfollowing. However, there are a few quick and easy ways to determine if somebody has blocked you.

How to know if someone blocked you on Instagram

In general, Instagram will not allow you to access any information about the person who has blocked you, including their posts, followers, or ability to find them on the platform. As a result, when you look at the profile, it appears to be a desert.

When someone blocks you on Instagram, all of their likes, comments, and direct messages (DMs) vanish. When you open their profile, you’ll notice that there are no posts yet and that User Not Found is shown. They also vanish from your following and follower list.

So, here are some general signs you can find out if you are blocked on Instagram by someone:

  • You are unable to locate the user using the search bar (if you have not searched before)
  • Their following is hidden from view.
  • You are unable to view their posts.
  • Their followers are hidden from view.
  • None of their Instagram stories are visible.
  • Even if you send a message, they will not receive
  • They are unable to view your posts and comments.
  • Their chat through direct messaging vanishes.
  • If you search by other accounts, the look for you and them is different.

If you’ve already searched for that person’s name in the search box, you might be able to discover it even after they’ve blocked you, but it’ll vanish after a while. So, the best approach to find out is to use other Instagram profiles to look for the individual discreetly.

To find out if you have been blocked on Instagram,

1. To begin, open the app. Then fill in the name of the person you believe has blocked you. If you’ve already searched for it, you’ll be able to see the username.
2. Once you’ve found the person you’re looking for, click on his or her name to go to his or her profile. You should be able to see his/her photos without issue, but if you can’t, it’s possible that you’ve been blocked or that their Instagram account has been canceled.

If the person you suspect has blocked you, you’ll be able to locate their name in the search bar, but you won’t be able to see their photographs once you reach their profile, despite the fact that the top bar indicates the individual has images in their profile (picture below).

This should not be confused with someone who has deactivated their Instagram account or has been blocked by Instagram, since this could also be the case. You may also utilize third-party programs like Unfollowgram to see who has unfollowed your account, as the person who blocked you will cease following you instantly but again, it’s possible that your friend simply quit following you without blocking your account.

How to know if someone deleted or deactivated their Instagram account

If you try to view a person’s profile but are unable to do so from your account, you have most likely been blocked. If you’re still not sure, try seeing that person’s profile from a different Instagram account. If you can see the profile of another account perfectly, you’ve been blocked.

Although Instagram may display a message button on their profile, if you have been blocked by someone, your private message will not be received. Furthermore, there is no way of knowing if the recipient of your private message has read it.

Nevertheless, you can contact the person you believe has blocked you by using @username in a post or remark. However, it seems that they will not see your message.

When you block someone on Instagram, the same thing could happen. Unless you unblock them, you won’t be able to send them messages or see their posts or profile.

Here’s an infographic with the main indicators that you’ve been blocked on Instagram:

Overall, you can tell whether someone has blocked you on Instagram by looking at the profile’s looks, but be sure you may still use other Instagram accounts. There are also various online tools, such as profile viewer, that can be used to see if their accounts have been deactivated or erased.


How to Do MLA Format on Google Docs

How to Do MLA Format on Google Docs

In This Post, we will show you:

You should know how to handle MLA format on Google Docs if you use Google Drive for academics. You can use a Google Docs template, but it also helps to know how to set up MLA format manually.

                Note: The instructions in this article are for Google Docs on the web. All web browsers and operating systems follow the same procedure.

What Is MLA Format?

While your instructor may have special criteria, the following are the standard MLA format guidelines:

  • 12 Times New Roman font size
  • Text should be double-spaced with no extra spaces between paragraphs.
  • Page margins of one inch on all sides
  • Every page has a header with your last name and a page number in the top-right corner.
  • In the top-left corner of the first page, write your full name, the instructor’s name, the course name, and the due date.
  • Above the body content, a centered title
  • A 1/2 inch indent is used to start body paragraphs.
  • A Works Cited page at the end of the paper.

How to Use an MLA Format Template in Google Docs

Google Docs provides some templates that might assist users get a head start on document layout. One such template is the Google Docs Report MLA add-on. Using this template, establish MLA in Google Docs:

1.  Choose File > New > From template in a new document.

2. A new browser tab will open with the template gallery. Choose Report MLA Add-on from the Education area by pulling down.

              TipOther academic styles, such as APA, have templates as well.

3. A new document containing dummy text will open, which you can replace with your own. The document’s formatting will already be in place. The only thing you’ll need to change is the words.

How to Do MLA Format on Docs

You can manually set up MLA format in Google Docs if you don’t trust utilizing a template or if you have a changed version of MLA format. You can store it as your own customized template once you’ve set it up so you don’t have to do it again the next time you require the format.

1. Alter the font to Times New Roman and the font size to 12.

             Note: There is no need to modify the margins because Google Docs utilizes 1-inch margins on all sides by default.

2. Choose Insert > Headers & footers > Header.

            TipIf you’re using Google Docs in a web browser, removing the headers from your Google Doc afterward is an easy task. If you’re using Google Docs on an iOS or Android smartphone, it’s a little more difficult.

3. It’s worth noting that the header font reverts to the default. Change the font to Times New Roman 12 point, then choose Right Align.

4. Tap Insert > Page numbers, then type your last name followed by a space.

5. Make any necessary changes to your Page numbers selections, then click Apply.

6. Choose Format > Line Spacing > Double by clicking or tapping anywhere below the header.

              Tip: Alternatively, you can choose Double by clicking the Line spacing symbol in the toolbar at the top of the page.

7. Write your namethe instructor’s namethe course name, and the due date on separate lines.

8. To move to the next line, press Enter, then pick Center Align and type your paper’s title.

              Note: Every keyword’s first letter should be capitalized. Don’t utilize bold, italics, and other text formatting options.

9. To move to the next line, press Enter, then select Left Align.

10. To indent, press the Tab key, then begin entering your first paragraph. Make an indent at the start of each new paragraph.

11. Choose Insert > Break > Page Break after you’ve finished writing the body of your document to generate a blank page for the Works Cited page.

How to Set MLA Works Cited in Google Docs

The words “Works Cited” (without quotation marks) should be centered below the heading on the last page of your report. Depending on the type of source, each work cited item has a different format. Use this format for articles found on the internet, for example:

  • Author name (last, first). “Title.” Publication, Date (day, month, year). URL. Accessed date.

As a result, an entry for an online news article would look like this:

The author’s last name should be used to alphabetize the sources. A hanging indent should be used for all works cited entries, which means that each line after the first should be indented.

               Tip: Visit the Purdue Online Writing Lab (OWL) website for particular examples of how to style various sorts of sources in MLA format.

How to Create a Hanging Indent in Google Docs

To create a hanging indent for your Works Cited page in Google Docs, follow these steps:

1. Choose Format > Align & Indent > Indentation options for all of the text on your Works Cited page.

2. Select Hanging from the Special indent choice box in the Indention settings dialog box, then Apply.

Note: For MLA style, the default ident of 0.5 inches is appropriate.


How to Fix Youtube Videos Black Screen [Easily]

How to Fix Youtube Videos Black Screen [Easily]

You’d like to watch a YouTube video. A video player appeared after you clicked the video on YouTube. You were eagerly anticipating the video’s loading and play. However, after a while, you noticed that nothing was playing on your screen. The video player on YouTube was completely black.
In truth, this is a quite typical issue – many YouTube viewers have experienced the “YouTube videos black screen” problem. For a period, they may not be able to see any images. However, in many cases, the issue persists throughout!
When you encounter this problem, you may become really frustrated! You can’t even watch YouTube videos! And perhaps you’re frantically searching the Internet in the hopes of rapidly resolving the problem.
Don’t be concerned. The strategies listed below are really helpful in resolving your issue. They’ve helped a lot of people get their YouTube videos back, and they might be able to help you as well. Simply give them a chance! (You don’t have to try them all; just work your way down until you discover one that works for you.)

» Read more

How to Stop Videos from Automatically Playing On Instagram

How to Stop Videos from Automatically Playing On Instagram


Instagram’s video autoplay is one of those essential things that isn’t going away. You’ll see vivid photographs of different people as you go through your Instagram feed, but then a video in the feed will start playing by itself. One of the reasons for Instagram’s excessive data consumption is the auto-playing of videos. Instagram provided a feature to turn off its video autoplay settings at launch, but you probably won’t able to do so now. Is that true, though? Is it true that we can’t turn off Instagram’s video autoplay? No way, no how!

If you’re annoyed with videos playing automatically on Instagram, there are a few options. You may wish to disable autoplay since it consumes a lot of mobile data, wastes your battery, or clogs your phone memory.

This method will assist you in stopping videos from auto-playing on Instagram for any reason.

» Read more

How to send a large video file from your iPhone to another device in 3 ways

How to send a large video file from your iPhone to another device in 3 ways

  • You cannot email a file larger than 25 megabytes using an iPhone, which can make it difficult to send large or long videos.
  • You can work around these file size limits to send a large video using the iPhone’s Mail Drop feature, which sends content via iCloud, or by using a third-party platform like Google Drive.
  • If you are sending a video to someone nearby, then you can transmit even very large videos directly with the iPhone’s AirDrop feature.

So, you’ve got a fantastic iPhone video that you can’t wait to show off to your friends? You can forget about sending anything by email if it’s greater than 25 gigabytes, which most videos of any kind are.

You’ll almost certainly get a “Message Not Delivered” notification if you transmit a movie that’s longer than around three and a half minutes over iMessage or text.

Luckily, there are a few options for sending huge films from your iPhone that get around these restrictions. The easiest of all is AirDrop, a built-in feature you’ve probably heard of that has no file size limit.

How to send large videos from an iPhone

Sending large videos via AirDrop

AirDrop, which sends data over Bluetooth, allows you to send huge files. They must be connected to iCloud and have Bluetooth enabled.

1. Make sure the recipient is within a dozen feet of your phone (and that AirDrop is enabled in their settings), then open the photo app and choose the video to send.

2. Choose the share button (a box with an upward-facing arrow coming out of it) in the bottom left corner of the screen.

3. Press the intended recipient’s name in the AirDrop section. The sending will begin once they confirm.

Send large videos via iCloud

You can also transmit huge files via iCloud using Mail Drop, an Apple tool.

1. Choose the video to send from the Photos app, then press the share icon.

2. Choose the mail button and wait for your phone to prepare the video.

3. Wait for a pop-up window that says, in part, “This attachment may be too large,” and offers Mail Drop as an option after you compose and send your email. To send the video via iCloud, tap Use Mail Drop. The recipient will soon be able to download it from the cloud.

Share large videos on iPhone using Google Drive

Google Drive is a cloud-based storage service that you may use on your phone or PC. You can share any file you upload to it with anyone who has an email account.

1. Download the Google Driver app first if your device hasn’t had it yet, then open it.

2. In the app, click the colorful plus (+) icon in the bottom-right corner.

3. Choose Upload on the popup menu, then tap Photos and Videos.

4. Begin the uploading process by selecting the video to be uploaded.

5. Locate the video and hit the three dots next to it once it has been uploaded.

6. Click Share in the menu that opens.

7. Fill in any email addresses you want to send the file to in the “People” area at the top of the page.

You may now go to your Drive and share the video with anybody you choose.

What To Do When The Power Button Of Your Android Phone Is Broken?

What To Do When The Power Button Of Your Android Phone Is Broken?

A broken power button appears to be the end of your device’s life. But don’t worry; there are many options for keeping your smartphone operational even if the power button on your Android phone is broken.

Not all methods are compatible with all devices. We’ve prepared a list of options for dealing with a broken power button in this post, and you may pick the one that works best for you.

If your power button is acting up, the most critical thing you can do to keep access to your device is to enable USB debugging and Scheduled Power ON.

How To Turn ON USB  debugging on Android?

1. Launch your Settings app.

2. Select Developer Options from the menu. If Developer Options isn’t available in Settings, open About phone and press on Build number a few times until you see a pop-up window that says “You are now a developer.”

3. Turn Developer options on.

4. Locate USB debugging and press on it to turn it on.


How To Turn ON Scheduled Power ON

You can turn Scheduled power ON/OFF in Settings to automate power ON and power OFF if your device supports it. If your smartphone shuts down due to a damaged power button, you may rest certain that it will restart at a pre-determined time.

1. Open the Settings. In the upper right corner, use the search button to look for “Scheduled power ON/OFF.”

2. Toggle Power ON and choose a time for it to turn on every day.


How To Unlock Your Android Device When Power Button Doesn’t Work

There are two instances in which you can be trapped with a broken power button. It’s possible that your device is switched on or off. Try not to let your smartphone turn off because gaining control of it without a power button is considerably easier when the gadget is turned on.

Ways to restart your device with a damaged power button when the device is OFF.

  • When your device’s charge is completely exhausted, simply connecting it to the charger may be enough to restart it. To boot into the recovery menu, try pressing your volume buttons in different combinations. By pressing the Power button in there, you can select “reboot system now.”
  • Use a USB cable to connect to a PC or laptop. This step may also cause the device to reboot.
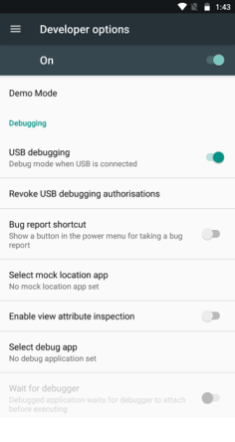
  • You can use ADB commands to restart your device if USB debugging is enabled. ADB drivers can be found here or here. After installing your device drivers, reboot your device using the “adb reboot” command. Follow the online instructions for your specific device.

How to unlock your device with a broken power button when your device is in the switched-ON state

When the device is switched on, it is significantly easier to wake the screen. You might try calling your device from a different number to get the screen to light up. The screen may also be turned on by connecting the charger or a USB cord. The touch of a fingertip will wake up devices with fingerprint sensors.

Use double-tap to wake

There are other options that can assist you in turning on your phone without using the power button. If you have the double-tap to wake function turned on, for example, you can use it to wake the screen and input the password. So, if you haven’t already, try enabling it in the Settings.

Apps can also be used to compensate for the lack of a power button. These programs can switch your screen off, wake it up, or perform the most basic function of starting up your device.

Apps to replace your power button

Note that most apps of this type make use of device administrator rights. You must first go to Settings>>Device Administrators and untick the app from the list before deleting it.

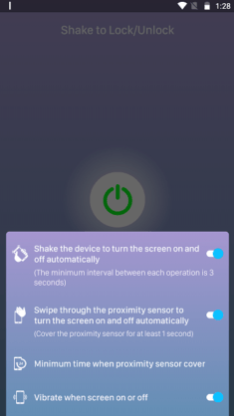
Shake to Lock/Unlock

It’s a simple app that does exactly what the name suggests. A simple shake can both wake up and switch off your display.
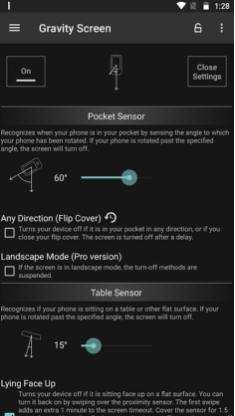
Gravity Screen

If your power button is broken, Gravity Screen is a fantastic app to have. When you put your phone in your pocket or on a flat surface, it might automatically turn off the screen. While the device is in motion, you can select to keep the screen on. Gravity screen allows you to customize its various sensitivities by setting your own parameters.

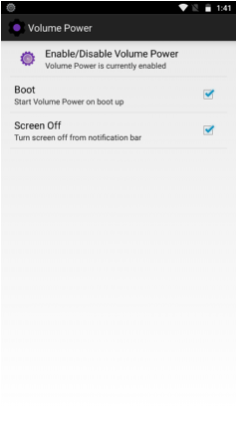
Power Button to Volume Button

This program can turn your volume button into a power button, allowing you to wake up your screen from sleep mode. However, you will not be able to use it to restart your device. It can also display a persistent notification in your notification panel that. When you tap on it, your screen will be turned off.

Although these apps are useful, they can be draining on your battery and shorten its life over time. Consider these apps and procedures as a temporary remedy before visiting a nearby store to get your device serviced permanently.

So, if the power button on your Android phone isn’t working, you can use one of those methods to unlock it. In terms of repairing your broken power button, there are two ways.

Hard reset your Android phone

Your malfunctioning power button could, believe it or not, be the consequence of a software issue on your phone. As a result, you should try resetting your device to restore functionality.

Check your phone’s manufacturer’s website to see whether they’ve produced a device reset tool for it. When I soft bricked my Sony Xperia while installing a custom ROM, I discovered one.

Send it for repair

If the power button is physically destroyed, resetting the phone will not cure the problem. Sending your phone in for repair is the next natural step. Maybe your phone is still under warranty, in which case you’ll be able to get it mended for free.

Were these suggestions for dealing with a broken power button helpful? Let us know what you think in the comments.


How to easily combine videos on your iPhone using the iMovie app

How to easily combine videos on your iPhone using the iMovie app

  • Using Apple’s free iMovie program, you may combine videos on your iPhone into a single video file.
  • You may use iMovie on your iPhone to assemble various videos, add transitions, and export your final video.

If you record a lot of video with your iPhone’s Camera app, you may want to use a simple video editor to polish it.

You undoubtedly already know how to trim a video’s beginning and finish points in your Photos app, but you may not be aware that Apple has a free video editing program that allows you to combine many recordings into a single, longer video.

If you haven’t already had iMovie, download and install Apple’s iMovie program to get started.

Take a look at the following items referenced in this post:

» Read more

10 fixes to try if Android hotspot is not working

10 fixes to try if Android hotspot is not working

You don’t have access to Wifi because you are on vacation, but you do have your laptop. Your cellphone data is the only thing that keeps you linked to your office. There is a pressing need to send your product proposal to an international client right now. So, what are your thoughts? Yes, you use your laptop to connect to your mobile hotspot. Your internet issues have been resolved, and you can now breathe a sigh of relief. Consider what would happen if your Android hotspot stopped operating.

You won’t be able to send the letters of clients any longer, which could be a game-changer for you as a business owner. This is why we’ve come up with some fantastic methods that will show you how to fix an Android hotspot that isn’t working. So, without further ado, let’s get started.

Making sure the internet connection is available

Many Android users share their hotspot connection so that it can be used on other devices such as tablets and laptops. Even if the connection is stable, they are unable to launch any online page or application if the android hotspot is not connected to the internet. Have you ever been perplexed as to why this occurs?

If your internet plan has expired, this will occur. To avoid this problem, it is recommended that you set a daily data plan restriction. If all of this seems too much for you, call your service provider and request that they enroll you on a plan with unlimited data per day.

Turning off the Wifi and switching it back on

There’s a risk that your wifi is having trouble getting the connection in some circumstances. In this instance, you could try turning off wifi and then on again. Go to the top edge of your Android phone and swipe down the bar from there. There is a wifi option available there. It should be turned off and then on again.

Restarting your phone 

Computers and smartphones have similar functioning mechanisms. When your computer unexpectedly hangs, your first reaction is to shut it down. After restarting it, you’ll see that it’s running smoothly again. The same thing occurs with your Android phone. As soon as you restart your phone, it clears off a number of problems, glitches, logs, and device cache. So all you need to fix the Android hotspot no internet problem is a simple restart.

Recreating your hotspot

This essentially means deleting the old password and replacing it with the new one on your hotspot. Replacing your old password with a new one is a good idea. You’ve just created a new hotspot for your Android device by doing so. We’ll move on to the next solution if this one doesn’t work.

Turn off the power-saving mode

Since you turned off power saving mode, your Android device’s hotspot is having trouble. Follow the instructions below to solve it.

  • Go to your phone’s settings menu and select the battery option.
  • Now turn off the power saving mode by tapping on it.
  • Check your hotspot connection once more after that. This should resolve your problem.

Checking the bandwidth

The most recent smartphones use a 5GHz frequency. Others do not have this feature. This implies that even if you employed a technique to force your Android to use the 5GHz frequency, your hotspot will fail if your phone does not support it.

To resolve this problem, follow the steps below.

  • First, make sure your Android phone is set to the supported bandwidth of 2.4Ghz.
  • To do so, go to the settings menu and select Network & Internet.
  • Then, touch on the hotspot and tethering option, and then click on wifi hotspot.
  • You will take an option called the AP band. Here choose the option known as 2.4Ghz

If this does not resolve the problem, we will proceed to the next step.

Checking the receiving device

It’s possible that your hotpot is working great, but your receiving device is having problems. Because the receiving device may have a hardware or software issue, your hotspot is unable to maintain a stable connection.

Factory reset

Factory resetting your phone would mean that all your data will be wiped out and your phone will start as if it was new. For this, you need to head over to your settings tab and then search for factory reset. This will wipe out all the glitches in your phone and it will start fresh. Now check your wifi connection again to see if it is working properly.

Finding out a phone service provider

If none of the above suggestions work, it’s time to seek the help of a reputable phone repair provider. Carlcare enters the picture at this point. Carlcare pops up when people think of resolving cellphone troubles for Infinix, TECNO, or itel. If your TECNO, Infinix, or itel phone’s hotspot isn’t working, find a Carlcare repair center near you to get it fixed.

Additional mention:  

If your hotspot isn’t connected for more than a few minutes, the new generation of smartphones has a feature that turns it off. This could cause problems with your hotspot. To avoid this, switch off the option that says “turning on the wifi automatically.”

To make this solution work, use the following syntax: network and internet > wifi hotspot > switch off the wifi.

1 9 10 11 12 13 15