How to turn off comments on Instagram?
How to turn off comments on Instagram?
Instagram just released a new upgrade that gives users more control over their postings than ever before. We may now switch off comments on Instagram thanks to the most recent feature update. Instagram users can now like worthy comments (much like on Facebook) and delete followers from private profiles without having to go through the hassle of barring them.
Because Instagram is largely a visual community rather than a chat medium, most debates take place in the comments section of posts. While the majority of these remarks are positive and encouraging, there are a few rotten apples in the bunch every now and then — and sometimes more than once. (After all, this is the internet, so expect trolls.) Users had to toggle on the “hide improper comments” option in order to sift out bad remarks in the past and protect themselves from additional abuse. This option would block comments with offensive keywords or phrases.
Controlling the comments on your article has never been easier thanks to the latest update. Instead of a time-consuming word search, all users may simply toggle the commenting functionality on or off at any moment – because sometimes you don’t need all that criticism on personal stuff, you know?
Whatever the reason, Instagram allows you to disable comments on your posts. Maybe you’re posting something that could be controversial, or maybe you’re sharing on a topic that’s difficult to discuss but feels important to share- Whatever.
How to turn off comments on Instagram?
These are instructions to turning off Instagram comments and making your feed a more friendly environment for self-expression and sharing.
Update Your App

Make sure that you’re running the most recent version of Instagram from Google Play or the app store before you try to change your comment settings,
On pentagram, there are two ways to turn off comments. The first is before you share a post, and the second is after you share a post.
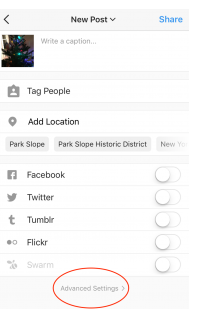
Turn off Instagram comments before posting
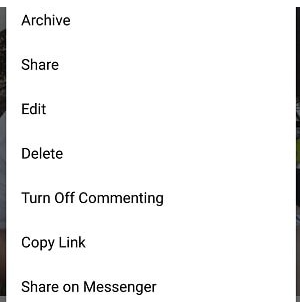
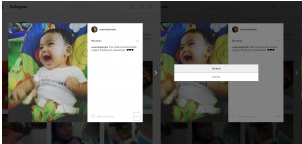
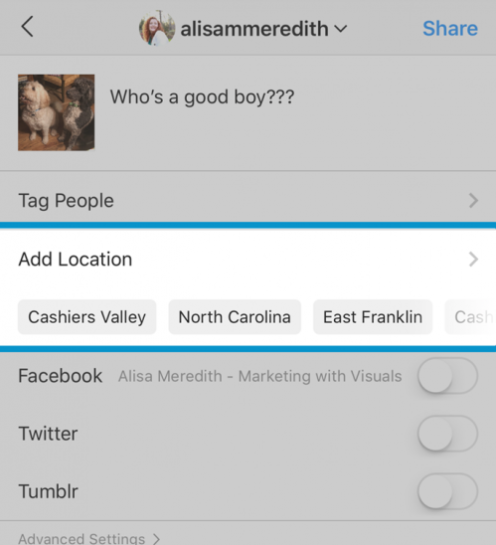
Simply choose the “advanced settings” button at the bottom of your screen to turn off commenting before you publish an image.
Choose “Turn Off Commenting”.
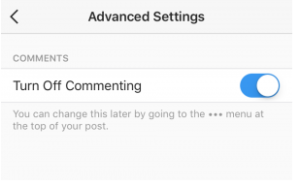
Toggle on the switch, and commenting for the new post will be disabled. Don’t worry if you change your mind! This function is quite adjustable, and you may switch it back on at any time!
Turn off Instagram comments before posting
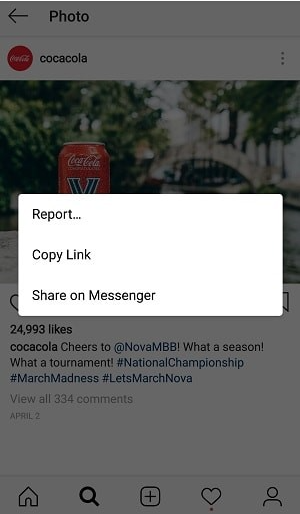
1. Select The “…” Menu On The Post
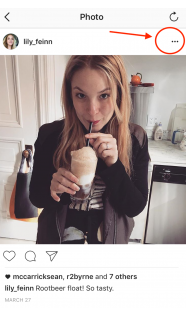
Let’s say you’ve got a post that’s gotten a lot of attention, but it’s not the kind you want. You may have been wanted in the past to remove your personal post or set your account to private, but there’s now a better choice! To turn off comments on a public post retrospectively, go to your Instagram profile, choose the post you wish to change, then in the upper right-hand corner of the screen, touch the “…” icon.
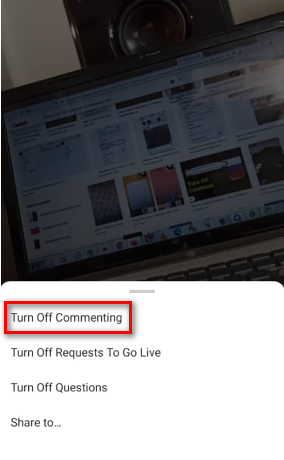
2. Tap “Turn Off Commenting”
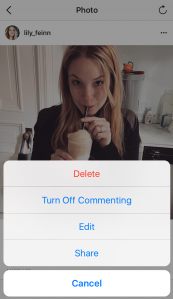
Tap the “Turn Off Commenting” option to turn off commenting. The small speech bubble icon that appears between the “heart” and “share” icons will be removed. Most visitors won’t even notice that comments are disabled on the post until they try to type something, as it’s a rather minor change. Oh, the quietness!
How to turn off comments on Instagram live?
Also, it’s possible to hide and disable comments on Instagram live videos, which is a fantastic feature for Instagrammers with a large following. In a few simple steps, you may switch off comments on your Instagram live videos:
To turn off comments after you’ve started your live video, follow these instructions.
1. In the lower left-hand corner of your screen, navigate to the live Comments box.
2. Tap on the three vertical dots.
3. Click Turn off Commenting.
To prevent others from commenting on your live stream, you can hide your comments at any time.