How to Open Links in Google Sheets with a Single Click

How to Open Links in Google Sheets with a Single Click

To open a link in a Google Sheets spreadsheet, you must make two clicks by default. You can make the link open with a single click by using a workaround. We’ll demonstrate how to do it.

How This Works

This solution publishes your Google Sheets spreadsheet as a web page. You then open the links on this web page with a single click.

For your published web page, Google assigns you a unique URL. This URL is used to access your spreadsheet via the internet as a web page. Make sure you only share this URL with people you want to have access to the data in your spreadsheet.

Open Links in a Google Sheets Spreadsheet with a Single Click

First, open your spreadsheet in Google Sheets in your web browser.

When the spreadsheet opens, go to the Google Sheets menu bar and select File > Publish to the Web.

Select the “Link” tab on the “Publish to the web” pop-up that appears. Then, choose “Entire Document” and select whether you want to publish your entire spreadsheet or just a single sheet. From the second drop-down menu, choose “Web Page.”

Next, to see more options, select “Published content & settings.”

Activate the “Automatically republish when changes are made” option in the expanded pop-up, then choose “Start publishing.”

Choose “OK” in the prompt that appears on your screen.

Now, in the “Publish to the web” pop-up, you can see a link. To copy the link, click this link box and tap Ctrl+c on Windows or Command+c on Mac.

In your browser, open a new tab, paste the copied link in the address bar, then hit “Enter.”

You may now open any link in your spreadsheet (which has been published as a web page) by just clicking on it.

That’s how you make it easier to open links in your spreadsheets!

For privacy reasons, it’s usually better to unpublish the web page once you’ve finished working with your links. To do so, open your spreadsheet in Google Sheets, go to File > Publish to the Web in the menu bar, and then choose “Stop publishing.”

That’s all.


[Solved] Computer Turns On but No Display | 2021 Tips

[Solved] Computer Turns On but No Display | 2021 Tips

When you turn on your computer, the screen remains black? This is extremely aggravating, and you are not alone. This problem is being reported by a large number of Windows users. The good news is that it is fixable. Here are five options to consider.

Try these fixes:

It’s possible that you won’t have to try all of them. Simply work your way down the list until you discover one that suits your needs.

  1. Check if your monitor is turned on
  2. Reconnect your monitor to your computer
  3. Disconnect your peripherals
  4. Reinstall your RAM
  5. Reset your BIOS settings to default
  6. Bonus tip: Update your device drivers

Fix 1: Check if your monitor is turned on

If your computer boots up but displays nothing, check to see if your monitor is functioning properly.

Check your monitor’s power light to make sure it’s switched on.

If your monitor won’t switch on, disconnect the power adapter and reconnect it to the wall outlet. If the issue persists, you will need to take your monitor to a repair facility.

If your display is working properly, try the following solution.

Fix 2: Reconnect your monitor to your computer

Your problem could possibly be caused by a bad connection between your display and your computer. Reconnecting the two devices is most likely the solution to your problem in this scenario. Here’s how you can do it:

1) Hold the power button down until your computer shuts down.

2) Disconnect the video cable that connects your computer to your monitor.

3) Examine your port connectors on your PC and on your monitor.

Note: If any of your device’s connectors are bent or damaged, you’ll need to take it to a repair shop.

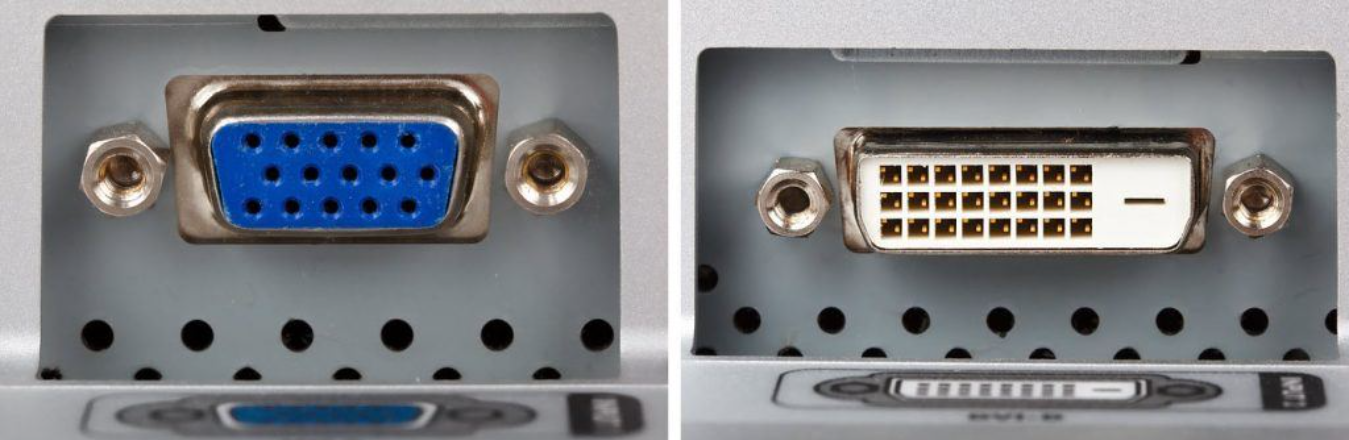
4) Examine your video cable for any damage. Reconnect your computer to your monitor if the video cable is in good condition. Alternatively, if you have another video cable, try connecting the two devices with it.

5) Turn on your computer and observe if it boots up normally.

If your computer breaks again, keep reading to see how to fix it.

Fix 3: Disconnect your peripherals

A black screen might also be caused by some devices attached to your computer. Disconnect all of your peripherals to determine if that’s the source of the issue. Here’s how you can do it:

1) Hold the power button down until your computer shuts down.

2) Disconnect all peripherals (your printer, scanner, mouse, etc.).

3) Turn on your computer once more.

If your computer boots up normally, one of the peripherals you removed is the source of the problem. Each device should be reinstalled into your PC and tested each time. Then you’ll track down the precise gadget that’s causing your issue. (Replace the device once you’ve identified it, or get help from the device’s maker.)

If your machine still won’t boot, try the solution below.

Fix 4: Reinstall your RAM

This issue can potentially be caused by a bad connection between your RAM and motherboard. You’ll need to reinstall your RAM in this instance. Here’s how to do it:

1) Hold the power button down until your computer shuts down.

2) Disconnect the power supply’s AC power cord, then open your computer casing.

Note: Depending on the type of machine, this method will vary. Consult your computer’s documentation or seek professional assistance if you don’t know how to accomplish it.

3) Remove your RAM from the memory slot on your motherboard.

RAM looks like this:

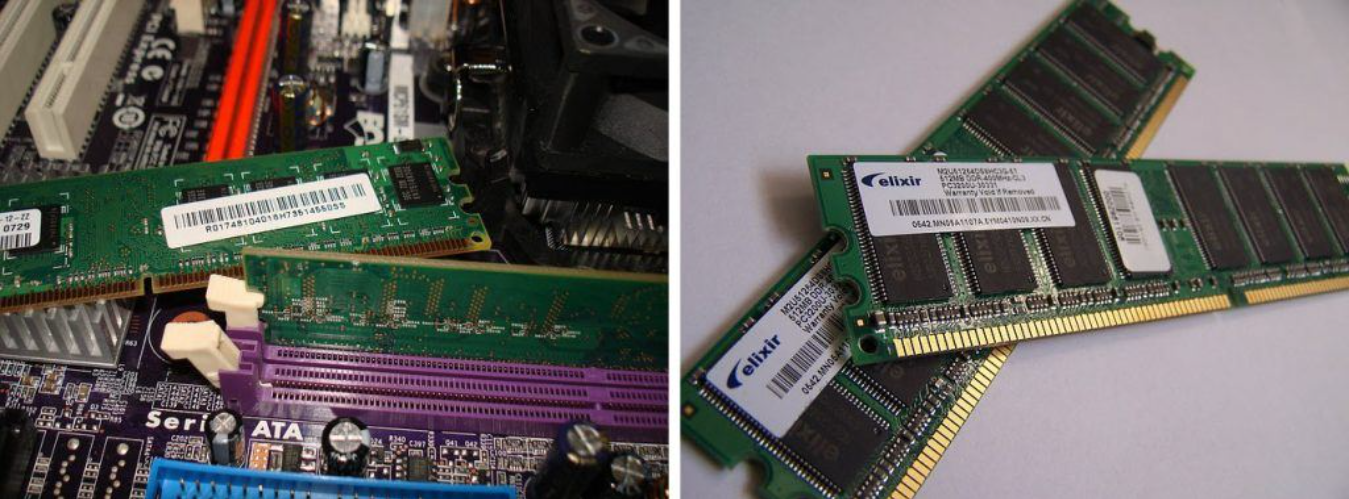
4) Put your RAM into the slot.

5) Turn on your computer after connecting the AC power cord to the power supply.

Don’t panic if your computer still won’t boot up properly. Take a look at the solution below.

Fix 5: Reset your BIOS settings to default

Your PC may also boot with a black screen due to incorrect BIOS settings. You should reset your BIOS to factory settings to check if that’s the issue. Here’s how you can do it:

1) Turn off your computer by pressing and holding the power button.

2) Disconnect the power supply’s AC power cord, then open your computer casing.

3) Remove the CMOS battery from your motherboard with your fingernail or a non-conductive screwdriver.

This is what the CMOS battery looks like:

4) Reinstall your CMOS battery after waiting 5 minutes.

5) Turn on your computer and connect the AC power cord to the power source to see whether the problem persists.

Hopefully, this material was beneficial! Please let me know which option worked for you, or if you have any other suggestions for how to resolve this problem. I’d love to hear what you have to say!


Bonus tip: Update your device drivers

A missing or outdated device driver can cause a variety of issues on your computer, therefore updating your device drivers should always be your first choice to avoid further difficulties. There are two safe ways to get the driver:

Manual driver update – You can manually update your drivers by going to the website of your hardware manufacturer and looking for the most recent right driver. Only install drivers that are compatible with your Windows version.

Automatic driver update – If you don’t have the time, patience, or computer skills to manually update your drivers, Driver Easy can do it for you. Driver Easy will detect your system and locate the appropriate driver for your graphics product and Windows version, which it will then download and install correctly:

1) Download and install Driver Easy.

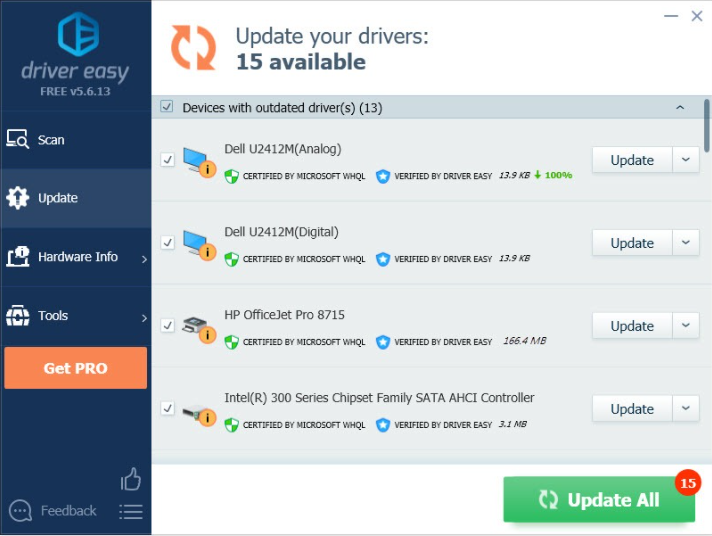
2) Launch Driver Easy and select Scan Now. After that, Driver Easy will check your computer for any problematic drivers.

3) Next to the graphics driver, click the Update option to automatically download the latest version of that driver, which you can then manually install (you can do this with the FREE version).

Alternatively, you can select Update All to have all the missing or out-of-date drivers on your system immediately downloaded and installed. (The Pro version is required for this, which includes full support and a 30-day money back guarantee. When you click Update All, you’ll be asked to upgrade.)


How to Extract Images from PDF Files

How to Extract Images from PDF Files

You can extract the images embedded in PDF files and store them in a folder if you want to utilize them elsewhere. We’ll teach you how to accomplish it on Windows 10 and Mac using two distinct techniques.

Extract Images from a PDF with Adobe Acrobat Reader DC

The Adobe Acrobat Reader DC app provides a simple and free way to extract photos from a PDF. Not only can you open PDFs with this program, but you can also extract their multimedia content. You can save selected photos from a PDF to a folder on your computer in this manner.

Download and install the free Acrobat Reader DC program for Windows 10 or Mac if you haven’t already. Then use this app to open your PDF.

Click the selection tool (an arrow icon) in the toolbar towards the top of the window when Acrobat Reader opens. This tool will be used to select images from your PDF.

Next, navigate to the page in your PDF that contains the image you wish to extract. To select an image, click it.

Then, From the menu, right-click the image and choose “Copy Image”.


The image you’ve chosen has now been copied to your clipboard. This image can now be pasted into any image editor on your pc.

If you’re using Windows, use the Paint app and paste the image using Ctrl+V. Then, in Paint’s menu bar, go to File > Save to save the image.

Open the Preview software on your Mac and go to File > New from Clipboard in the menu bar. Then, to save the image, go to File > Save.

Your saved image file functions in the same way that any other image on your computer. It’s possible to add it in documents, upload it to websites, and more.

Use Adobe Photoshop to Extract Images from a PDF

A custom feature in Photoshop allows you to import the contents of a PDF file. You can use this to load your PDF and extract all of the photos.

To utilize this strategy, open Photoshop on a Mac or Windows 10. Click File > Open in the menu bar in Photoshop, then browse to the PDF file from which you wish to extract photos.

The “Import PDF” window in Photoshop will appear. To view all of your PDF images, pick the “Images” radio button at the top of this window.

All of the images in your PDF files will be displayed in Photoshop. Select the image you want to extract. Press and hold Shift and then click the photos to choose multiple images.

After you’ve made your selections, click “OK” at the bottom of the window.

Each image will be opened in a new tab in Photoshop. Select File > Close All in Photoshop’s menu bar to save all of these photos to a folder on your computer.

Photoshop will ask whether you want to save changes to your images. Enable the “Apply to All” option in this popup, then click “Save.”

The typical “Save As” window in Photoshop is next. At the top, click the “Save As” box and give your image a name. Then select a format for your image from the “Format” drop-down option. Finally, at the bottom of the window, click “Save.” Each image must go through this process.

If you’re unsure about the picture format, go with “PNG,” as it will work in most circumstances.

Now, the images that you selected are free from their PDF prison!


How to Share Audio Recordings from Google Recorder

How to Share Audio Recordings from Google Recorder

On Pixel smartphones, Google Recorder is one of the greatest apps from the search giant. It can transcribe audio recordings into text, making them searchable, and it can also access and share those recordings from the cloud. We’ll show you how to do it.

If you’re not familiar with Google Recorder, it’s a Pixel phones-only app. Behind a modest design, the software hides several sophisticated features. Your recordings, as well as the transcriptions, can be stored at recorder.google.com if it’s enabled.

Open the Recorder app on your Google Pixel device to get started. To use the cloud capabilities, you’ll need a Pixel 3 or newer phone.

If you’re using the app for the first time, you’ll see a splash screen with information on what it can do. Select “Get Started”.

If you choose to back up your recordings to the cloud, the app will prompt you. To continue, tap “Back Up Recordings.”

Simply hit the red button at the bottom of the screen to make an audio recording.

When you’re finished, use the pause button to stop recording.

You have the option of adding your location to the recording, which will be utilized when searching through it. Select the “Add Location” option to do so.

Then, you can add a title to the recording file and click “Save” to complete.

You can share a recording in two ways: through the app or through the website. Let’s begin with the app. Press and hold  a recording from the list.

The recording will be highlighted from now on (as indicated by the check mark). Click the share icon in the top bar after selecting any other recordings to share.

You’ll have four options in the share menu (just the first two if you select several recordings):

  • Audio: Share the .m4a audio file.
  • Transcript: Share the transcript as a .txt file or through Google Docs.
  • Link: Get a link to the recording in the cloud.
  • Video Clip: Create a video clip with waveform animation or transcript text.

After you’ve chosen one of the sharing methods, you’ll be able to select an app to share it with.

In a web browser like Google Chrome or Microsoft Edge, go to recorder.google.com for the second method. Make sure you’re using your Google account to log in.

In the left sidebar, you’ll find a list of your recordings. Choose the one you want to share.

Next to your profile icon in the top-right corner, choose the three-dot menu icon.

From the menu, tap “Share”.

On the internet, the sole choice is to share the link. Choose between “Private to Me” or “Shared Link,” then “Copy Link.”

You may now post the link anywhere you like, and anyone will be able to listen to the audio and read the transcript in real-time, depending on your privacy settings. They won’t need the Recorder app to listen to it if they use the link.


How To Fix Roblox Not Launching [2021 Tips]

How To Fix Roblox Not Launching [2021 Tips]

Roblox is entertaining, but it’s not entertaining when you can’t even launch it. Roblox not launching is a regular issue, but the good news is that there are some recognized solutions. Continue reading to learn more about them…

Try these fixes…

You don’t have to try all of them; simply work your way down the list until you discover one that works!

1: Restart your PC

2: Check your browser

3: Reset your Internet options

4: Check your proxy settings

5: Reinstall Roblox desktop app

Fix 1: Restart your PC

A restart of your computer is the first and easiest thing you should try. Many gamers have reported being able to launch Roblox after restarting their PCs, so it’s worth a go.

If rebooting your computer does not solve the problem, move on to the next step.

Fix 2: Check your browser

When you select a game on Roblox’s website and click to play, a pop-up window should appear, allowing you to launch the Roblox app. If the pop-up window does not appear in your browser or does not allow Roblox to launch with your permission, try using another browser.

Also, check if your browser is up-to-date. If it isn’t already updated, do so and then test the problem. Some players have reported that clear the browser’s cache allows them to load Roblox, so it’s worth a go.

If your browser doesn’t appear to be the source of the Roblox not starting issue, proceed to the next step.

Fix 3: Reset your Internet options

The actions following must be completed in Internet Explorer, but they have been shown to work in other browsers as well. To reset your Internet Explorer options, follow these steps:

1. Start Internet Explorer. If it isn’t on your desktop, use the Start menu or the search box next to the Start button to look for it.

2. Select Internet Options from the gear-shaped icon in the top-right corner.

3. Move to the Advanced tab, tap Reset then.

4. Select Delete personal settings, then tap Reset.

5. To make the modifications take effect, restart your computer.

You may now continue to test the issue in your preferred browser and use it. If this doesn’t work, move on to the next step.

Fix 4: Check your proxy settings

Roblox may not launch if your PC is trying to connect through a proxy server. The following steps will show you how to verify and configure your proxy settings:

1.  Enter proxy then tap Change proxy settings in the search bar next to your Start button (or in the Start menu).

2. User setup script and Use a proxy server should both be turned off.

If this doesn’t work, try the last option.

Fix 5: Reinstall Roblox desktop app

Many gamers have found that reinstalling the Roblox desktop software solves the problem of the game not launching. Just make sure you delete the software completely before reinstalling it. All you have to do is follow these steps:

To uninstall the Roblox app:

1. To begin, ensure all other programs are closed and not running in the background to avoid anything that could interfere with the reinstallation.

2.  Tap the Windows logo key and on your keyboard to invoke the Run box.

3. Enter control panel, then tap OK.

4. Move to View by: Small icons, then tap Programs & Features.

5. Locate Roblox, right-click it then tap Uninstall.

To remove the Roblox folder:

1. Tap the Windows logo key and E to open the File Explorer.

2. Go to C:\Users\(Your Username)\AppData\Local

3. Locate the Roblox folder and remove it.

To reinstall the Roblox desktop app:

1. Log in to your Roblox account on the website.

2. Select a game you enjoy and press the Play button.

3. As the Roblox software is immediately downloaded, a pop-up window will tell you.

4. After you’ve installed the app, you should see the game open and ready to play.

I hope, this guide has helped you address your issue, and you can now play Roblox! If you have any further questions or recommendations, please leave a comment.


How to Schedule the Blue Light Filter on Android

How to Schedule the Blue Light Filter on Android

The human body clock and hormone regulation are both heavily influenced by light. As the amount of light in the room dims at night, our bodies know that night is approaching and it’s time to sleep. We wake up and get energetic as the light levels rise, ready to take on the day.

Sadly, we now live in a world filled with light-emitting devices, making it more difficult for our bodies to tell when we should be sleeping and when we should be awake.

While we may not be willing to give up our cellphones, computers, or television time before night, we can minimize our exposure to blue light.

Using a Blue Light Filter on Your Android Phone

Aside from wearing blue light-blocking glasses, using a blue light filter on your smartphone is one of the simplest ways to decrease your exposure to blue light before bed. Most phones now include a blue light filter as part of their operating system.

On your Android phone, this’s how to set a blue light schedule.

1. Open the Display settings in your phone’s settings.

2. You should see a section entitled Blue light filter, Night shift, or Eye comfort shield, among other things, from here. Depending on which phone you have, the name changes.

3. You can change your screen’s color temperature, turn on the blue light filter permanently, or establish a schedule from here.

4. You can pick between an automatic sunset-to-sunrise plan and a bespoke timetable when creating a blue light program.

5. If you’re utilizing the sunset-to-sunrise schedule, your phone’s location service must be turned on in order for it to know when the sun rises and sets in your region.

6. If you’re using a custom schedule, you’ll be able to choose when the blue light filter turns on and off each day.

Maintaining a Healthy Relationship With Technology

A blue light filter can aid in getting a better night’s sleep. While technology has numerous applications in our lives, it’s vital to remember to put your devices down and give your body a break.


How to edit videos on your iPhone or iPad using the Photos app or iMovie

How to edit videos on your iPhone or iPad using the Photos app or iMovie

  • On your iPhone or iPad, you may cut the beginning or end of videos, crop them, apply filters, and more.
  • Open a video in the Photos app on your iPhone or iPad and press “Modify” in the top-right corner to edit it.
  • Consider downloading the iMovie app if you want more extensive video editing features.

Almost every iPhone on the market today is capable of shooting high-resolution, high-quality video. As a result, it’s not surprising that the phone has some rudimentary video editing tools right out of the box.

Crop, rotate, trim the video’s duration, add filters, modify the color balance, and more can all be done in the Photos app on your iPhone or iPad. You can also make further adjustments to your film if you download the free iMovie program.

This’s the way to edit videos on your iPhone or iPad.

How to edit a video in your iPhone or iPad’s Photos app

By default, all of your photographs and videos are saved in the Photos app.

1. Find the video you want to modify in the Photos app. If you’re having difficulties finding it amid a sea of photographs, go to Albums and then Videos to see a list of all of your phone’s videos.

2. In the top-right corner, click Edit after opening the video.

3. You have a few alternatives here. The first menu, which should appear automatically, allows you to trim the beginning and conclusion of your video. Drag the left-facing arrow and the right and use the slider at the bottom of the screen to trim the beginning of the video, and the right-facing arrow to the left to trim the end.

4. You may then modify the color balance and more by tapping the icon that looks like a volume wheel. To see the tools, swipe through the options below the video clip, tap one to select it, and then modify the levels with the slider below that (or on the side of the screen if you’re on an iPad). Your modifications will be immediately visible in the video preview.

5. . You can add filters by tapping the icon that looks like three overlapping circles. Each of these filters also has a slider that you may use to adjust the filter’s strength.

6. To rotate, crop, or skew the video, tap the square cropping icon. This is the option to use if you mistakenly captured a video in the wrong direction.

7. Click Done in the bottom-right corner after you’re through editing. You’ll be able to save your changes as a new clip or replace the original video.

Tip: Don’t worry if you accidentally overwrite the original video and later want to remove the changes. To get the original video back, simply edit the video again and tap Revert in the bottom-right corner (or top-right on iPad).

Editing videos with the iMovie app

If you download the iMovie app, you’ll have a lot more video editing possibilities.

You can use iMovie to select various films and photos to mix into a single movie, in addition to all of the options listed above. You can also choose from a half-dozen other transitions (such as dissolves, slides, and wipes) to insert between these pieces. You may also use iMovie to add music and voiceovers to your video.

It’s not a world-class video editor, but it’s perfect for making fast movies straight on your iPhone or iPad.


1 3 4 5 6 7 8