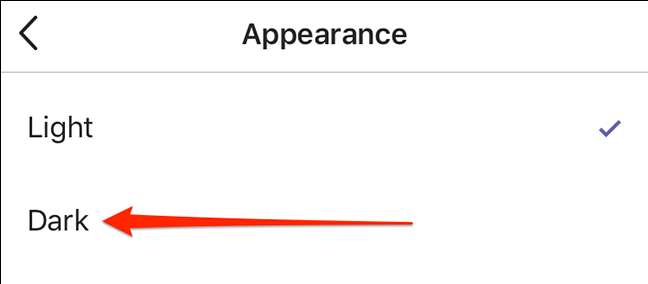
How to change Netflix region

Some Netflix content is restricted to specific countries due to broadcasting agreements with movie and television studios. As a result, the episodes and movies available on Netflix vary depending on where you are in the world. Or, to be more precise, where Netflix thinks you are.
Yes, there are techniques to make Netflix believe you’re in a different country. We’ll look at how to change your Netflix region and how to watch Netflix from another country in this article.
Using a VPN to unblock geo-restricted content on Netflix is the simplest solution. It’s also quite easy to do. You’ll be viewing your favorite episodes in no time if you follow our simple step-by-step guide on how to change the country on Netflix.
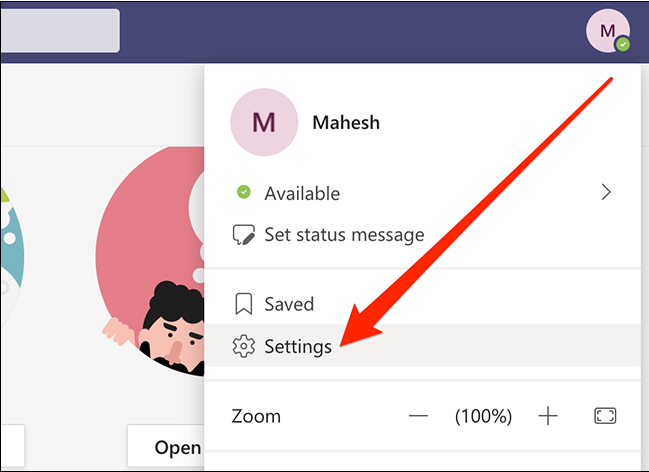
How can I change Netflix region or country?
- Subscribe to Netflix: Sign up in case you haven’t already.
- Download and install a VPN: Choose a VPN that can unblock Netflix.
- Connect VPN to the right server: Choose the country that has the Netflix content you want to watch.
- Log in to your Netflix account: All the content from the region your VPN is connected to should be available.
- Grab some popcorn, sit back and enjoy!
Netflix country exclusives
Some films and television shows are only available in certain countries. So, even though the content is stored in their cloud, if your IP doesn’t match, you won’t be able to access it. However, by hopping from server to server with a VPN, you can see them all. Here are some of the ones you shouldn’t miss, which are only available in a few countries.
USA: Universal Soldier: The Return, Alexander Revisited: The Final Cut, The Yeti Adventures, My Fair Lady, etc.
Canada: The Upside, Alita: Battle Angel, Bill & Ted Face the Music, Unhinged, John Lewis: Good Trouble, etc.
UK: Prince Philip: An Extraordinary Life, The Sound of Silence, Capone, Saint France, etc.
Greece: Dr. Strangelove, Flashdance, Area 51, The Avengers, Malibu’s Most Wanted
Japan: CODE BLUE the Movie, Kekkaishi, Shinjuku Swan, Syoga Drama Nobunaga Oda, etc.
Do free VPNs work with Netflix?
A free VPN is not a good choice for watching any type of online video content for some reasons:
1. Watching Netflix on freemium VPNs will use up your data allowance: Monthly data restrictions are frequently enforced by freemium VPNs. As we all know, watching video consumes a lot of bandwidth, so you’ll quickly exhaust your free VPN data allowance.
2. It’s quite likely that a free VPN won’t let you access region restricted content: Netflix and other streaming services are improving their ability to detect and disable VPNs on their servers. So much so that many paid VPN providers have abandoned providing dependable Netflix access. As a result, it’s even less probable that a free VPN service will be able to escape being blacklisted.
3. It probably won’t protect your online anonymity: Free VPNs can come at a cost to your online security. Many of them will recoup expenditures by tracking your internet activities and selling your data to third parties. Alternatively, your free VPN provider may inject advertisements and track cookies while you’re online.
While a free VPN for the job is findable, here are three commercial VPNs that will unblock Netflix without a hitch.
Which VPNs unblock Netflix
1. NordVPN
First on our list is NordVPN, and for good reason. NordVPN’s global server network uses more than 5,400 servers across more than 59 countries. So this gives you plenty of choices if you’re looking to change your Netflix region.
It provides reliable access to multiple Netflix locations, including the United States, Canada, the United Kingdom, Japan, the Netherlands, France and Italy.
Not only can you use NordVPN to access region-restricted Netflix content, but you can also access BBC iPlayer, Amazon Prime Video, Hulu, and other streaming services.
NordVPN’s connections are extremely fast, allowing for smooth, buffer-free streaming of HD and even 4K content. You can also stream for as long as you like because NordVPN doesn’t impose any data constraints or bandwidth limits. As a result, you won’t have to worry about exceeding your data limit if you binge-watch an entire series.
In addition, NordVPN provides 24/7 customer support via live chat and email. It also takes cryptocurrency as a payment method.
NordVPN is available on:
- PC
- macOS
- iOS
- Android
- Linux
- Fire TV
- Android TV
With NordVPN’s SmartPlay feature, you can unblock content on devices that don’t support VPN, such as many smart TVs, game consoles, and other gadgets.
2. Surfshark VPN
The VPN service provided by Surfshark is a fantastic solution for streaming Netflix in another region. It boasts over 3,200 servers in 64 countries, providing you a lot of options for streaming region-locked content. And, given that Surfshark just more than doubled its server count, we expect this service to continue to expand until it becomes one of the most competitive on the market.
You may use a Surfshark VPN to watch Netflix, HBO Go, BBC iPlayer, and Amazon Prime Video in addition to Netflix.
Surfshark is as quick as its competitors, has excellent security features, and, most importantly, includes a Smart DNS function that allows you to bypass content restrictions not only on your computer or mobile device, but also on smart TVs, game consoles, and other devices.
But it’s Surfshark VPN’s unlimited simultaneous connections allowance that really sets it apart. This allows you to use a single Surfshark account for your entire family or group of friends.
Surfshark VPN is available on:
- PC
- macOS
- iOS
- Android
- Linux
- Fire TV
3. PrivateVPN
Although PrivateVPN only offers about 150 servers worldwide, it is still a feasible option for watching Netflix from another country. In fact, while having only a fraction of the servers that its competitors boast, these servers are dispersed throughout 60 countries.
It can also let you connect to servers in countries with some of the world’s largest Netflix catalogs, such as the United States, Canada, France, Japan, and the United Kingdom. You may also use it to access Hulu, HBO, Amazon Prime Video, and BBC iPlayer, among other streaming services.
It makes our list because of the combination of fast connection speeds and the ability to unblock content from a variety of countries.
PrivateVPN, as its name suggests, provides government-grade encryption and a VPN kill switch to keep your data safe and secure at all times. It also has a no-logs policy and accepts Bitcoin payments, so you can keep your transaction private.
If you have any problems, PrivateVPN has 24/7 live chat customer support, as well as a Contact Us, form to assist you in promptly resolving your issues.
PrivateVPN is available on:
- PC
- macOS
- iOS
- Android
- Linux
4. CyberGhost
CyberGhost is another wonderful VPN to use if you want to watch Netflix in other countries because it has over 6,800 servers in 90 countries. This includes streaming-dedicated servers are available in major areas like the United States, Canada, Japan, Brazil, India, the United Kingdom, France, Germany, Italy, and Austria.
Streamers will like the fact that CyberGhost provides dedicated servers for Netflix, BBC iPlayer, Disney+, and other streaming services.
But, of course, material quality and quantity aren’t the only factors to consider. CyberGhost, fortunately, provides robust encryption and a VPN kill switch to ensure your online anonymity.
In addition, CyberGhost provides 24/7 live chat customer support, as well as a troubleshooting ticketing system to assist you in resolving any issues you may encounter.
CyberGhost is available on:
- PC
- macOS
- iOS
- Android
- Linux
5. ExpressVPN
ExpressVPN, another fantastic VPN provider for changing your Netflix region or country, combines incredibly fast connection speeds, good app support, and a big global server network to unblock Netflix with ease.
It’s not just Netflix either. Along with other streaming services, EpressVPN can unblock Hulu, Amazon Prime Video, and BBC iPlayer.
ExpressVPN has more than 3,000 servers in 94 different countries. As a result, when it comes to changing your Netflix location, you have a lot of options.
ExpressVPN’s speeds can support HD and 4K HDR streaming, assuming you have a strong connection, so you can get the most out of your Netflix viewing experience. It also has no data constraints or bandwidth limitations, so you may watch as much content as you want.
When using ExpressVPN to watch region-restricted content, you may take advantage of the ExpressVPN MediaStreamer feature, which allows you to experience the service’s benefits even on devices that don’t support VPN. This includes a lot of smart TVs and game consoles, which are likely to be used to view Netflix.
If you’re concerned about security, ExpressVPN’s government grade encryption should ease your mind, as hackers and third parties won’t be able to see your online activities as long as you’re connected.
ExpressVPN is available on:
- PC
- macOS
- iOS
- Android
- Linux
- Routers
- Fire TV
How do I solve the Netflix proxy error?
You’ll probably get a streaming error warning if Netflix detects that you’re using a VPN or proxy service. The good news is that this proxy problem is very simple to resolve. All you have to do is follow our simple step-by-step tutorial to figure out what to do if you see an error message that says, “You seem to be using an unblocker or proxy.”
1. Sign up to a VPN that has the ability to unblock Netflix (if you already have one – just switch the server). We’ve developed a list of our favorite VPNs for watching region-restricted content and included it earlier in this tutorial if you need help choosing one.
2. Open the VPN app or browser extension. Connect to a server in the country where the Netflix content you want to watch is available. If you want to view Netflix in the United States, for example, make sure you connect to a server in the United States.
3. Clear your browser’s cache and cookies.
4. If this doesn’t work, try another server. The procedures outlined above should unblock Netflix and fix the proxy error. If it doesn’t work, try a different server or contact your VPN’s customer service for more personalized assistance.
How to change Netflix region on Android
Do you want to stream geo-restricted films on your phone? On Android, here’s how to change the Netflix region:
1. Install the VPN program of your choice from the Google Play Store (we recommend NordVPN, now 72% OFF)
2. Go to your new VPN account and sign in.
3. Select the country to which you want to connect.
4. Open your Netflix app and it will display your favorite country’s content.
How to change Netflix region on iPhone
If you wish to change the Netflix region on your iPhone, follow these steps:
1. Search for the VPN you require in the App Store and install it on your iOS device (our top choice for iPhone is NordVPN, now 72% OFF, now 72% OFF)
2. To log into your account, enter your username and password.
3. Choose a server in the nation to which you want to connect.
4. Check Netflix to see if the Netflix location has changed.
How to change Netflix region on TV
If you have a modern smart TV, it is almost certainly running on Android OS. Changing the Netflix location on your smart TV is a piece of cake in such instance. Simply follow these steps and you’ll be able to stream Netflix in no time:
Subscribe to a reputable VPN service (i.e., our top-pick for Netflix NordVPN, now 72% OFF)
Find your VPN on the Google Play Store and install it
Log into your existing account and pick the region of your choice
Open Netflix – it should show the content of the country you’ve chosen
Changing the Netflix region is a little more complicated – but not impossible – if your smart TV doesn’t have access to the Google Play Store. For example, NordVPN offers a feature called Smart DNS, that allows you to unblock Netflix libraries even on devices that don’t support VPNs.
How can I change Netflix region without a VPN?
If you don’t want to use a VPN and want to change your Netflix region to watch restricted content that isn’t available in your country, you can utilize a proxy service. However, keep in mind that a proxy does not encrypt your data, making it far less safe. If your online privacy is vital to you, changing your Netflix location should be done with the help of a reliable VPN provider.
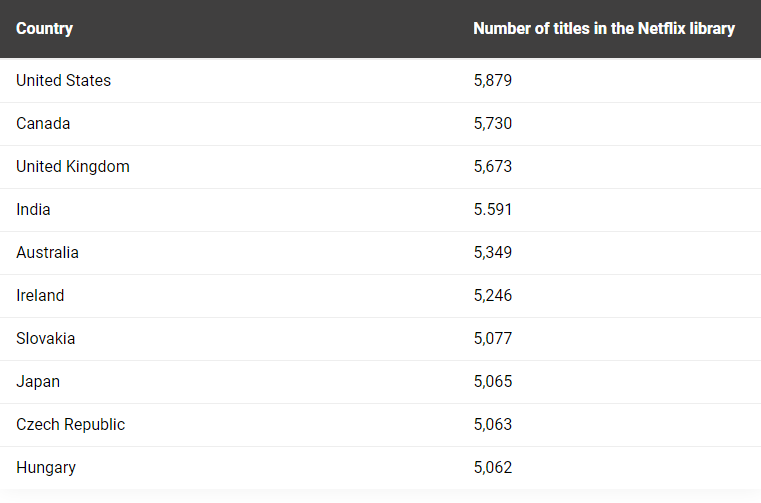
Countries with largest Netflix library
It should come as no surprise to learn that the United States boasts the largest Netflix library in the world. There are more titles available in this region than in any other Netflix region.
If you’re looking for anything to watch now that you know how to get region-restricted Netflix content, here’s a list of the top ten nations with the largest Netflix libraries:
Is using a VPN for Netflix legal?
Sure. In most countries, it’s perfectly legal to use a VPN to watch Netflix. Only if you use it in a nation where VPNs are prohibited, such as Russia, Iran, or China, will this cause you problems.
However, using a VPN to view any website, including Netflix and other streaming services, is lawful.
Using a VPN to stream Netflix content in another country is technically against Netflix’s rules. However, this does not make it illegal. And even if you are caught, there should be no cause for concern. Even after continuous use of VPNs, Netflix does not have a policy of actively taking down accounts. After all, even if the user is accessing content from another nation, they are still paying for a Netflix membership.
Netflix may be able to tell whether you’re using a VPN. If it occurs, you’ll get a message saying you won’t be able to watch any content until you disconnect your VPN. As a result, you won’t be able to watch anything on Netflix’s foreign version, but you won’t face any other major consequences. And if you’re having trouble watching Netflix with your VPN, we’ve got some tips and tricks for you lower down.
If you’re considering about using a VPN to watch Netflix, you might be concerned about copyright infringement. However, you do not need to be concerned about this. While Netflix has agreements in place with copyright holders that limit it to showing certain content in specific places, it is up to Netflix to enforce those agreements. You can still view it regardless of where you are (if you know how).
FAQ
Can Netflix detect if you’re using a VPN?
Yes. Netflix makes a concerted effort to block VPN IP addresses. Netflix will detect that you’re using a VPN if you login using one of these blacklisted IP addresses.
Why does Netflix ban VPN providers?
Because of distribution rights agreements, Netflix works hard to prevent VPN providers from allowing users to access region-restricted material. Netflix, in essence, has the authority to stream content for which they do not hold the copyrights in agreed-upon regions.
Which country has the best Netflix?
With 5,879 items in its catalog, the United States boasts the largest Netflix library. This equates to 4,035 films and 1,844 television programs. Canada, on the other hand, has a larger film library, with 4,043 titles.
It is up to you to decide which library is the greatest.