Month: June 2021
How to Enable the Disappearing Messages Feature on WhatsApp
How to Enable the Disappearing Messages Feature on WhatsApp
WhatsApp allows you to delete messages that you don’t want to be remembered. Here’s how you can turn it on.

Because not all WhatsApp messages are vital, they shouldn’t be kept around indefinitely. You may delete unimportant or compromising messages on WhatsApp, just like you would in real life, so you can move on from your conversations once they’re finished.
WhatsApp has joined the likes of Signal in allowing you to delete messages that you no longer want to be a part of your life. The feature has a number of advantages, like cutting your digital trace, providing a sense of anonymity, and more.
How WhatsApp’s Disappearing Messages Feature Works
You can establish an option for each individual chat, whether it’s an individual or a group chat, to automatically erase messages seven days after they’ve been delivered, using this feature.
However, unlike some of its competitors, WhatsApp does not allow you to choose the length of time that messages are saved. Furthermore, the service will delete any photographs or videos submitted through the chat.
To use this function, make sure you have the most recent version of WhatsApp on your iOS or Android device. To get the latest version of your app, go to the App Store or Google Play and select Update.
How to Enable Disappearing Messages in Individual Chats


The procedure for enabling disappearing messages in your WhatsApp chats is outlined below.
1. Tap on the contact’s name at the top of the chat to enable the Disappearing Messages function for that contact after opening that contact.
2. Now pick Disappearing Messages by scrolling down.
3. When you enable the feature for the first time, you’ll get a pop-up notice explaining how it works. After you’ve finished reading it, click Continue. Off will be set as the current status.
4. Press On to enable the feature.
How to Enable Disappearing Messages in Group Chats


Follow the steps outlined below to enable disappearing messages within group chats.
1. Press on the contact’s name at the top of the chat to enable the Disappearing Messages function for that contact after opening that contact.
2. Now pick Disappearing Messages by scrolling down. Off will be set as the current status.
3. Tap On to enable the feature.
How to Disable Disappearing Messages in Individual and Group Chats
To turn off the Disappearing Messages feature in both individual and group chats, follow the same steps as you did to enable it, but in the penultimate step, hit Off instead of On.
The screenshots below demonstrate how to accomplish this.


When the Disappearing Messages Feature Won’t Work
Messages sent or received prior to the Disappearing Messages feature’s activation will not be affected. If you forward a vanishing message to someone else, it will not disappear from their conversation unless they have the functionality turned on as well.
If the recipient of a disappearing message responds to it directly by swiping right to quote it, the message may be accessible after the seven-day limit has passed.
A Word of Caution
Remember that the Disappearing Messages tool only removes messages and media (such as photographs and videos) from within the chat. It has no effect on the recipient’s forwarded messages or media.
While any messages and media you may have sent will be deleted from the chat, they will still exist wherever they were forwarded. Furthermore, if the receiver has downloaded the media you sent, it will remain in their gallery.
This function, like everything else in technology, has flaws. It’s possible that after you send something, you won’t be able to control how far it spreads. This is why you should only share information and media that you don’t mind being shared.
Not All Conversations Have to Last Forever
Your WhatsApp conversations will no longer have to go on indefinitely. The Disappearing Messages function gives you the assurance that anything you texted a week ago won’t be available for you to revisit if it’s no longer needed.
10 Free Chat Apps for Messaging on Your Phone or Computer
How to Get Google Search Bar Back on Android Screen?
How to customize your start page in Safari on iPhone and iPad
How to customize your start page in Safari on iPhone and iPad
In iOS 15, you can now customize your start page in Safari.

Apple has enabled users to customize their start page in Safari since macOS Big Sur. Despite the fact that this feature was introduced last year, it did not make it to the greatest iPhone or iPad. However, following the release of iOS 15 and iPadOS 15 at WWDC, it appears that this capability will now be available on smaller screens as well.
You can choose a background image to use as well as new sections to display on the start page when you personalize the start page. Your Favorites, Siri Suggestions, Reading List, Privacy Report, and other features are included in this section. You can definitely make Safari on iPhone and iPad feel more like your own with the correct changes.
This’s the way to customize your start page in Safari on iPhone and iPad.
Apple occasionally offers updates to iOS, iPadOS, watchOS, tvOS, and macOS as closed developer previews or public betas. While the betas contain new features, they also contain pre-release bugs that can prevent the normal use of your iPhone, iPad, Apple Watch, Apple TV, or Mac, and are not intended for everyday use on a primary device. That’s why we strongly recommend staying away from developer previews unless you need them for software development, and using the public betas with caution. If you depend on your devices, wait for the final release.
How to choose sections for your start page in iOS 15 and iPadOS 15
1. On your iPhone or iPad, open Safari.
2. If you’re already on an existing page, hit the Tabs button to open a new tab.
3. Scroll to the bottom of the start page and choose Edit.
4. Make sure the toggle for Use Start Page on All Devices is set to ON if you want to use the same start page customization across all of your iPhones, iPads, and Macs (green). This ensures that the appearance and settings of your start page are synchronised via iCloud.
5. Favorites, Frequently Visited, Shared With You, Privacy Report, Siri Suggestions, Reading List, and iCloud Tabs are among the sections. Turn ON the toggles for the areas you’d want to display (green).
6. If you wish to change the order in which these sections display, simply drag-and-drop the handle into the desired position.
How to set a background image for your start page in iOS 15 and iPadOS 15
Adding a backdrop image to your Safari start page is a fun way to liven up your browsing experience. Apple gives you the choice of selecting a preset image or creating your own. Here’s how to do it.
1. On your iPhone or iPad, open Safari.
2. To get to the start page, make sure you’re in a new tab.
3. Scroll to the bottom of the page and select Edit.
4. Press the toggle for Background Image to ON (green).
5. Press on one of the preset photos to select it.
6. Tap the large plus (+) button if you prefer to use your own.
7. Select a picture from your Photo Library.
Questions?
As you can see, customizing your start page in Safari on the iPhone and iPad in iOS 15 is simple. When you start a new tab in Safari, this will provide you a better experience, and it’s a terrific way to personalize the browser.
Do you have any queries regarding how to modify your iPhone’s Safari start page? Leave them in the comments, and we’ll assist you.
How To Play Granny 3 on PC – Windows 10/8/7
How To Play Alchemy Stars on PC – Windows 10/8/7
How to download and install iTunes on PC (Windows 10/8/7)
How to Record Your Screen Using VLC
How to Record Your Screen Using VLC
VLC Media Player offers a lot of features, but did you know it can also record your screen? Here’s how to use VLC to record your desktop.

You may need to record video of your desktop at some point. Perhaps you want to record the steps of a problem you’re having, or you want to capture footage from a favorite game. There is another technique to record your Windows screen without installing anything.
VLC Media Player, the multi-purpose video player, has a different trick is hidden. It is capable of recording your screen without the use of any additional software. This is how it goes.
How to Record Your Screen Using VLC
1. Search VLC Media Player in the Start Menu and open it.
2. On the toolbar, click the Media tab and choose Convert/Save.
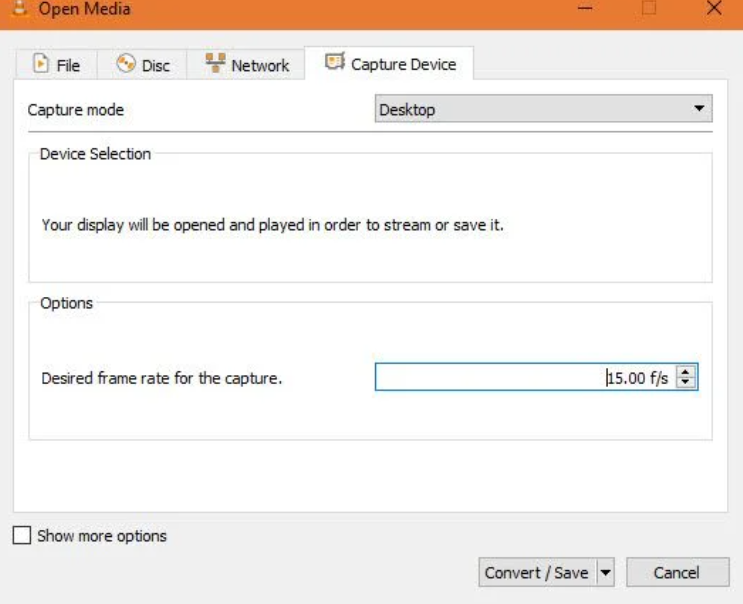
3. Move to the Capture Device tab. Change the Capture mode dropdown box to Desktop here.
4. In the Desired frame rate box, type a number of frames per second. 15FPS should work fine for simple screen recordings. Try 30FPS if you need a high-quality recording. A greater frame rate results in a smoother recording, but it also results in a bigger file size.
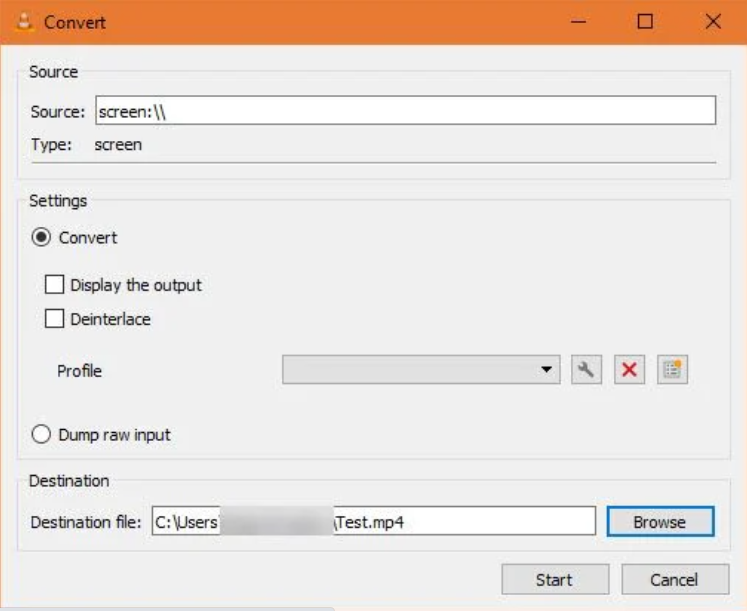
5. To enter the next dialog box, click the Convert/Save button.
6. Choose a location to save the recording by selecting Browse next to the Destination file box.
7. Once you’ve completed this, click Start to begin the recording. VLC will record anything on the screen without giving you any indication.
8. To stop the recording, press the Stop button on VLC’s interface, and the file will be saved automatically. It will be ready for you in MP4 format at the place you indicated previously.
That’s all there is to make a quick screen recording. VLC doesn’t have all things of specialist recorders, but it’s simple to use in a pinch. You may now share whatever is on your screen at any moment without having to use your phone’s camera!
How Do People on Clubhouse Make Money?
How Do People on Clubhouse Make Money?
Have you ever wondered how Clubhouse users generate money? They can accomplish this in three ways.

These days, the clubhouse is all the rage. Many entrepreneurs, activists, and content creators have joined Clubhouse since Elon Musk’s decision to join the audio-based social networking app to share their ideas and establish a fan base.
Clubhouse, on the other hand, is an invite-only platform, which means you can only join the app or a chat room if a buddy provides you a link. Because of the exclusivity, there is a limit to how quickly you can expand your audience.
But that doesn’t rule out the possibility of making a living from Clubhouse. So, how do users earn money on the app?
1. Sponsorships
Sponsorships are one of the main ways to generate money on Clubhouse as a content creator, and they’re a popular business model in the social media age. Companies who want to promote a product look for influencers on Instagram, so it’s only natural that they’ll do the same on Clubhouse.
Sponsored Clubhouse creators are paid a set sum to mention a company’s product or service, similar to YouTubers.
Brands are increasingly going beyond simply paying for shoutouts. Many companies are beginning to pay creators and entrepreneurs to construct entirely new chat rooms on the app, with titles and descriptions dedicated to the company. There are also affiliate links involved.
2. Paid Rooms

Closed Clubhouse chat rooms are occasionally created and monetized by Clubhouse users with a continuously rising listener audience.
An entrepreneur who wants to launch a Closed Clubhouse chat room, for example, will tell their listeners about it and ask them to RSVP ahead of time.
Participants who have been confirmed will be required to pay before the event. Then, they’ll be able to listen in on the day the Closed chat room becomes live.
Some artists or influencers even invite high-profile speakers or moderators to make guest appearances or serve as moderators to gain more exposure. Many CEOs and well-known celebrities have appeared on Clubhouse to discuss a variety of topics.
3. Direct Contributions From Listeners


Some Clubhouse hosts prefer to collect money from their listeners directly. Many users will post links to their Venmo or CashApp accounts, as well as links to crowdfunding sites like Patreon, in their user bio.
Patreon is a prominent third-party service that many authors use when it comes to crowdfunding platforms. There are, however, a number of alternatives to the site.
Nevertheless, this way of receiving funds may not be necessary soon. In April 2021, Clubhouse launched a unique new feature that will allow users to monetize their work on the app.
Payments is a new feature in Clubhouse that allows users to pay money directly to their favorite content creators without having to rely on third-party crowdfunding platforms.
To help a creative, simply go to their profile, press Send Money, and type in the amount you’d like to donate. Clubhouse will not take any cuts and will give the developer 100% of the money.
Payments is still in the early stages of implementation. Clubhouse, on the other hand, plans to make the service available to users all around the world soon.
Making Money On Clubhouse
The audio-only nature of Clubhouse means it is ad-free, unlike many social networking platforms, but it hasn’t stopped people on the app from earning money.
With its first-ever Clubhouse Creator First accelerator program, the app has begun to step up and give help to newcomers.
Join Clubhouse if you have a brilliant idea you’d want to share with the world. After all, who knows? You may be the app’s next great thing.