How to Install Steam Link on Raspberry Pi (and play PC games)
Are you a Raspberry Pi fan who likes Retropie and tiny games? Probably
Are you using your Raspberry Pi to play the latest PC games? Nope
However, beginning December 2018, you may play Steam games on a $35 machine. This tutorial will show you how to do it.
The Steam Link is a product from Steam to replicate a computer screen on a gaming device (Steam Machine). It’s available on Raspberry Pi OS, so it’s possible to install it, to play recent games on the Raspberry Pi.
I’ll teach you how to do it; it’s not difficult.
But first, let me explain where it comes from and how it functions.
Steam Link history
As is customary, I’ll begin by ensuring that you understand the background of this session.
Steam introduction
Steam is a well-known game marketplace.
You can explore their game collection and then buy and download a ton of games, just like an app store on your phone.
Now, Steam has over 150 million players and 15,000 games in store.

Over the years, Steam has brought a lot of technological innovation in the game distribution.
Steam, which launched in 2003, entered a competitive market where games were mostly sold in physical boxes.
With the globalization of the Internet, this concept is now being implemented by a growing number of players.
Steam also pushed for the acceptance of multi-platform gaming.
In 2010, they worked on a macOS version. And in 2013, a Linux version became available.
This was a significant advancement for these platforms.
They had previously been out of the way in the world of video games.
Steam consoles
Steam has also attempted to introduce its product to game consoles, but with fewer degrees of success.
They began by installing their program on the PlayStation 3 console (for Portal2 for example).
In 2013, things sped up with the release of Steam OS and the beginning of the Steam Machine concept.
Steam OS is a Debian-based Linux system that allows you to play Steam games on another computer.
This machine is the Steam Machine, which was available in 2015 and ran Steam OS.
Steam Link announcement
And finally in 2015, Steam announced new hardware in this catalog: the Steam Link.
The Steam Link is a compact device that includes USB, HDMI, and RJ45 connectors.
It enables us to play our favorite games on the television, similar to a console.
But this tiny box isn’t truly in charge of the games.
It’s just a screen sharing system that you can play with other controllers and watch on your TV or computer screen.
Steam Link on Raspberry Pi
The Steam Link hardware and the Raspberry Pi have a number of things in common.
This is how the Steam Link appears to look likes inside the box:

Yes, it reminds us of something… a small single board running Debian.
Recently, the Steam Link software was released in the Raspberry Pi OS repository, so we can install it easily and freely on Raspberry Pi.
That is the purpose of this post, so let’s get started with the installation.
How to turn your Raspberry Pi into a Steam Link?
Prerequisites
Raspberry Pi OS installation
The first thing you need to do, if not already done, is to install the latest Raspberry Pi OS version on your Raspberry Pi.
Choose the Desktop version and, if possible, try to use Raspberry Pi 4.
Even if we’re simply doing a screen share, you should start with the more powerful Raspberry is a good idea.
Steam Link installation
Then follow the installation steps below:
- Start a terminal, or connect via SSH.
- Update your system.
sudo apt update
sudo apt upgrade
- Install the Steam Link package.
sudo apt install steamlink
It’s already finished for the installation part.
First start
Then start the application:
- Navigate to the main menu
- Go to the Games section and select “Steam Link.”
It may do an update before proceeding; simply confirm the installation.
- When the program opens, select “Get started.”

- Pair your controller if prompted.
It’s mostly if you use the Steam controller (which you can find on Amazon).
Simply connect in USB controllers, and Steam will automatically recognize them.
- Then, from the list, choose the computer you want to use:

- Finally, to couple the two devices, input the pin displayed on your computer’s screen.
Steam will begin network tests, and you will be ready to play shortly after.

First game
Here is the screen you should get:
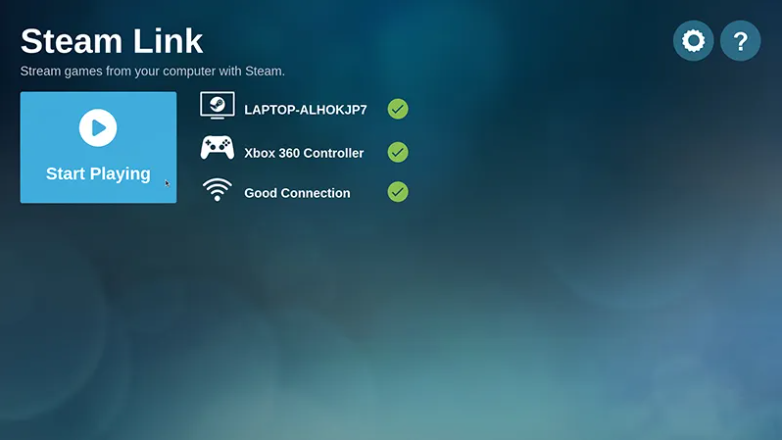
Now click on “Start playing” and follow theses step:
- Steam may ask you to install an additional driver on the main computer the first time you click “Start Playing.”
It was merely an audio driver in my instance (to send the computer sound to the Raspberry Pi, I think).
It’s as simple as clicking “Install” on the PC.
- The Steam main screen will appear after that. It’s almost identical to the menu on your computer:

- Go to “Library” and choose a game if you already have ones.
On the Game page, you have two main parts:
- Your game:
- This is the place where you can begin the game.
You can also find out about your statistics, friends that are playing this game, and latest news.
- Manage game:
- You’ll find all of the game’s settings and preferences here.
I propose that you review the controller configuration at the very least.
- It’s possible that the game controls don’t quite fit your vintage controller.Or, they will require a keyboard key, which is inconvenient for gaming on the Raspberry Pi.
- Next, tap on “Launch game” in “Your game”. Configuring the Steam Link for the first time can take a few minutes. Patience is required.
- You’re finally ready to play your favorite game:

Extra tip
I’m not sure if it’ll be of interest to you, but I came across something amusing.
If you force quit Steam on the computer (ALT+F4), the screen mirroring stays active.
On the television, you gain access to your computer.
This enables you to watch movies, photos, documents, and webpages on your television.
If you don’t have a smart TV yet, this could be useful to bring the power of Windows apps on the Raspberry Pi.


