This PC can’t run Windows 11 – How to solve this error
This PC can’t run Windows 11 – How to solve this error
- Several customers have reported encountering difficulties while attempting to determine whether their PC is compatible with Windows 11.
- Despite the fact that machines respect the minimal hardware requirements, Microsoft’s utility returns an error.
- The key is to have a TPM 2.0 on the motherboard that is turned on.
- Enabling Secure Boot in the BIOS will also solve the problem.

When testing if their computer is compatible with the next version of Windows, many people are receiving the This PC can’t run Windows 11 problem.
Regrettably, this occurs even on machines that adhere to Microsoft’s minimum system requirements.
When you are actually surfing with your machine on Microsoft’s official system requirements page, the error notice will also appear as This PC will not run Windows 11 after scanning.
We tested this on a cutting-edge Dell XPS 17 machine with massive system needs and can confirm that the reports are correct.
The PC Health Check tool indicates Windows 11 is not compatible, despite the fact that the PC has enough hardware to move mountains.
The issue is usually not with the machine’s hardware, but with the inclusion of a TPM 2.0 chip on the motherboard and a BIOS feature called Secure Boot that must be enabled.
How to fix This PC will not run Windows 11 error?

To begin, double-check that your motherboard has a TPM 2.0 chip. This component is normally present on most machines, however, it may not be on yours if it is genuinely antique. Here’s a quick guide to assist you with the process:
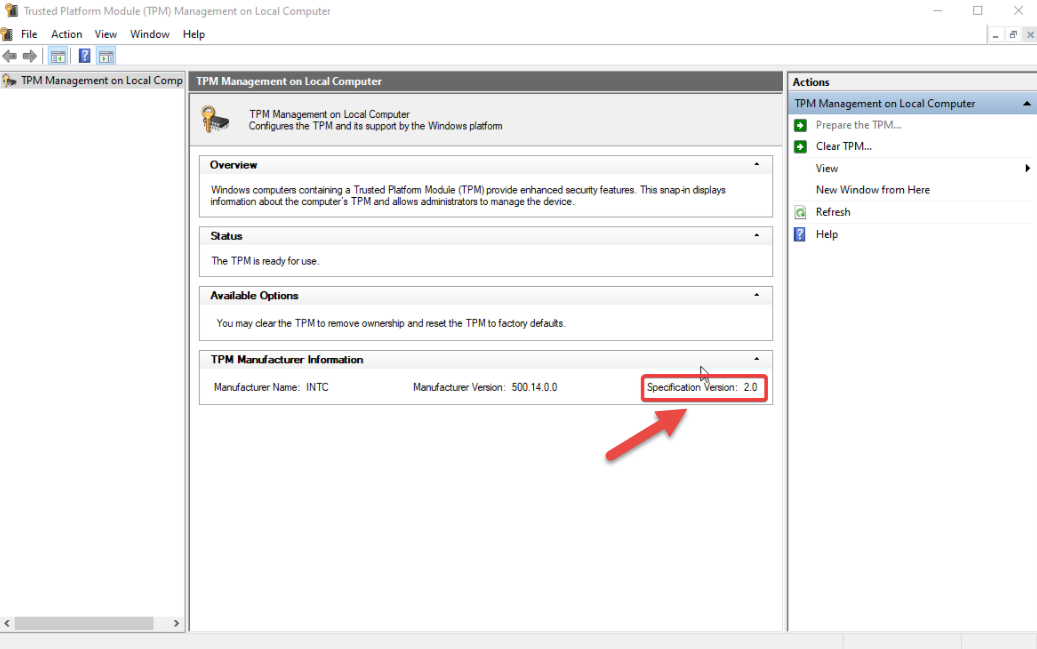
To open the Run dialog, press Windows + R, type tpm.msc, and then click OK.

This should open the Trusted Platform Module (TPM) Management console.
Check the value of the Specification Version in the TPM Manufacturer Information screen. As shown in the screenshot below, this should be set to 2.0.

If you don’t see this console screen and instead get an error instead of compatible TPM not found, that means the TPM chip isn’t installed on your motherboard or is disabled in BIOS.

The TPM state chip must be turned on straight from the BIOS.

Download and change the appraiserres.dll file
1. You must first obtain the appraiserres.dll file from an external source or a Windows 10 ISO image.
2. Mount the Windows 11 ISO.
3. Go to the Sources folder after mounting or extracting the ISO.
4. Locate and delete the appraiserres.dll file from the folder.
5. Copy the received appraiserres.dll file from step one and paste it into the Windows 11 ISO.
6. Reinstall Windows 11 on your computer.
Because the Windows 10 operating system does not check if a computer has a TPM 2.0 chip, replacing the file with the one from Windows 11 forces it to skip this step.
Check if Secure Boot is enabled
Microsoft states that Windows 11 requires a Secure Boot-capable system, but in reality, this functionality must be turned on. Not that simple, right?
To enable Secure Boot, restart your computer and go to the Boot menu. Before booting into Windows, press F2, F11, or the Delete key, depending on the device.
Now look through the Boot menu for the Secure Boot option and turn it on. Explicit instructions differ from one BIOS version to the next, but I’m confident you’ll figure it out.

You can check the PC Health Check Utility again at the end of the procedure, and you should now receive a confirmation message similar to the one below:

Additionally, the message on Microsoft’s official requirements page will now be changed:
