How to Move Apps to an SD Card on Your Android Device
In this article, I will show you how to offload Android apps to an SD card to free up storage space on your phone!
Don’t you dread it when the Not Enough Space warning appears when you try to install a new app on your Android device? It implies that all of those games, photographs, and 4K films have finally paid off.
The remedy is simple if your phone has a memory card slot. A microSD card is a low-cost solution to enhance the storage capacity of your phone. Rather than uninstalling apps from your Android device, you can move them to an SD card to free up space.
Depending on the Android version you’re running, you’ll have to do this in a different way. In this post, we’ll look at all of the options for moving Android apps to an SD card.
Using an SD Card on Android: Basics
Consider the following factors before you begin.
Because memory cards are slower than the internal storage, resource-intensive software may function slightly worse. When choosing a card, choose the one that is the quickest and largest that your phone can support—-check your phone’s specifications to see what cards it supports. (To avoid being conned, make sure you know how to recognize a phony microSD card.)
It isn’t possible to move preinstalled apps without rooting, and even some third-party apps may not support it. Also, on previous versions of Android, you might not be able to use widgets connected with apps you’ve moved to your memory card.
Let’s look at how to migrate apps to an SD card with all of this in mind.
Use an SD Card as Internal Storage
Changes to the way Android phones can handle memory cards were introduced in Android Marshmallow, and these changes were carried over to succeeding versions of Android.
MicroSD cards can now be used as internal storage. Android treats the card as an extension of your built-in storage space, rather than having internal and external storage as separate locations.
Data and apps can write to either as needed, and the process is completely automated. As a result, you don’t have to be concerned about the location of your apps.
You must first set this up. Because your card will be deleted during the procedure, make sure you’ve backed up any important information:
1. Insert the card into the phone’s slot. Tap Set Up when the New SD Card notification shows.
2. The next step is to decide how your phone will use the card. On Android 9, choose Phone Storage, or Use as Internal Storage on previous versions. Go to Settings > Storage, pick the card, hit the menu button, and then select Storage Settings. Choose Format as internal.
3. Tap Format SD Card or Erase & Format on the next screen. Your card will be wiped as a result of this.
4. On Android 9 and later, you have the option of moving your material, including apps, to the card. It also displays the amount of space you’ll save. To finish, click Move Content.

Adoptable Storage is a feature that demands you to maintain your card in your phone at all times. The card is also encrypted, so you can’t copy the data by inserting it into another device.
The main disadvantage of adoptable storage is that every Android phone is different, hence some manufacturers choose not to include it. If you don’t have it, you’ll have to manually transfer your apps to your SD card.
How to Move Apps to an SD Card on Android 9 Pie and Above
On Android 9 and later, you can manually transfer apps to an SD card if your phone doesn’t support adoptable storage. Just keep in mind that you won’t be able to do it for every program, and you won’t be able to do it at all for pre-installed apps:
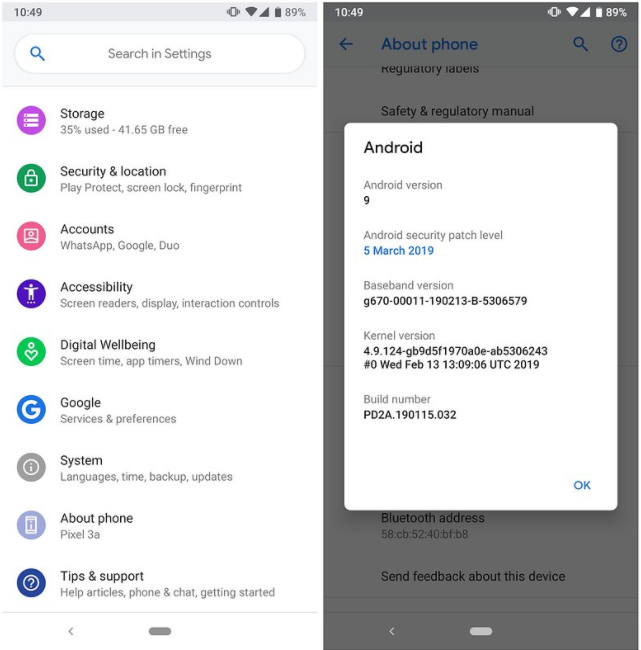
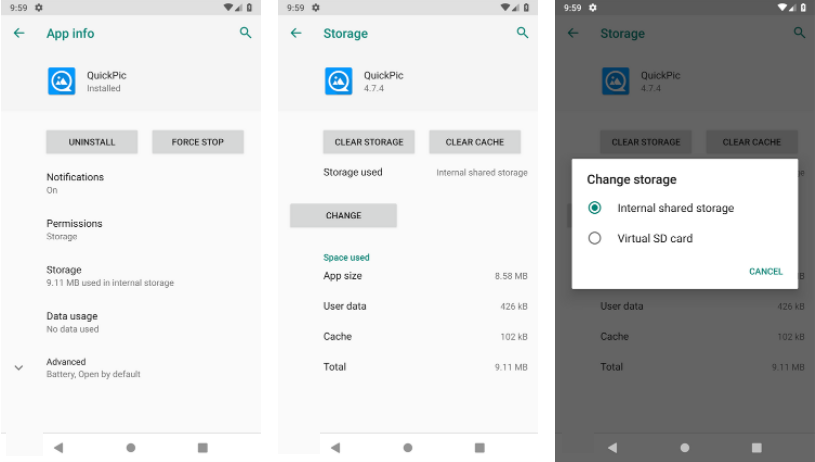
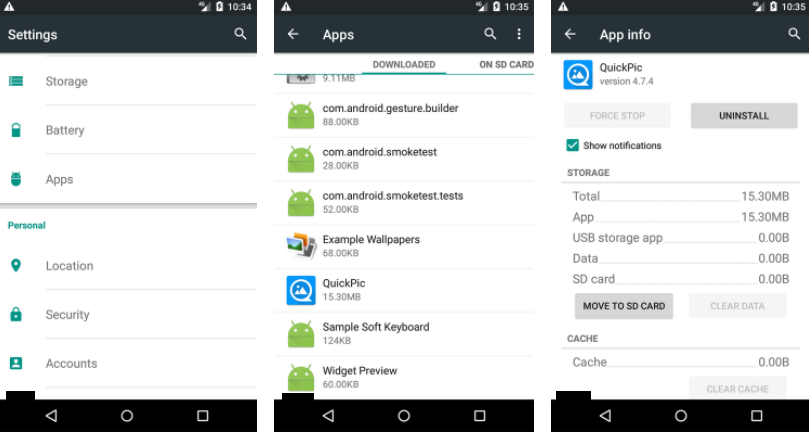
1. Head to Settings > Apps & Notifications > App info.
2. In the list, locate the app you wish to move and tap it.
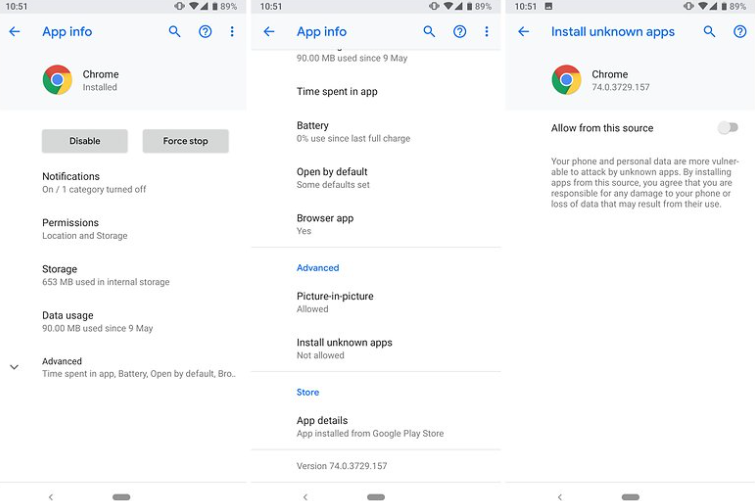
3. Choose Storage option. If the program allows switching to a card, you’ll see a Change button here. This should be tapped.
4. In the Change Storage dialog box, select the SD Card. A confirmation screen appears as a result of this action. To begin, tap Move.
To return the program to internal storage, repeat the steps above, but in the final step, select Internal shared storage. When changing or removing your memory card, you should always do so in this manner.
How to Move Apps to an SD Card on Android 8 Oreo
Moving an app to the SD card in Android 8 is essentially the same as it is in Android 9:
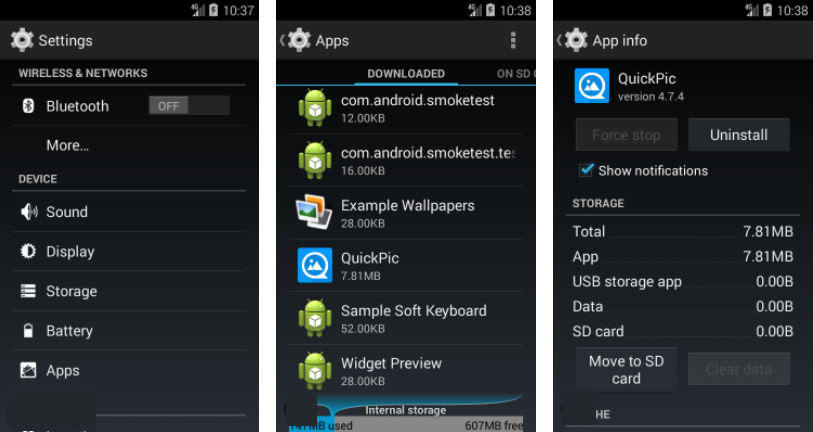
1. Head to Settings > Apps & Notifications > App info.
2. Tap on the app you wish to move to the card by scrolling down to locate it.
3. Choose Storage option. You’ll see a section titled Storage used if the program can be relocated to a card. Change the setting by using the Change button.
4. Select the card to which you wish to move the app, then press Move.
How to Move Apps to an SD Card on Android 7 Nougat
On Android 7 Nougat, you can move apps to a memory card via Settings. However, you won’t be able to relocate all of your apps. You won’t see the Change button in Step 3 if they don’t support it.
1. Head to Apps > Settings.
2. Locate and press the app you wish to move to your microSD card.
3. Select your card from the prompt box that appears by going to Storage > Change.
4. To complete the process, tap Move.

It may take a few moments to complete depending on the size of the app (particularly in the case of large games), so don’t touch your phone until it’s finished. To revert the app, go back to Step 3 and select Internal shared storage.
How to Move Apps to an SD Card on Android 6 Marshmallow
Moving apps to a microSD card in Marshmallow is the same as in Nougat:
1. Navigate to Settings > Apps, then tap on your chosen app.
2. Choose Storage > Change, then choose the card when prompted.
3. Select Move to complete the process.
How to Move Apps to an SD Card on Android 5 Lollipop
Memory cards aren’t as well supported in Lollipop as they are in subsequent Android versions, but you can still move apps via the Settings menu.
The programs you can put on your external storage are limited; it depends on the developer’s support for the feature. Also, the complete software does not migrate to the card—only a portion of it does.
Swipe to the right tab in the App page, titled On SD Card, to view which apps you have on your card. This makes it simple to spot any that you might want to return to in the future.
To move apps, follow these steps:
1. To move an app to your SD card, go to Settings > Apps and press the app you wish to move.
2. After that, tap Move to SD Card under the Storage section. While the program is moving, the button will be grayed out, so don’t touch it until it’s finished.
3. The app cannot be moved if there is no Move to SD Card option.
The Storage section will refresh to display how much of the software is now stored on the card once it’s finished (and how much is still in internal storage). Move to Phone or Move to Device Storage will now appear on the Move button.
You can delete the app from the card by tapping on this.
How to Move Apps to an SD Card on Android 4.x and Earlier
MicroSD card support was severely limited in all Android 4.x versions. Google seemed intent on phasing cards out entirely, so stock Android didn’t support the ability to move apps to an external card at all.
Some manufacturers, on the other hand, have chosen to incorporate the feature in their own versions of the operating system. If your older equipment supports it, the method is straightforward:
1. Navigate to Apps > Settings.
2. Then, find and press the app you’d like to add to the card.
3. Choose Move to SD Card. If this button isn’t present, you won’t be able to move the app (or your phone won’t allow it).
In the odd event that you still have an Android 2.x handset, here are the steps you’ll need to follow. Widgets on the home screen aren’t supported in these older versions, thus if you want to use one, you’ll have to save it on internal storage.
If your phone doesn’t have the option, you’ll need to check into a third-party app.
How to Move Apps to an SD Card Using Link2SD
There are a few third-party apps that can assist you to move apps to the SD card if your phone doesn’t support it or if you want to migrate an app that doesn’t support it individually. FolderMount and Apps2SD are both popular choices. Both require a rooted Android phone.
We’ll take a look at another option, Link2SD, which offers both root and non-root functionality. It may be used to bulk-upload apps to your card, “force-move” apps that don’t ordinarily allow it and unload data folders for larger apps and games to external storage.
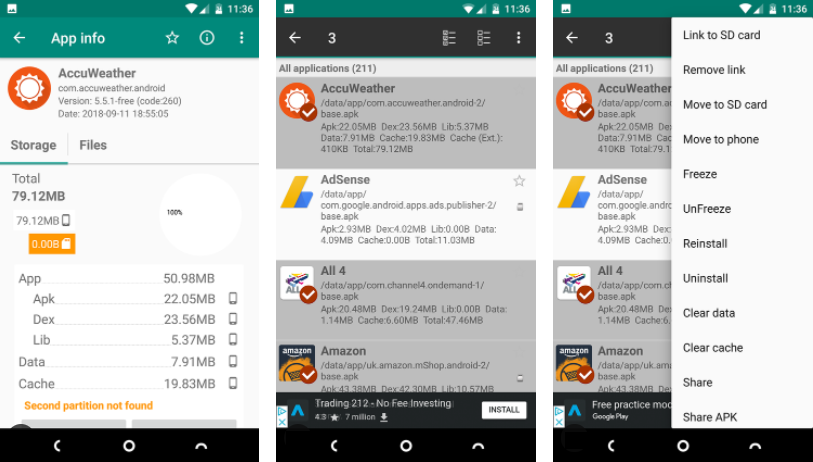
If your phone is rooted, open the app and grant root rights. Then tap the app you’d like to move and choose one of the following options:
Link to SD Card: This option necessitates root access and copies the entire app and its data to your SD card.
Move to SD Card: This doesn’t require root, but it will only work if your phone allows you to move apps to external storage. You can also force-move apps that don’t ordinarily support it if you have root.
Link to SD Card (Data and Cache): Moves data files and requires root.
Tap the menu button in the upper right corner and select Multi-select to move many apps at once. Now press all of the apps you wish to relocate, then hit the menu button again and select Link to SD Card or Move to SD Card. These are the same options as previously stated.
Link2SD is available for free, with a premium upgrade available. It is compatible with Android version 2.3 and higher.
The Best Way to Move Apps to an SD Card on Android
The easiest approach to install apps on your SD card is determined by the Android version you’re running, whether your phone’s maker has incorporated all of the functionality, and the program you wish to move.
In conclusion:
- That’s the greatest option on phones that allow adoptable storage. It eliminates the need to manually manage your card.
- That way is the best and cleanest for phones that only support manually moving apps to the card.
- Consider rooting and utilizing Link2SD if your phone doesn’t support any of this or if you have unique requirements.
- Don’t forget about the disadvantages of using an SD card on Android.
If your apps are taking up too much space, another option is to switch to one of the Android Go apps. They are not only smaller and take up less space, but they also perform better on older or less powerful phones.