How to Tether Your Android Phone Using PdaNet+
With PdaNet+, your phone can become a modem for your laptop.
Through a process called “tethering,” PdaNet+ turns your phone into a modem that your laptop can use. You don’t have to worry about finding a Wi-Fi hotspot because of this feature. As long as your cell phone has data service, you can use your laptop to work online.
The Android version of PdaNet+ can connect to a Direct Hotspot either through a USB cable or over Wi-Fi. If you don’t mind being interrupted, you can use the free version of PdaNet+. However, as of late 2018, the full version costs less than $10 and gives you full access to secure websites after a 30-day trial period.
Note: Many smartphones now have built-in hotspots, which you can usually find in Settings > Tethering (or similar term). If your phone can do this, you don’t need an app for it.
How To Download and Install PdaNet+ on PC/Laptop (Windows 11/10/8/7)
Installing PdaNet+ on both your phone and your Windows computer is all it takes to set it up.
1. First, go to the June Fabrics website to download the PdaNet+ Windows installer.

2. Install PdaNet+ on your computer. Setup on the computer side is easy, but there are a few steps involved. Start by opening the installer. In the first part, you’ll be asked some basic questions about how you want to set up PdaNet+. Generally, the defaults are fine.
3. PdaNet+ will ask you to connect your Android device during the installation process. Stop what you’re doing and look at your phone.

4. On Android phone, install PdaNet+ from the Google Play Store.
You’ll need to turn on USB debugging on your Android device. Take a moment to do that if you haven’t already.
5. Connect your Android phone to the computer using USB.
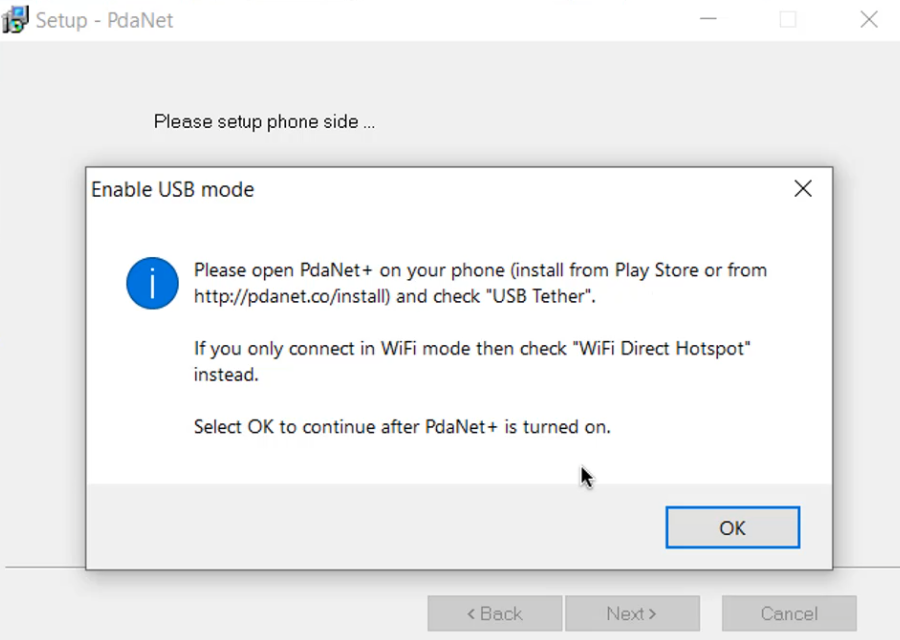
6. Launch the PdaNet+ app on Android, and tap USB Tether.

7. Tap Ok back on the Windows installation window.
8. Then, Windows will tell you that the PdaNet+ installer wants to install a new device. Press “Install” to move forward.
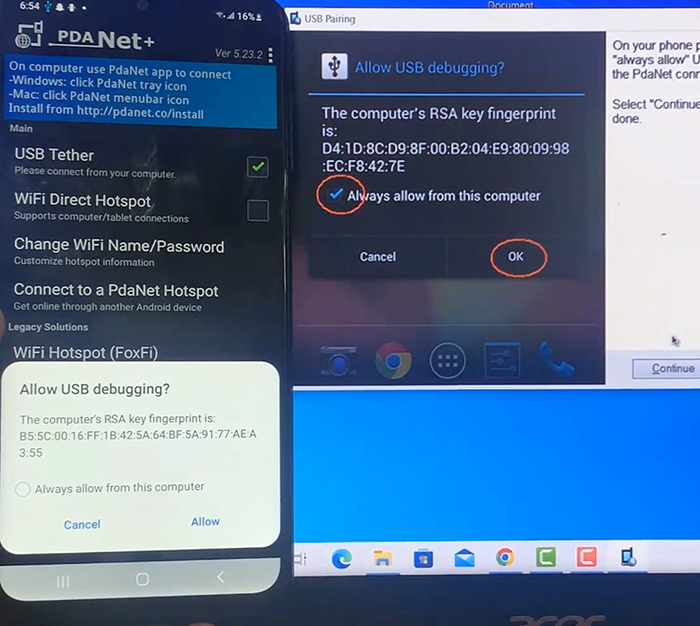
9. The installer will then ask you on your Android device if you want to allow USB debugging.
10. Open your Android device, and you should see the debug request. Select Always Allow from this computer, and then click OK.

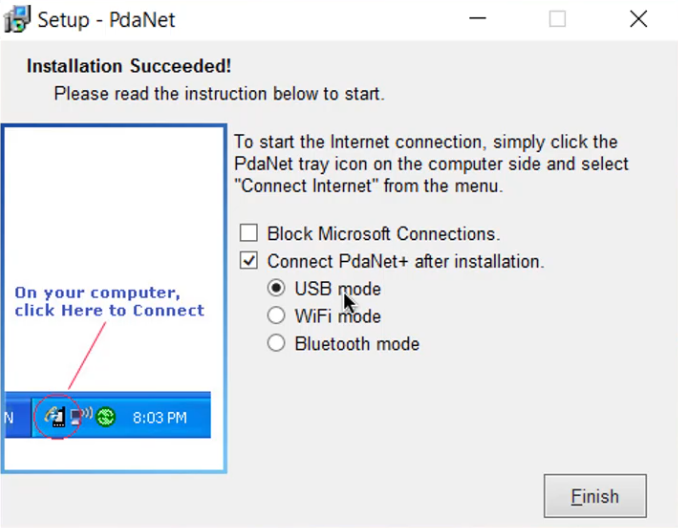
11. The Windows installer will tell you that the installation went well. Make sure that Connect PdaNet+ after installation is checked, and choose USB mode. Click Finish.

12. Turn to your Windows PC. You’ll see that you’ve connected. In the future, you will use the PdaNet+ icon in your system tray to connect on Windows and the App on Android.
13. When you get a “Connected!” message on your laptop, you can use the data connection on your Android to surf the web.
In this video, we are gonna show you how to tether your Android Smartphone using PdaNet+:
That’s about it.