How to Set a Song as a Ringtone on iPhone
In this tutorial, learn how to set a song as a Ringtone on iPhone.
Here’s how to make a ringtone for your iPhone for free using a song or any sound file. All you’ll need is our full step-by-step tutorial.
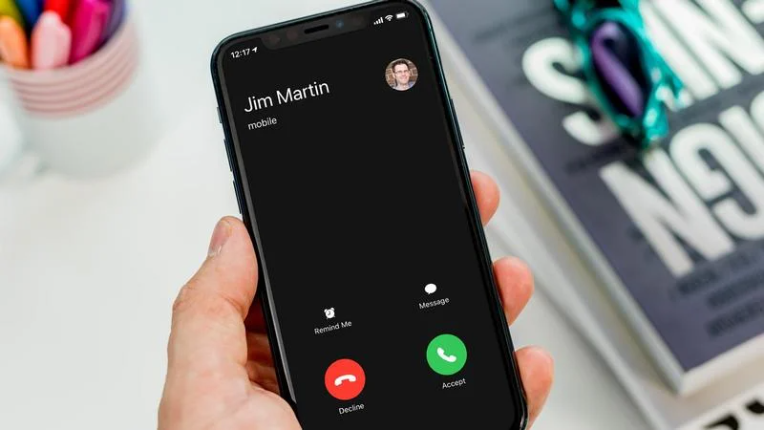
You can’t seem to locate a ringtone for your favorite song? You don’t want to spend money on ringtones? You’ve arrived at the right location. In a few minutes – maybe even faster – we’ll show you how to produce a ringtone from a specific segment of a song you like.
We’ve broken down the entire process into easy-to-follow stages so you can listen to any part of a song – or any audio file for that matter – on your iPhone when people call you.
The procedure is completely free, however, it does necessitate the usage of iTunes. Sorry. There isn’t anything we can do about it.
No, you can’t just utilize an app on your phone, before you ask. Apple does not allow apps to write ringtones into the particular folder where they must reside, so be wary of programs that claim to be able to create ringtones. They can’t, in fact.
Now that you’ve made up your mind to make that catchy riff your ringtone, keep reading.
See more:
Prepare your song
Before you begin, make sure the song you wish to use it in your computer’s iTunes collection.
If it isn’t, you can use iTunes to import any MP3 or AAC file. Alternatively, you can record real-world sounds or people’s voices to transform into ringtones using the Voice Memos app on your iPhone. It makes no difference.
Simply ensure you have the most recent version (12.11.0.26 as of this writing), then run iTunes by double-clicking its shortcut or searching for it in the Start menu.
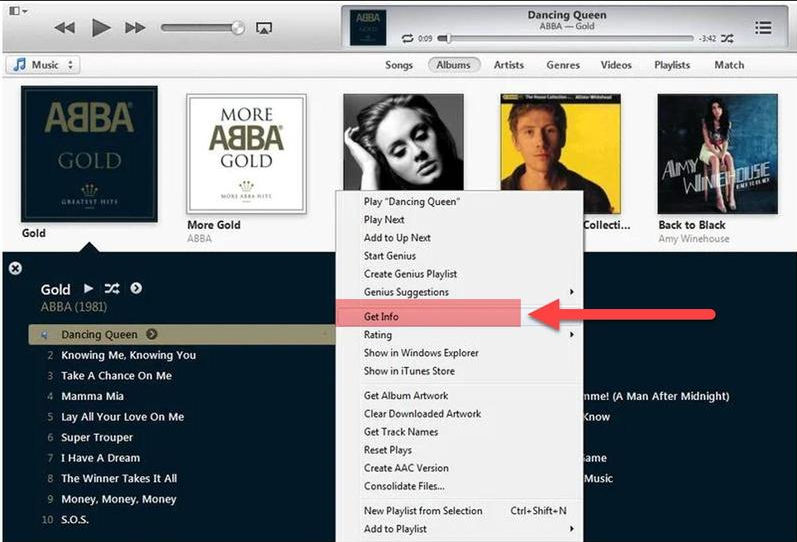
Click on the album that contains the music in the Library, then right-click on the song you wish to utilize and select Song Info from the menu.
Choose timings
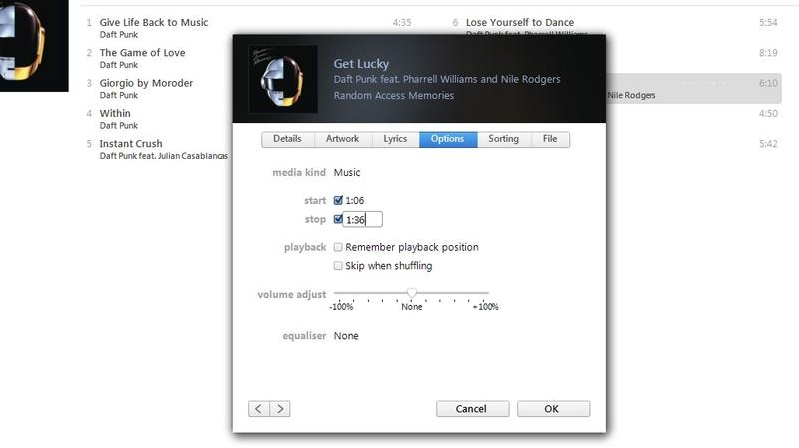
Click the Options tab in the new window that appears, then check the Start and Stop boxes. Put the start and stop times for the ringtone in the box.
To figure out these numbers, first, listen to the track and write down the time you want it to begin. Because a ringtone can only be 30 seconds long, the stop time must be less than that.
Use a decimal point if you want to be extremely specific about when your ringtone begins. For instance, if the music portion begins between 44 and 45 seconds, type 0:44.5 in the Start Time box. You may even use 0:44.652 to define the start and stop times in thousandths of a second.
To close the window, click OK.
Create AAC version
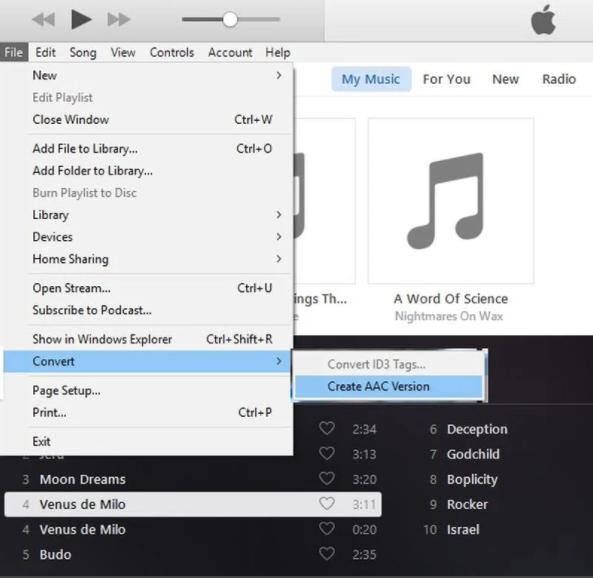
You must now select the song by clicking on it once more. Then select Convert from the File menu, then Create AAC version.
Instead of showing as a duplicate track in the album, it will display in your Library as a new album with a single song.
1. The remedy is in the next step if you see ‘Create MP3 version’ or something else.
Note: The ‘Create AAC version’ option has been moved in iTunes 12.4 by Apple (and later). Previously, you could convert a song to AAC by just right-clicking on it.
AAC Encoder
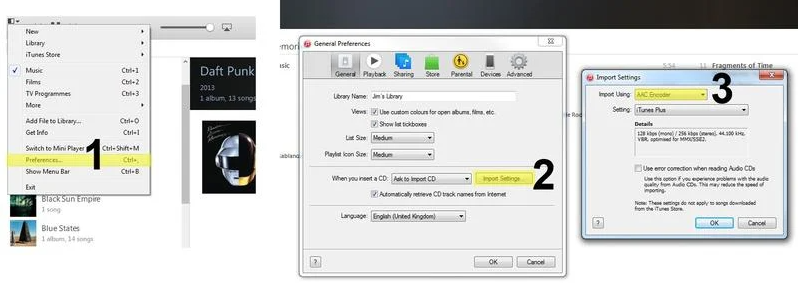
It’s because your CD rip settings aren’t set appropriately if you don’t see a choice to Create AAC version. To make a modification, go to the Edit menu and select Preferences…
Now choose Import Settings… then to ‘When you insert a CD’ and select AAC Encoder from the Import using: menu.
Start & stop times
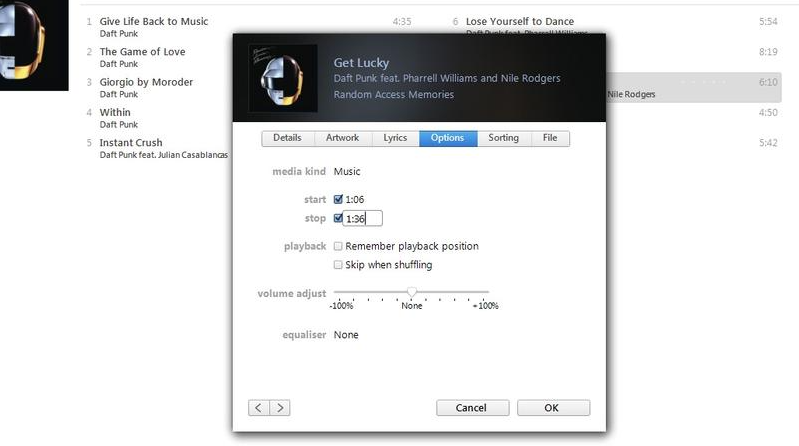
Click on the original album from which you selected the song and right-click on that song as a housekeeping measure. Select Song Info, then Options.
Now untick the start and stop times to return them to their original times then choose OK.
Otherwise, the track will only play the area between the start and stop times when you play it again.
And I’m sure you don’t want it to happen.
Find the file
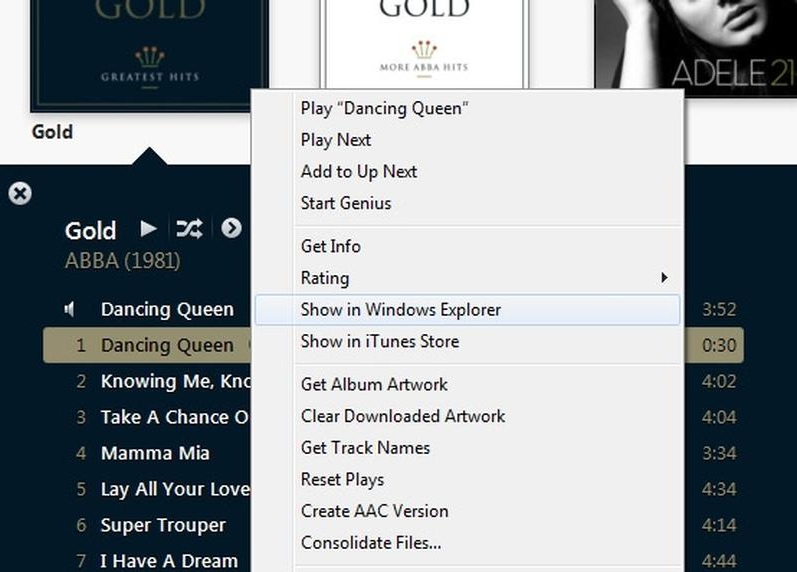
Return to the duplicate album that contains the newly produced song you’ll use as a ringtone now.
Choose Show in Windows Explorer by right-clicking on that music. On a Mac, the Show in Finder option is available.
This is necessary so that you can alter the file’s extension (and thus its type) in the next step.
Change extension
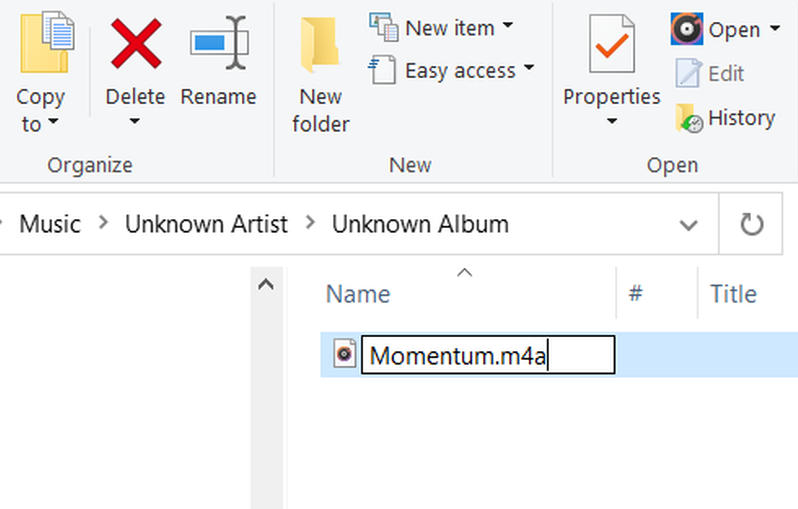
The file should now be highlighted in the pop-up window and named something.m4a (where’something’ is the title of your song).
If you can’t see the .m4a part (i.e. you see only ‘Dancing Queen’ and not ‘Dancing Queen.m4a‘), it’s because Windows is set to hide the extensions. Here’s how to show the file extension for editing.
When you see the m4a part of the file, right-click it and select Rename. Change the.m4a extension to .m4r and press Return, Enter, or simply click in some white space.
When prompted if you wish to change the extension, select Yes.
NOTE: Because this is a common stumbling block, keep in mind that if file extensions are hidden, you cannot simply add .m4r when renaming the file. All you’d have to do is rename the file from ‘Dancing Queen.m4a‘ to ‘Dancing Queen.m4r.m4a.‘
This is not going to work!
Import & sync ringtone
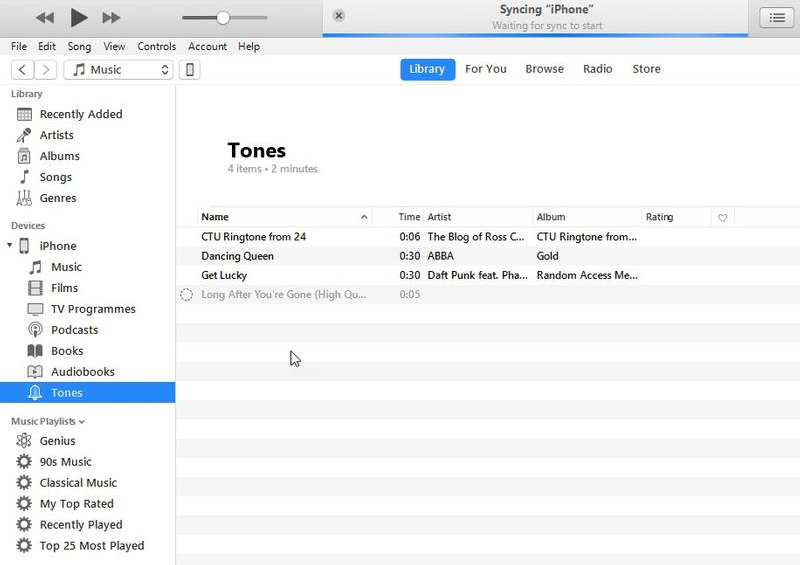
In version 12.7, Apple removed the App Store and another bloat from iTunes, including Tones, which was where you could quickly see all of your ringtones.
However, you can still use your iPhone to sync your new ringtones.
To do so, use the USB cable that came with your phone to connect it to your PC or laptop. If you’re running Windows 10, tap ‘Trust this machine’ if necessary (if the notification doesn’t appear, remove and re-plug the USB cable). Then enter your phone’s passcode and wait for iTunes to display your phone’s icon.
‘Do you want to allow this computer to access information on “Xxxx’s iPhone”?’ you could be asked. To allow this access, click the Continue button.
Look under Devices in the left-hand column for your phone. When you click it, the list should expand to reveal a Tones section.
If you click it, any custom tones you have will appear on the right (if you don’t, that list will be blank).
Switch to File Explorer – or Finder on a Mac – and make sure your ringtone is still highlighted (or refer to the Find the File step earlier).
Copy it by right-clicking on it (or pressing Ctrl+C on your keyboard if you’re on a Mac).
Return to iTunes, choose Tones if it isn’t already chosen, and paste the tone using Ctrl+V (Command+V on Mac).
What should happen is that the tone will show in the list of tones and will sync to your iPhone shortly.
Note: It’s worth noting that you can’t drag and drop tones from an Explorer window into iTunes anymore.
Mac users: Ringtones may or may not appear in the Tones section. There are two options to consider here:
1- Delete the ringtone ‘song’ entry from your iTunes Music collection (but not the actual file on your hard disk; choose to keep it when prompted). Then, in Finder, double-click on the.m4r file, and it should appear in Tones.
2- If it doesn’t work, try relocating the.m4r file to a different location on your hard drive than your iTunes folder (such as to the desktop). After that, double-click it.
Remove ‘song’ from library
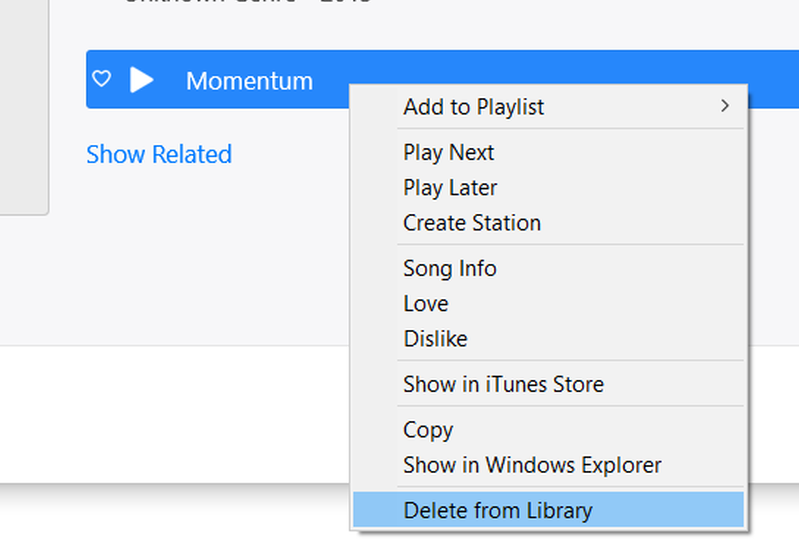
You don’t have to remove the newly produced AAC version of the song from your iTunes music collection, but you should.
That’s because making a few ringtones can get chaotic, and having single-track albums that won’t play and aren’t the complete song anyway can be confusing.
Select your ringtone
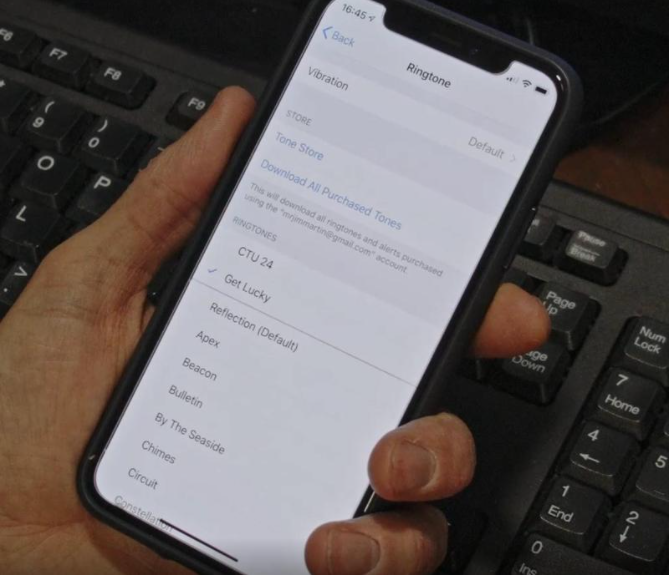
All you have to do now is set the new tone as your ringtone on your phone.
To do so, open your iPhone’s Settings app, then tap Sounds (commonly known as Sounds & Haptics), then Ringtone.
Your personalized tones will display above the preset Ringtones at the top of the list. To make one of them your ringtone, simply tap on it.
You may utilize your personalized tones for other things, such as text message notifications, so the fun doesn’t have to end there.
Custom alert tones
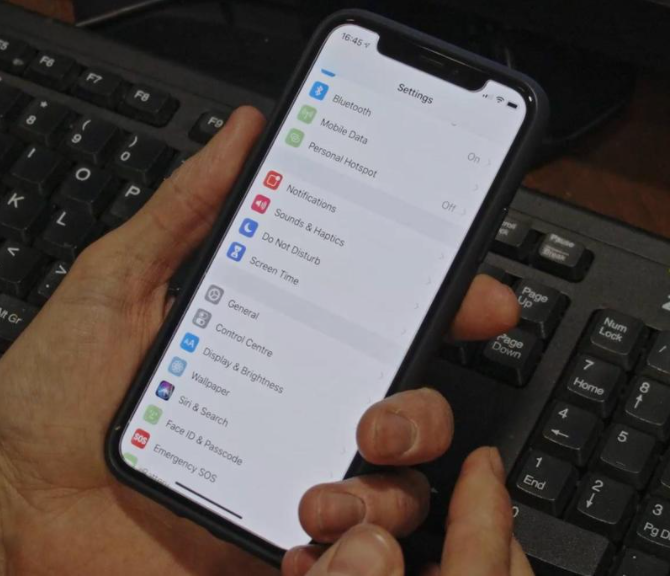
It’s exactly the same process as for a ringtone if you want a custom tone for text messages, tweets, Facebook posts, new voicemails, reminder notifications, or anything else.
The only difference is that on your iPhone, you’ll need to go to ‘Sounds & Haptics’ and find the proper section.
Simply tap on the type you desire, such as Text Tone, and the Alert Tones list will appear.
After you’ve scrolled down past these, you’ll find your Ringtones list. This area will once again include your custom tones at the top.
However, using a 30-second song as a text message alarm is not a good idea. And, in case you’re wondering, in iTunes, there’s no distinction between a’song’ and a sound effect, so you don’t have to utilize a portion of a song from your music library as your custom alert tone.
All you’ll need is a sound effect in an iTunes-compatible format (often MP3), and it’ll be treated like any other music. Then, much like with a ringtone, repeat the process to generate and sync the sound effect to your iPhone, then choose it as displayed.