How to Fix Lenovo Laptop Keyboard Not Working in Windows 10
In this tutorial, learn how to fix Lenovo laptop keyboard not working in Windows 10.

Lenovo laptop keyboard not working on Windows 10? Don’t worry. Here we will show you some effective methods to fix this issue.
Some laptop models feature keyboards that create regular problems for users. Lenovo is one of these brands. Users have complained that the Lenovo laptop keyboard does not always operate in Windows 10.
If your Lenovo laptop keyboard is not working, you’ve come to the correct place on the internet because we’ll show you how to fix it in a few simple steps.
The Most Recommended Solution for the ‘Lenovo Laptop Keyboard Not Working’ Issue
One of the most common reasons for the Lenovo keyboard not working in Windows 10 is faulty and outdated drivers. As a result, updating the keyboard drivers is recommended to resolve the problem. The Bit Driver Updater program may be used to automatically update the drivers. It not only provides one-click driver updates from recognized manufacturers, but it also enhances your computer’s performance substantially.
Fix Lenovo Laptop Keyboard Not Working Issue in Windows 10:
Let’s look at the top seven options for dealing with the Lenovo laptop keyboard not working issue. if you’re stuck with a non-functional keyboard.
Method 1: Reboot the Windows 10 Computer
The issue with your Lenovo laptop keyboard not working might be resolved by just restarting your computer. Rebooting the Windows 10 system is frequently useful in rapidly resolving some minor hardware issues. If the Lenovo keyboard is still not working after restarting the computer, you can proceed to the next steps mentioned below.
Method 2: Tap the Problem Keys Diagonally
This is another simple method that may help you get your Lenovo keyboard operating again if certain keys aren’t working. All you have to do is press the difficulty causing keys diagonally for a few seconds (bottom left point of the keys).
If the issue with the Lenovo laptop keyboard not working in Windows 10 remains, move on to the next step.
Method 3: Switch Off the Filter Keys
If you accidentally turned off the filter keys, this could be the cause of your Lenovo laptop keyboard not working. It can be fixed in the following manner:
Step 1: Navigate to the Control Panel and then to the Ease of Access.
Step 2: After that, tap on the Ease of Access Center.
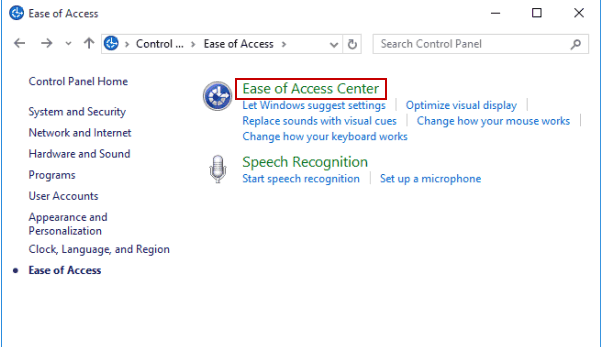
Step 3: Then, choose the “Make the keyboard easier to use” option.
Step 4: Lastly, untick the option “Turn on Filter Keys” in the “Make it easier to type” section.
Step 5: To confirm and save the changes, use the Apply and OK buttons.
Method 4: Replug the Power Cable
Remove the battery and power cable from the Lenovo laptop, then replug the power cable and reattach the battery to see if the issue with the Lenovo laptop keyboard not working in Windows 10 is resolved.
To remove the battery and power cable from the Windows 10 Lenovo laptop, first, turn it off. For 60 seconds, press and hold the power button.
Replug the power cable and reattach the battery after that. After that, reboot the computer to see if the problem has been resolved.
Method 5: Run the Keyboard Troubleshooter
Microsoft Windows operating systems have a number of troubleshooters to assist you in locating and resolving issues with your computer. If the keyboard on your Lenovo laptop has stopped working, you can use the keyboard troubleshooter to resolve the issue. Here are the actions you must take to accomplish this.
- Tap the Windows logo and I keys together on your keyboard to open the Windows Settings app on your PC.
- Locate the Update & Security option and tap on it.
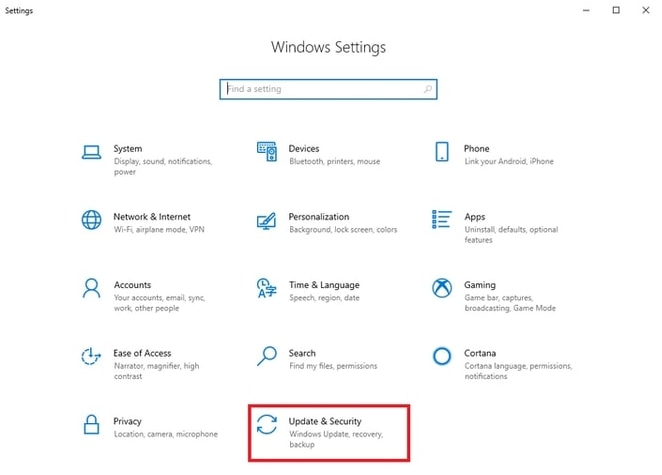
- On the left navigation panel, choose the Troubleshoot option.
- In the right section, look for the Keyboard option and click on it.
- Then, tap on the Run the troubleshooter.
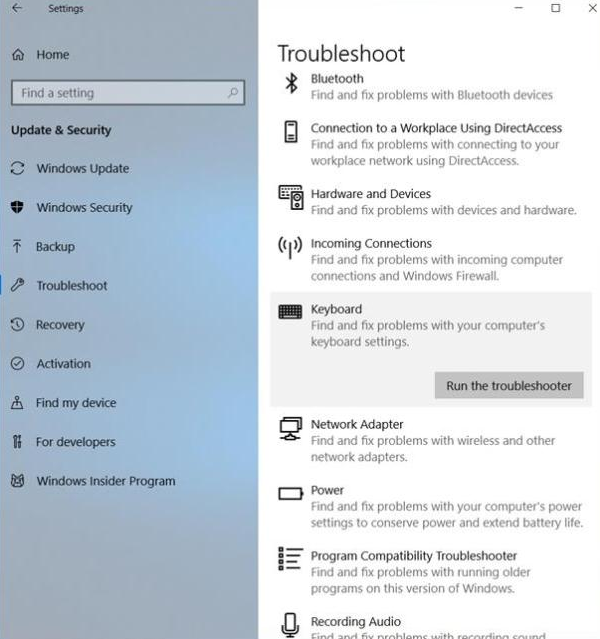
- Reboot your computer after the keyboard troubleshooting process ends.
Your Lenovo laptop keyboard should start working again after rebooting. If the problem continues, move on to the next remedy.
Method 6: Uninstall Multiple Keyboards
The Lenovo keyboard not working problem in Windows 10 could be caused by having two or more keyboards installed on a single computer. In this case, you can try uninstalling the external keyboard device from your computer to see if that solves the issue. The steps are outlined below.
- Go to Device Manager on your computer.
- In the Device Manager, expand the Keyboards section.
- From the pop-up menu, right-click on the keyboard you want to remove and select the Uninstall device option.
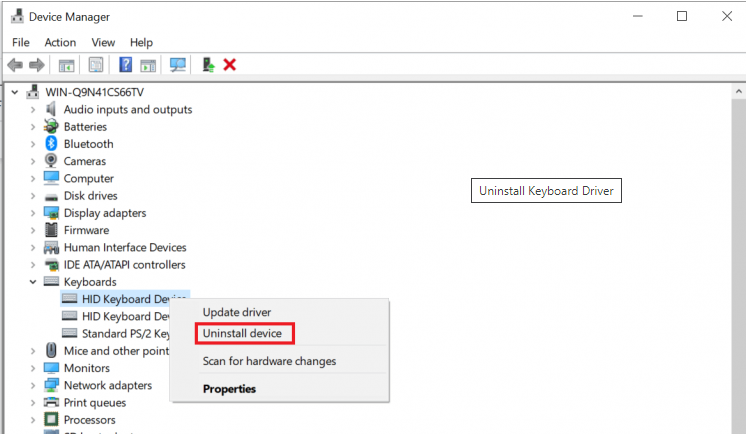
After the uninstallation is complete, restart your device to see whether the keyboard not working on Lenovo laptop issue has been repaired.
Method 7: Reinstall Synaptics Driver
If the problem with the Lenovo laptop keyboard still persists, you can try uninstalling and reinstalling the Synaptics Driver to resolve it.
Step 1: From the Control Panel, open Device Manager and look for the Synaptics driver.
Step 2: From the context menu, right-click on the Synaptics driver and select Uninstall.
Step 3: Afterwards, from the Action menu, choose “Scan for hardware changes” to have Windows look for and reinstall the Synaptics driver on the laptop.
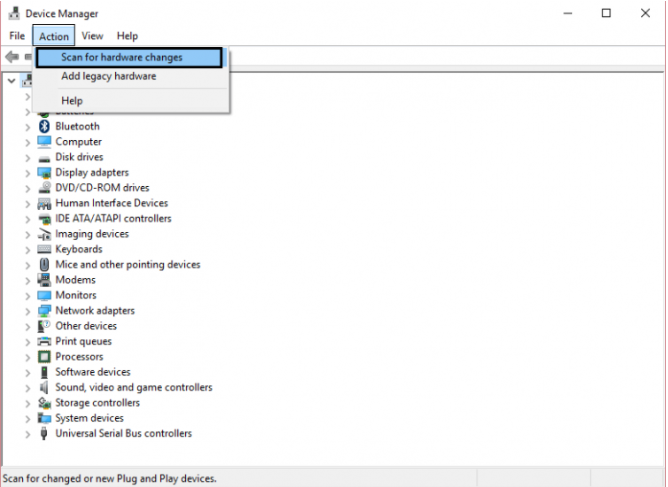
Step 4: Make sure to restart the Lenovo system again.
Method 8: Check for Windows Updates
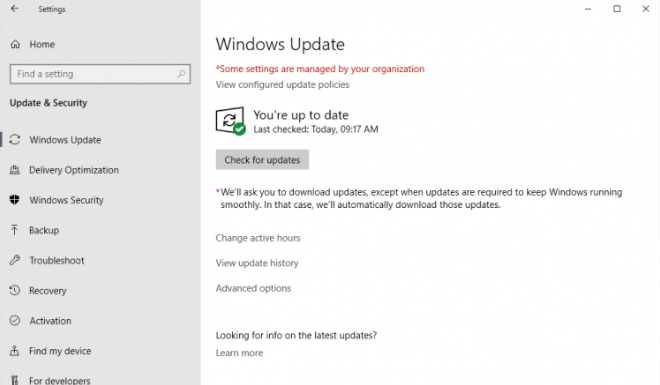
If you have not installed the Windows 10 system updates in a long time, you may experience issues such as the Lenovo laptop keyboard not working. As a result, users are advised to install Windows updates on a frequent basis. It is possible to do it in the following manner:
Step 1: Go to the Lenovo laptop’s Settings app.
Step 2: Navigate to the Update & Security section.
Step 3: After that, tap on the Check for Updates button on the main screen and let Windows search for the latest updates and install them on your PC.
Method 9: Update the Lenovo Keyboard Driver
If your Lenovo laptop keyboard problem hasn’t been resolved yet, this solution will almost certainly help you. All you have to do to get your Lenovo keyboard working again is upgrade your outdated and corrupt keyboard drivers to the latest driver versions. There are two ways to achieve this: manual and automatic.
A) Update Lenovo Keyboard Driver Manually
Using the Windows built-in program Device Manager, you may manually download and install the newest keyboard drivers for your Lenovo laptop. Here are the steps that must be followed.
- Enter device manager in the search box and choose it from the menu
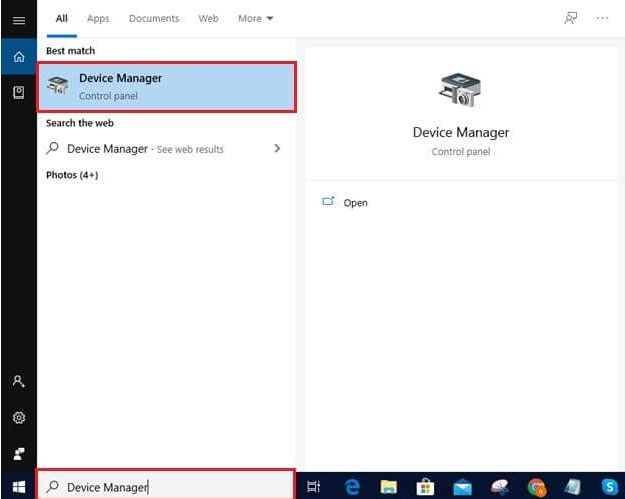
- Expand the ‘Keyboards’ category. Locate the keyboard device and right-click it, then choose the ‘Update Driver’ option from the context menu.
- Then, tap on the ‘Search automatically for updated driver software’ option.
- Wait for your computer’s Windows operating system to locate and install the most recent driver version.
B) Update Lenovo Keyboard Driver Automatically
It is general knowledge that the manual method is time consuming and demands a great deal of patience. As a result, we have a quick and easy method for you. Simply download and install Bit Driver Updater on your Lenovo laptop, and it will take care of the rest. Here’s how to use this fantastic tool to update your Windows PC’s keyboard and other hardware drivers.
- Download Bit Driver Updater
- Start the driver scanning process by going to the application’s home screen and choosing Scan Drivers.
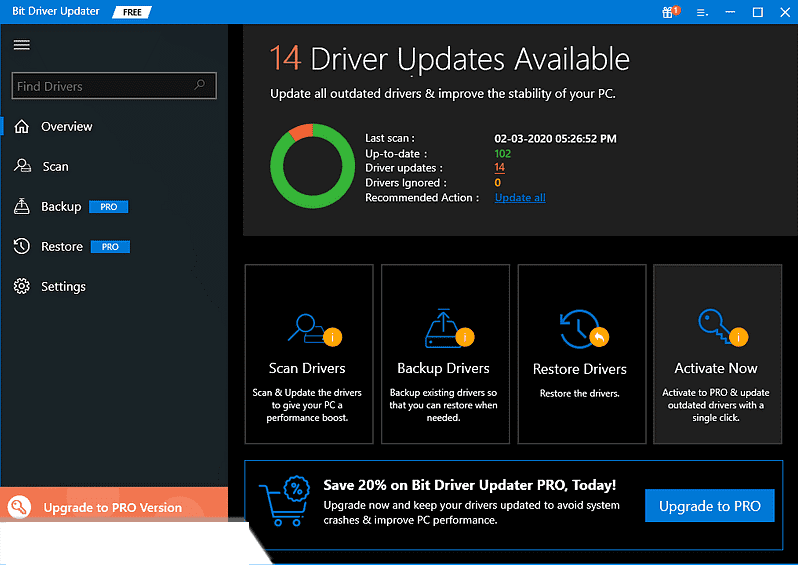
- From the scanning results, choose your keyboard device and then click the Update Now option next to it.
Resolved: Lenovo Laptop Keyboard Not Working Issue
This article covered several methods for resolving the Lenovo laptop keyboard not working problem in Windows 10. Please leave any questions, recommendations, or further solutions for the laptop keyboard not working issue in the comments area.
In this video, we are gonna show you how to fix Keyboard Not Working on laptop Lenovo Windows 10:
Hope something helps you.