How To Fix Can’t Write to SD Card on Samsung Phone
[Solved] 6 Ways to Fix Can’t Write to SD Card on Samsung Phone
I’ve experienced noticeable difficulty accessing programs since the previous update of Samsung on October 16, 2020, with the message “Can’t write to SD Card.” The Samsung SD Card was working perfectly before the update.”
Your Samsung phone won’t let you write to your SD card? This is an issue that has been reported by a number of users following the newest Samsung System Update. If you’re one of these people, you’ll be happy to hear that you’ve come to the right place! This post will walk you through a variety of events that could lead to this problem.
Contents
- Why Can’t I Write to My SD Card on Samsung Phone
- 6 Verified Ways to Solve Cannot Write to SD Card
Why Can’t I Write to My SD Card on Samsung Phone
Several Samsung users have reported that they are unable to write to their SD cards using their phones. These individuals discovered that a variety of methods worked for them. As a result, there are a variety of factors and events that lead to this problem. The following are the most likely scenarios:
- It’s possible that the SD Card was mounted wrongly.
- It’s possible that the SD Card is corrupted.
- The SD Card type may not be supported by your Samsung smartphone.
- It’s possible that the SD Card has become loose.
- It’s possible that the card slot or tray has been damaged.
- It’s possible that a virus on your Samsung phone is stopping you from using the SD Card.
6 Verified Ways to Solve Cannot Write to SD Card
By comprehending the potential causes, you will be able to quickly identify your problem, making it much easier for you to find a suitable solution. With that out of the way, let’s get started on the guide.
- Way 1: Unmount SD Card and Re-insert
- Way 2: Turn Off SD Card Protection
- Way 3: Try to Change SD Card
- Way 4: Backup & Format SD Card
- Way 5: Clean Samsung Viruses
- Way 6: Repair Samsung System to Fix Cannot Write to SD Card
Way 1: Unmount SD Card and Re-insert
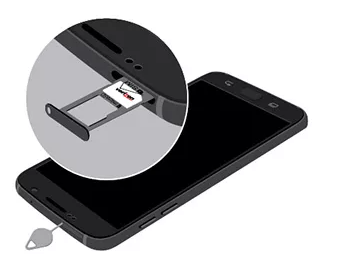
Can’t write to SD Card Samsung can be caused by an incorrectly installed SD Card. If this is the case, simply unmount the SD Card and re-insert it into your Samsung phone.
1. To switch off your phone, press and hold the Power button.
2. To remove the tray, insert the ejection tool or a paper clip into the SIM/SD Card slot.

3. From the SIM tray, remove the SD card.
4. Slide the tray back in and re-insert the SD Card in the correct place.

5. To turn on the phone, tap and hold the Power button.
Way 2: Turn Off SD Card Protection
If you can’t write to your SD card on Android, it’s possible that SD Card protection has been turned on. This disables the ability to write fresh data to the SD Card. Follow the instructions below to turn off this feature:
- Remove the SD Card from your device, which is currently in read-only mode.
- On the SD Card, look for the ‘Lock’ switch.
- Toggle the switch from on to off.

Way 3: Try to Change SD Card
If you can’t write to your SD Card, it’s possible that your Samsung phone doesn’t support the SD Card type you’re using. In some cases, the existing SD Card may be damaged or corrupted, making it impossible to write data to it. In this instance, all you have to do is swap out the SD Card in your Samsung cellphone.
1. Using the ejection tool or a paper clip, expel the SIM/SD Card tray.
2. Remove the SD Card that is currently in use.
3. Place the new SD Card in the appropriate slot.
4. Slide the SIM tray back into the phone.
Way 4: Backup & Format SD Card
If none of the other options worked, this method has a good possibility of resolving your problem. It’s possible that the SD Card has reached its limit and has to be wiped. To get the SD Card back to its original state, you’ll need to format it.
1. Unmount your Samsung phone’s SD card and insert it into your laptop.
2. Save a backup of the data on the SD Card on your laptop. Simply copy and paste the files from the SD Card storage to your PC to accomplish this.
3. Remove the SD Card from your phone and re-insert it.
4. Open ‘Settings’ and go to ‘Storage’.
5. Navigate to ‘Advanced’ and choose ‘SD Card’ and pick ‘Format SD Card’.

Way 5: Clean Samsung Viruses
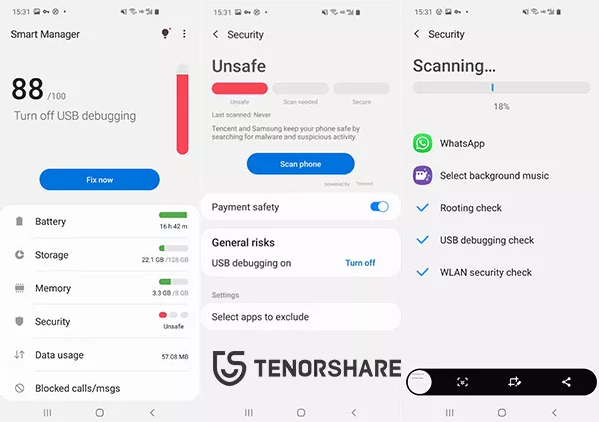
It’s always a good idea to do a virus scan on your phone and remove any viruses that are hindering normal operation. If Smart Manager isn’t currently installed on your device, you’ll need to download it from the Play Store.
1. Go to Launch Smart Manager on your Samsung phone.
2. Press ‘Device Security’.
3. Choose ‘Scan Device’ or ‘Scan Phone’ to check for viruses in your phone.

If an app is suspected of being a virus, you will be asked to remove it from your device.
Way 6: Repair Samsung System to Fix Cannot Write to SD Card
Your device may have been infected with erroneous or corrupted system software as a result of the Samsung System upgrade. If you can’t write to your SD Card, it could be due to system difficulties. You must resolve all system concerns in this scenario. To complete the operation with the least amount of work, you should use Tenorshare ReiBoot for Android.
1. Launch ReiBoot after connecting your Samsung phone to your PC via USB cable.
2. Tap ‘Repair Operating System’.

3. Choose ‘Repair Now’.

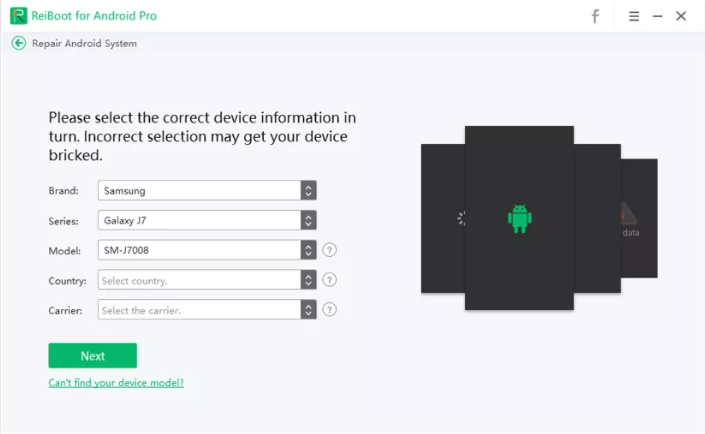
4. Fill in all of the required information about your Android phone and then press the ‘Next’ button.

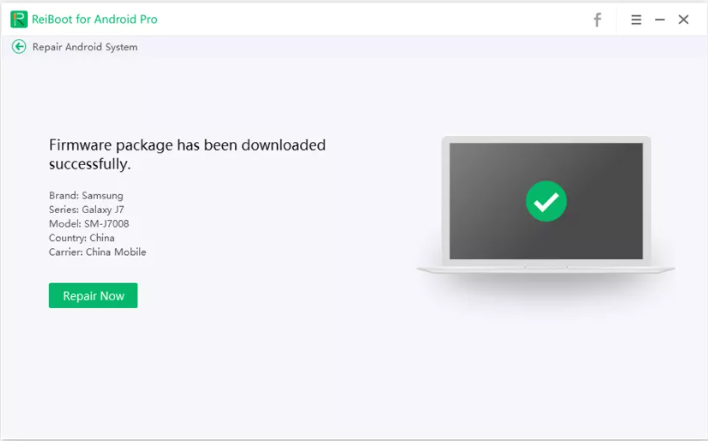
5. The Firmware package for the System software is then downloaded by pressing ‘Download’.

6. After that, press the ‘Repair Now’ button to start the repairing procedure.

In this video, we are gonna show you how to fix the can’t write to sd card problem on Samsung Galaxy Android device.
Conclusion
You now know what to do if your Android can’t write to the SD card, thanks to this advice. This is a rather typical problem that can occur in a variety of situations. In each circumstance, at least one of the strategies listed above will undoubtedly solve your problem. Tenorshare ReiBoot for Android is my personal favorite because it is really simple to use and reduces your effort significantly.