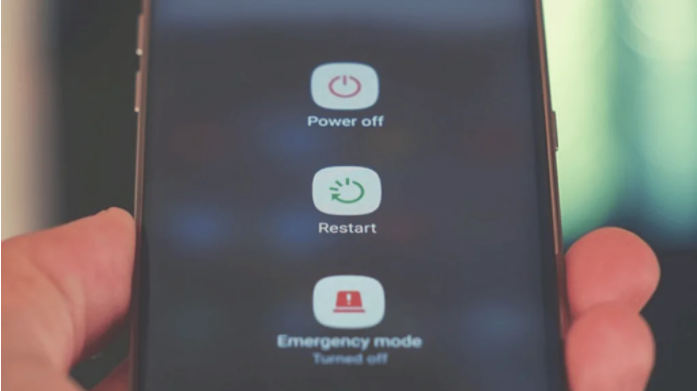
When your phone receives an incoming call, the screen may or may not turn on. The phone continues to ring, but you are unable to see who is calling since the display does not turn on. This is a typical problem on Android, and users must launch the Phone app to see who is calling. When it receives a call, the screen may not even wake up for a few seconds, or it may not even show anything at all. If you’re having trouble with incoming calls not showing up on your Android phone’s screen, we’ve got six solutions for you. Continue reading!
As we’ve indicated in most of our Android tips and tricks, a simple restart of the device can occasionally solve the problem. If your calls aren’t showing up on your screen, restart your phone; the problem may go away.
Check DND Mode
If the restart doesn’t fix the problem and you still can’t see calls on your phone, it’s possible that the DND mode is to blame. Unless you’ve authorized some apps to override this, DND mode disables all notifications. To double-check, go to:
1. Go to Settings and choose Sound.
2. Press on “Do Not Disturb”. Switch it off by pressing “Turn off now” if it is on.
3.
3] If you need DND mode for some reason, tap on “Calls” and select “Allow calls in DND mode.”
So, if you wish to use DND mode while still being able to see calls on your phone, you’ll need to follow the method described above.
Enable Call Notification
On all cellphones, notifications are enabled by default for all incoming calls, and no one normally changes this setting. However, it is possible that an update will alter it. Follow these procedures to re-enable the notification:
1] Go to Apps & Notifications in Settings.
2] Locate the default Phone app and tap it.
3] Next, go to Notifications and make sure the “Show notifications” toggle is turned on.
That concludes our discussion. By pressing on Incoming Calls, Behavior, and changing it to Make Sound and Pop Up on Screen, you can change the behavior of call alerts.
Give Special App Access
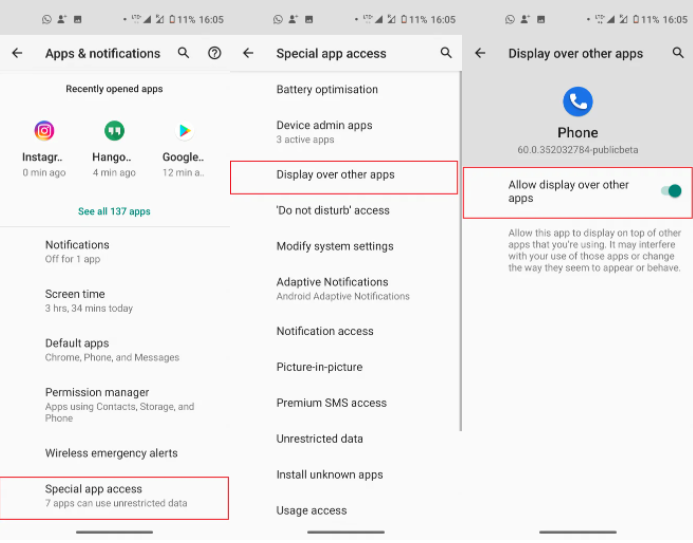
Permissions are required for any software to function effectively, as we all know. It could be a question of permission access if your display doesn’t show the incoming call notifications. To see if your phone has special app access, follow these instructions.
1] Navigate to Apps & Notifications in Settings.
2] Go to the bottom of the page and select Advanced, then Special app access.
3] Select ‘Display over the other apps’ from the drop-down menu.
4] Find the Phone app and enable “Display over other apps” for it here.
Reset App Preferences
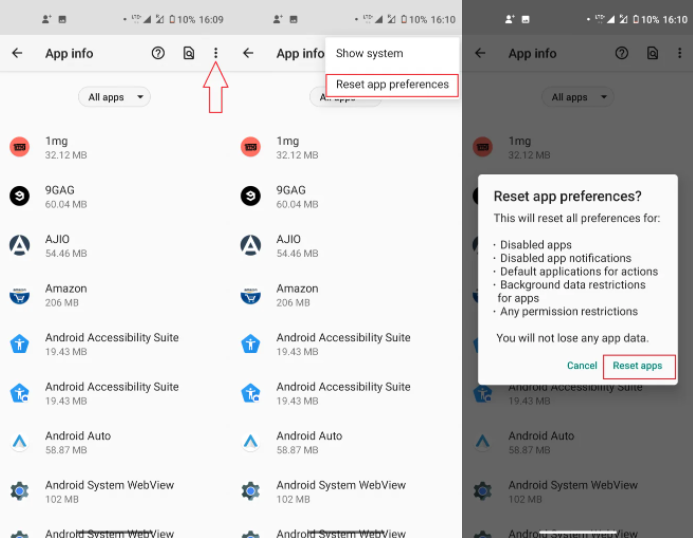
When we reset an app’s preferences, it may revert to its default settings and begin to function normally. This also applies to apps that do not display notifications on the screen.
1] Go to Apps & Notifications in Settings.
2] Tap the three-dot icon in the top right corner of All Apps.
3] A pop-up will appear once you hit on “Reset app preferences.” That’s it! Tap on Reset applications and you’re done!
It’s important to know that resetting app preferences will not remove any data from your apps.
Clear Cache and Data
Clearing the cache in any program can help with a variety of difficulties. If your Phone app isn’t displaying calls, try emptying the cache. It should be noted that your data is not deleted. However, if it doesn’t work, you might try deleting your data.
1] Go to Settings > Apps & Notifications.
2] Locate the Phone App and press it, then select Storage and Cache.
3] Tap the Clear cache button on the next page, then restart the device.
4] If the problem remains, repeat the steps above, but this time hit Clear data.
You should be aware, however, that wiping data will also remove your call logs.
So those were some solutions for incoming calls not showing up on your phone’s screen. If you have any questions, please let us know in the comments section. Stay tuned for more similar hints and tips!
The majority of the time, Instagram does not collapse. However, all platforms have problems, which is why we sometimes get the “Instagram Couldn’t Refresh Feed” error for no apparent reason.
The flashlight, which uses the camera’s LED flash to assist you traverse dark situations, has long been a feature of phones. Android has a flashlight feature, but it requires a few swipes to access. Continue reading to find out how to turn your phone’s flashlight on and off faster.
Fortunately, there are a number of quick ways to activate the flashlight on your Android phone, ranging from shaking the phone to using your voice, and we’ve compiled a list of them here.
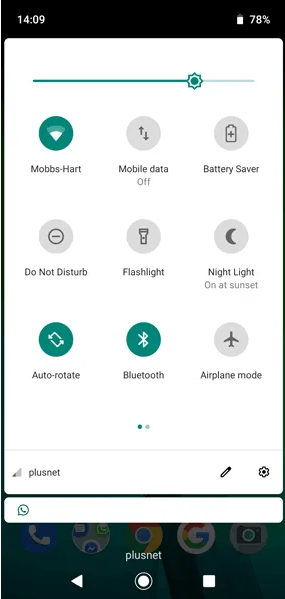
Add Flashlight to Quick Settings
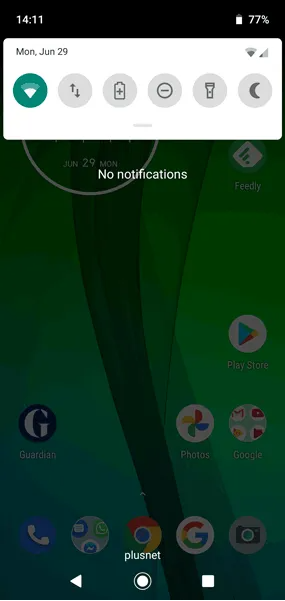
When you swipe down from the top of your screen one time, the Flashlight symbol appears in the menu on many phones. If it isn’t, slide down once more to reveal all of the quick-launch icons, then tap the pen icon beneath them.
Hold and drag the Flashlight symbol to a location in the icons list where it will appear among your default notifications from here.
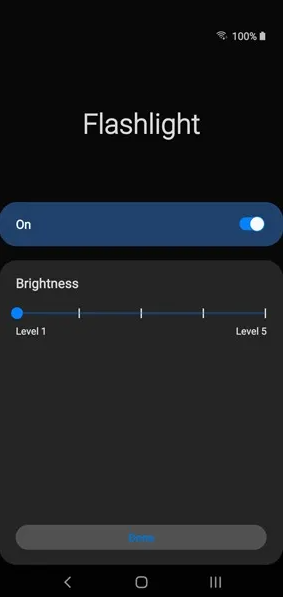
You can even alter the brightness of your built-in flashlight on some phones, like as the Galaxy series. To do this on a Galaxy phone, pull down the Quick Settings menu until you find the Flashlight icon, then hit the text beneath it that says “Flashlight” instead of the actual icon.
When you switch on the flashlight, this will take you to a hidden menu where you can control the brightness. After you’ve made your changes, click “Done,” and you’re ready to go.
Tap Back of Phone to Turn Flashlight On
We’ll go through how to shake your phone to turn on the flashlight later, but from my experience, this can result in the flashlight coming on while your phone is in your pocket. This wonderful program from XDA Developers makes the same feature work on earlier devices. Android 11 has a function where you can tap the back of your phone to activate various functions, but this excellent app from XDA Developers makes the same function work on older devices.
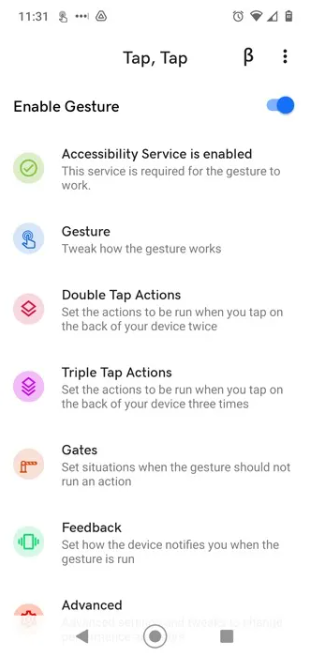
To install and set it up, you’ll need to enable different permissions, such as unknown sources. When you first launch the app, there’s a helpful tutorial that walks you through the permissions you’ll need to grant.
After that, tap “Double Tap Actions” or “Triple Tap Actions” from the main Tap, Tap menu (depending on how you want to turn on your flashlight).
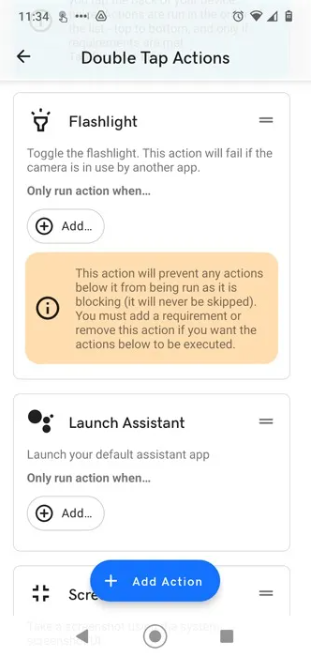
Tap “Add Action -> Utilities -> Flashlight,” then “Allow” on the next screen.
Back on the “… Tap Actions” page, drag your gesture to the top so that it always takes precedence over the other default actions.
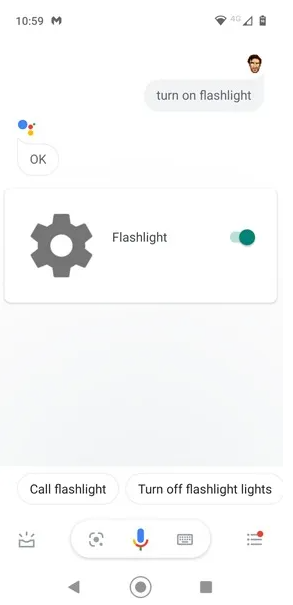
Tell Google to Turn on Flashlight
Remember to use “OK Google” to activate the Flashlight. Tap the microphone icon or say, “OK Google, turn on the flashlight” (or “OK Google, Flashlight on“). To turn it off, say “OK Google, turn off Flashlight” or “OK Google, Flashlight off.” If you already have too many apps on your phone and don’t have enough room for another, this is a great solution.
Another option is to press and hold your phone’s Home button until Google Assistant appears, then say “Turn on Flashlight.”
Use Gestures
Gestures are supported by most recent Android phones, allowing you to enable and activate certain functions with particular button pushes or motions.
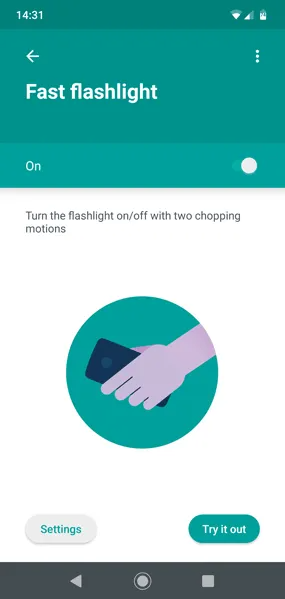
The specific motions vary by the device manufacturer, but to use them, go to “Settings -> Gestures,” then look for and enable the Flashlight option.
Shaking your phone in a chopping motion on Motorola phones will switch on your flashlight instantaneously. (This prevents it from being mistakenly turned on.) When your OnePlus phone is shut off, it draws a “V” on the screen. The exact gesture may differ if you use a different phone, but it will most likely be just as quick!
Turn on the Flashlight with the Volume Buttons
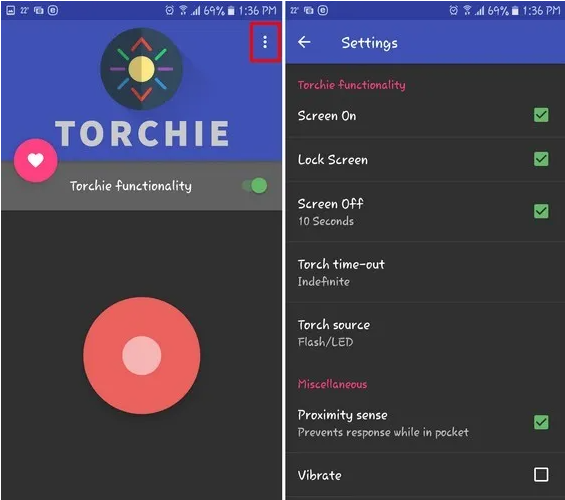
Torchie – Volume Button Torch is a free app that lets you turn on the flashlight on any Android device using the volume buttons. The app will take up 4MB of storage on your phone and will not overwhelm you with advertisements.
You must provide the app the “Accessibility Service” permission in order for it to work in the background.
You may even use the Flashlight from your lock screen, but you must first enable it in the app’s settings. Simply open the app and press the three vertical dots on the upper right of your screen to reach Settings.
Shake the Flashlight On
If your phone lacks the built-in Gesture functionality described previously, you can install a third-party software to replace it.
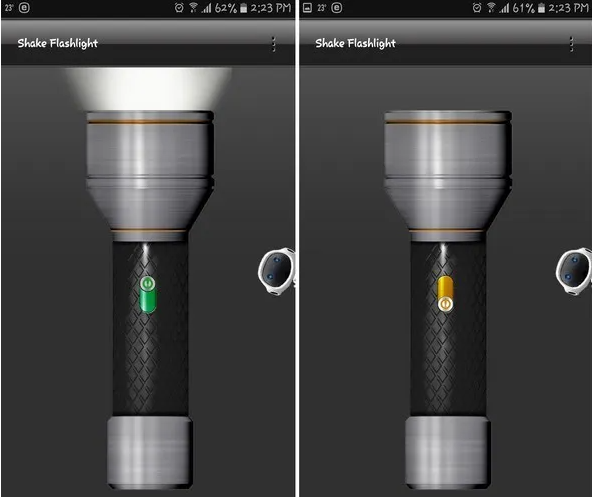
You’ll need to download the Shake Flashlight app. The Flashlight will turn on when you shake your phone. Even if your Android device’s screen is off, you can switch on the flashlight by shaking it, then shaking it again to turn it off.
If you find that shaking your phone too hard is necessary, you can adjust the sensitivity in the app’s settings. Select “Shake Sensitivity” from the three vertical dots in the top-right corner. If you set the sensitivity too high, the Flashlight may switch on accidentally, according to the app.
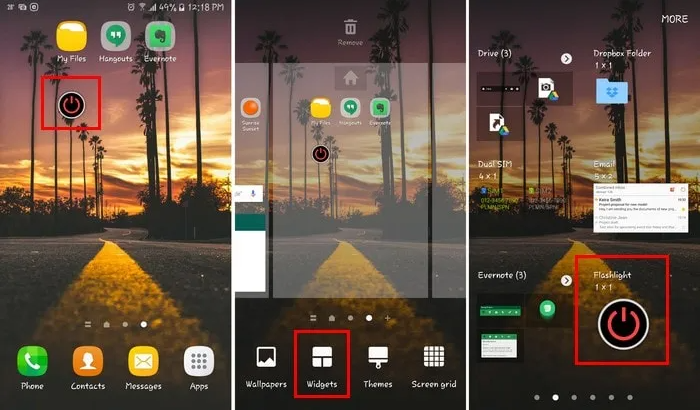
Use a Flashlight Widget
Last but not least, the Flashlight Widget app might help you obtain some light. The widget will not appear on its own; instead, you must long-press on a spot on your home screen where you want it to appear.
The widget should be on the first page if you select the Widgets option at the bottom. Long-press and drag the widget to an empty spot on your screen. The program doesn’t have a Settings page; you’ll only know if it’s installed if the widget appears. There will be no app icon displayed.
While the Flashlight’s original purpose was to brighten your surroundings so that the camera app could take better night shots, it has since developed into a handy and practical torchlight. Isn’t it lovely?
In this article, I will show you how to offload Android apps to an SD card to free up storage space on your phone!
Don’t you dread it when the Not Enough Space warning appears when you try to install a new app on your Android device? It implies that all of those games, photographs, and 4K films have finally paid off.
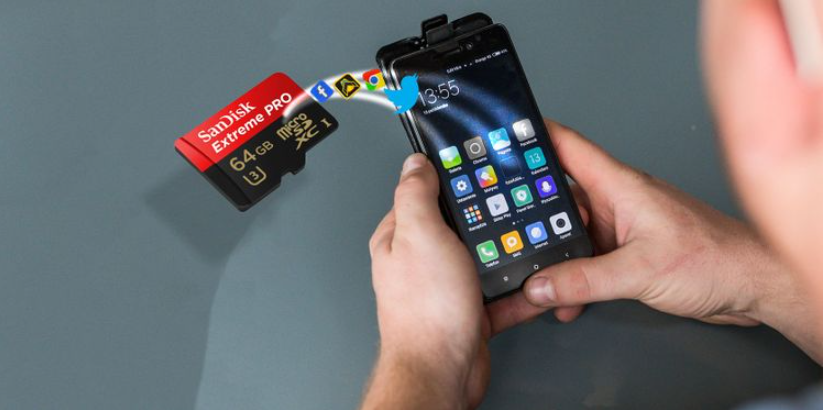
The remedy is simple if your phone has a memory card slot. A microSD card is a low-cost solution to enhance the storage capacity of your phone. Rather than uninstalling apps from your Android device, you can move them to an SD card to free up space.
Depending on the Android version you’re running, you’ll have to do this in a different way. In this post, we’ll look at all of the options for moving Android apps to an SD card.
Using an SD Card on Android: Basics
Consider the following factors before you begin.
Because memory cards are slower than the internal storage, resource-intensive software may function slightly worse. When choosing a card, choose the one that is the quickest and largest that your phone can support—-check your phone’s specifications to see what cards it supports. (To avoid being conned, make sure you know how to recognize a phony microSD card.)
It isn’t possible to move preinstalled apps without rooting, and even some third-party apps may not support it. Also, on previous versions of Android, you might not be able to use widgets connected with apps you’ve moved to your memory card.
Let’s look at how to migrate apps to an SD card with all of this in mind.
Use an SD Card as Internal Storage
Changes to the way Android phones can handle memory cards were introduced in Android Marshmallow, and these changes were carried over to succeeding versions of Android.
MicroSD cards can now be used as internal storage. Android treats the card as an extension of your built-in storage space, rather than having internal and external storage as separate locations.
Data and apps can write to either as needed, and the process is completely automated. As a result, you don’t have to be concerned about the location of your apps.
You must first set this up. Because your card will be deleted during the procedure, make sure you’ve backed up any important information:
1. Insert the card into the phone’s slot. Tap Set Up when the New SD Card notification shows.
2. The next step is to decide how your phone will use the card. On Android 9, choose Phone Storage, or Use as Internal Storage on previous versions. Go to Settings > Storage, pick the card, hit the menu button, and then select Storage Settings. Choose Format as internal.
3. Tap Format SD Card or Erase & Format on the next screen. Your card will be wiped as a result of this.
4. On Android 9 and later, you have the option of moving your material, including apps, to the card. It also displays the amount of space you’ll save. To finish, click Move Content.
Adoptable Storage is a feature that demands you to maintain your card in your phone at all times. The card is also encrypted, so you can’t copy the data by inserting it into another device.
The main disadvantage of adoptable storage is that every Android phone is different, hence some manufacturers choose not to include it. If you don’t have it, you’ll have to manually transfer your apps to your SD card.
How to Move Apps to an SD Card on Android 9 Pie and Above
On Android 9 and later, you can manually transfer apps to an SD card if your phone doesn’t support adoptable storage. Just keep in mind that you won’t be able to do it for every program, and you won’t be able to do it at all for pre-installed apps:
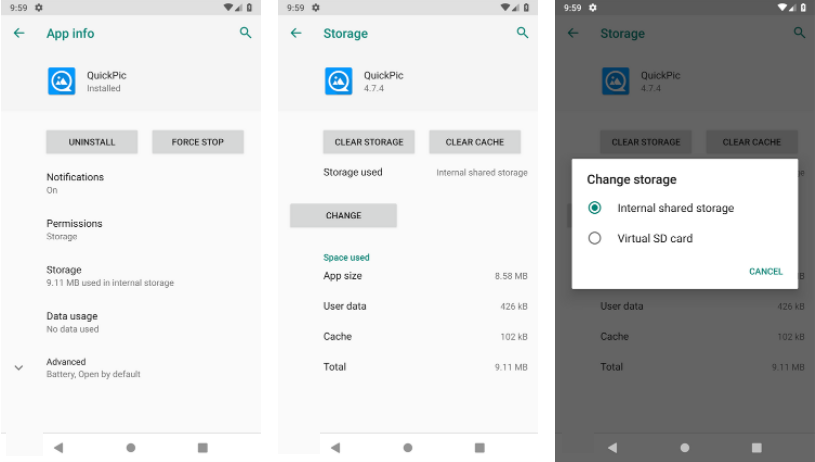
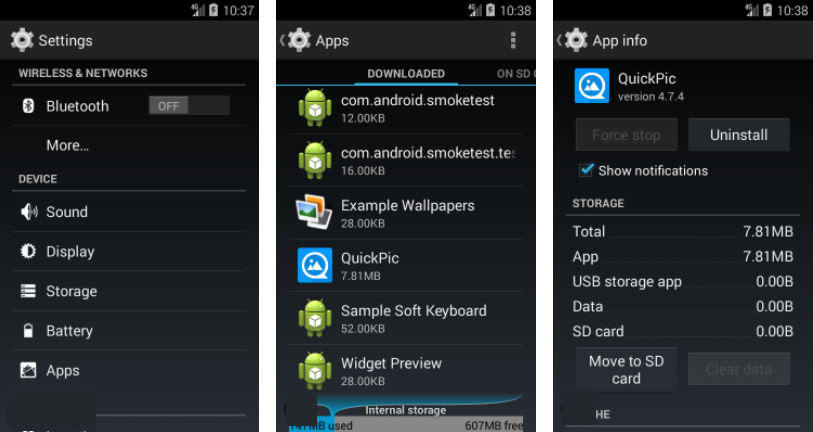
1. Head to Settings > Apps & Notifications > App info.
2. In the list, locate the app you wish to move and tap it.
3. Choose Storage option. If the program allows switching to a card, you’ll see a Change button here. This should be tapped.
4. In the Change Storage dialog box, select the SD Card. A confirmation screen appears as a result of this action. To begin, tap Move.
To return the program to internal storage, repeat the steps above, but in the final step, select Internal shared storage. When changing or removing your memory card, you should always do so in this manner.
How to Move Apps to an SD Card on Android 8 Oreo
Moving an app to the SD card in Android 8 is essentially the same as it is in Android 9:
1. Head to Settings > Apps & Notifications > App info.
2. Tap on the app you wish to move to the card by scrolling down to locate it.
3. Choose Storage option. You’ll see a section titled Storage used if the program can be relocated to a card. Change the setting by using the Change button.
4. Select the card to which you wish to move the app, then press Move.
How to Move Apps to an SD Card on Android 7 Nougat
On Android 7 Nougat, you can move apps to a memory card via Settings. However, you won’t be able to relocate all of your apps. You won’t see the Change button in Step 3 if they don’t support it.
1. Head to Apps > Settings.
2. Locate and press the app you wish to move to your microSD card.
3. Select your card from the prompt box that appears by going to Storage > Change.
4. To complete the process, tap Move.
It may take a few moments to complete depending on the size of the app (particularly in the case of large games), so don’t touch your phone until it’s finished. To revert the app, go back to Step 3 and select Internal shared storage.
How to Move Apps to an SD Card on Android 6 Marshmallow
Moving apps to a microSD card in Marshmallow is the same as in Nougat:
1. Navigate to Settings > Apps, then tap on your chosen app.
2. Choose Storage > Change, then choose the card when prompted.
3. Select Move to complete the process.
How to Move Apps to an SD Card on Android 5 Lollipop
Memory cards aren’t as well supported in Lollipop as they are in subsequent Android versions, but you can still move apps via the Settings menu.
The programs you can put on your external storage are limited; it depends on the developer’s support for the feature. Also, the complete software does not migrate to the card—only a portion of it does.
Swipe to the right tab in the App page, titled On SD Card, to view which apps you have on your card. This makes it simple to spot any that you might want to return to in the future.
To move apps, follow these steps:
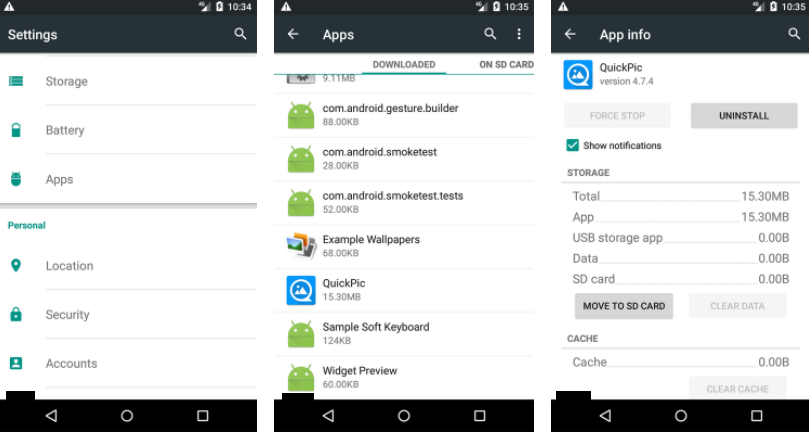
1. To move an app to your SD card, go to Settings > Apps and press the app you wish to move.
2. After that, tap Move to SD Card under the Storage section. While the program is moving, the button will be grayed out, so don’t touch it until it’s finished.
3. The app cannot be moved if there is no Move to SD Card option.
The Storage section will refresh to display how much of the software is now stored on the card once it’s finished (and how much is still in internal storage). Move to Phone or Move to Device Storage will now appear on the Move button.
You can delete the app from the card by tapping on this.
How to Move Apps to an SD Card on Android 4.x and Earlier
MicroSD card support was severely limited in all Android 4.x versions. Google seemed intent on phasing cards out entirely, so stock Android didn’t support the ability to move apps to an external card at all.
Some manufacturers, on the other hand, have chosen to incorporate the feature in their own versions of the operating system. If your older equipment supports it, the method is straightforward:
1. Navigate to Apps > Settings.
2. Then, find and press the app you’d like to add to the card.
3. Choose Move to SD Card. If this button isn’t present, you won’t be able to move the app (or your phone won’t allow it).
In the odd event that you still have an Android 2.x handset, here are the steps you’ll need to follow. Widgets on the home screen aren’t supported in these older versions, thus if you want to use one, you’ll have to save it on internal storage.
If your phone doesn’t have the option, you’ll need to check into a third-party app.
How to Move Apps to an SD Card Using Link2SD
There are a few third-party apps that can assist you to move apps to the SD card if your phone doesn’t support it or if you want to migrate an app that doesn’t support it individually. FolderMount and Apps2SD are both popular choices. Both require a rooted Android phone.
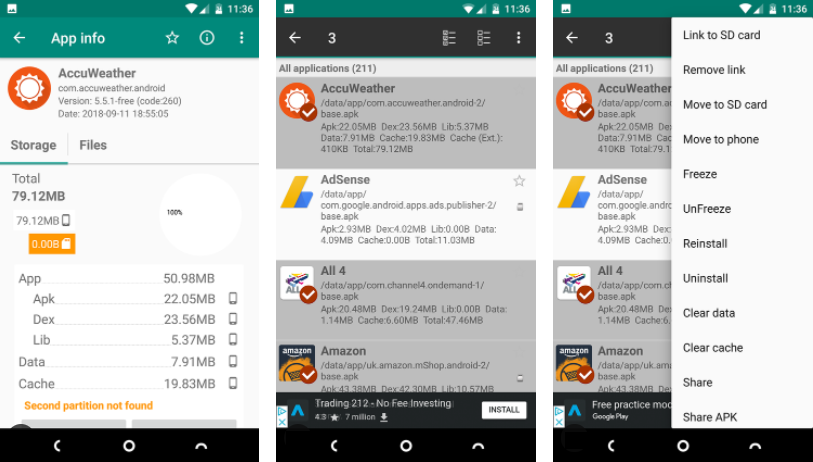
We’ll take a look at another option, Link2SD, which offers both root and non-root functionality. It may be used to bulk-upload apps to your card, “force-move” apps that don’t ordinarily allow it and unload data folders for larger apps and games to external storage.
If your phone is rooted, open the app and grant root rights. Then tap the app you’d like to move and choose one of the following options:
Link to SD Card: This option necessitates root access and copies the entire app and its data to your SD card. Move to SD Card: This doesn’t require root, but it will only work if your phone allows you to move apps to external storage. You can also force-move apps that don’t ordinarily support it if you have root. Link to SD Card (Data and Cache): Moves data files and requires root.
Tap the menu button in the upper right corner and select Multi-select to move many apps at once. Now press all of the apps you wish to relocate, then hit the menu button again and select Link to SD Card or Move to SD Card. These are the same options as previously stated.
Link2SD is available for free, with a premium upgrade available. It is compatible with Android version 2.3 and higher.
The Best Way to Move Apps to an SD Card on Android
The easiest approach to install apps on your SD card is determined by the Android version you’re running, whether your phone’s maker has incorporated all of the functionality, and the program you wish to move.
In conclusion:
That’s the greatest option on phones that allow adoptable storage. It eliminates the need to manually manage your card.
That way is the best and cleanest for phones that only support manually moving apps to the card.
Consider rooting and utilizing Link2SD if your phone doesn’t support any of this or if you have unique requirements.
If your apps are taking up too much space, another option is to switch to one of the Android Go apps. They are not only smaller and take up less space, but they also perform better on older or less powerful phones.
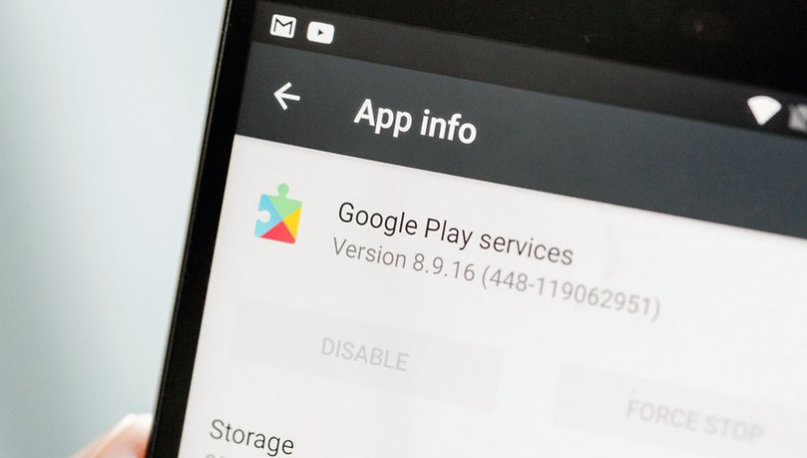
Everything the Play Store does with the apps on your phone goes through Google Play Services. This tells your phone when to update apps and introduces new features and settings to Google Play. Find out how to update Google Play Services both the easy way or the more technical way with a newer APK.
Here you may find the changelogs for the most recent version of Google Play Services, as well as timelines and logs for previous releases. The majority of the improvements are minor tweaks beneath the hood, such as optimizing parts of marketing, gaming, and fitness, and making the Google ecosystem more effective and stable.
You may find the changelogs for the latest version of Google Play Services here, as well as timelines and logs for previous releases. The majority of the improvements are minor tweaks beneath the hood, such as optimizing parts of marketing, gaming, and fitness, and making the Google ecosystem more effective and stable.
Install Google Play Services: the easy way
Updating Google Play Services is helpful for all users, including casual ones, because the increased efficiency saves battery life and improves offline services.
The best method to ensure that you always have the most recent version of Google Play Services installed is to bookmark this page, where we’ll post links to the most recent versions available in the Play Store. To guarantee you have the most recent version, simply tap the install button below.
Nevertheless, as with most things Android, if you’re prepared to put in a little more effort, there are always newer and better versions available. For example, depending on whatever version of Android you have, there are numerous versions of Google Play Services. So, if you want the most up-to-date version, simply follow the instructions below.
Install Google Play Services: the technical way
Users who want to be sure they have the most recent updates, or who want to try out beta or multiple versions of Google Play Services, should use a more sophisticated way. This is useful for app developers and anyone experiencing a software fault that prevents Google Play Services from upgrading routinely.
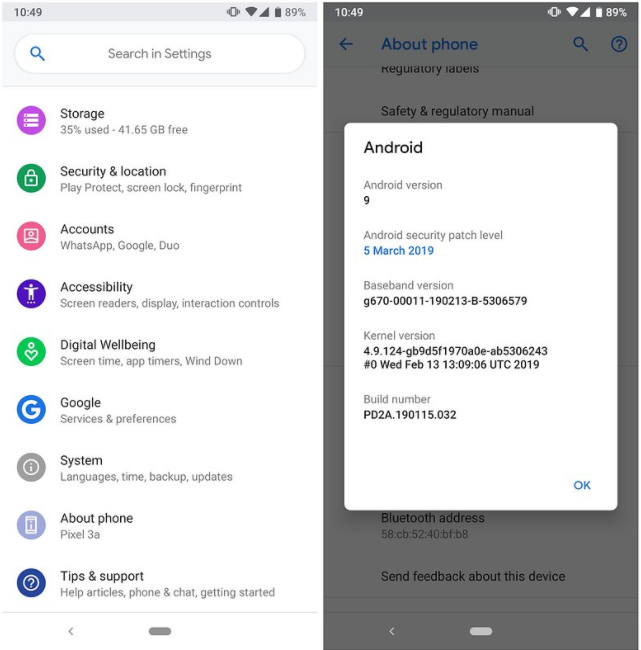
To begin, you’ll need to figure out which Android version you have.
Look for Android Version or Software information in Settings > About Phone (or just About on some smartphones).
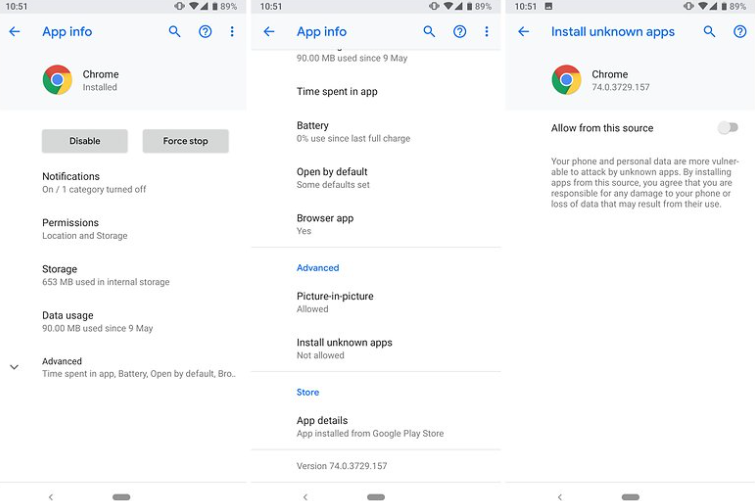
Then you must determine which apps are permitted to be installed from unknown sources.
Go to Apps, then Settings. Locate the app you’ll be installing from, which is usually your mobile browser or a file explorer. It should be tapped.
Scroll until you reach the Advanced section. Install unknown apps should be there. Tap on it and tick Allow from this source.
After that, you’ll need to utilize the same browser to look for a Google Play Services APK. This is how you do it.
Download Google Play Services APK
Now all you have to do is select the appropriate Google Play Services version. APK Mirror hosts the most recent versions of Google Play Services, and it’s usually a good idea to use the most recent stable version rather than a beta version. Then, on your phone, simply download and install Google Play Services.
Was this information helpful to you? Do you have any suggestions or information you believe we should know about? Let us know what you think in the comments!
A Trusted Platform Module (TPM) chip is a required component of the Windows 11 upgrade. It’s very likely that your computer has a TPM chip if it’s not too old. However, just because your computer contains a TPM chip doesn’t mean it’s activated. This TPM chip is required for more than only the Windows 11 upgrade. Security features like BitLocker and device encryption require it as well. If your PC supports TPM 2.0, I’ll show you how to enable it in this article.
Enable TPM 2.0 Chip
This chip, which is normally found on the motherboard, is responsible for storing, generating, and protecting encryption keys. This chip has been deemed a prerequisite for upgrading to Windows 11, so if you’re interested in doing so, check sure your device fulfills the requirements. TPM is sometimes turned off, giving the appearance that your device isn’t ready for the Windows 11 update. The good news is that it’s simple to enable via UEFI. You can enter UEFI mode and enable TPM in one of two ways.
Enable TPM 2.0 Chip via Settings
Step-1: Navigate to the Start Menu and choose the Settings option. (Shortcut Keys: Win + I)
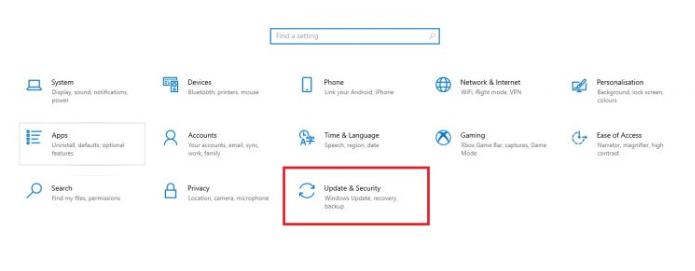
Step-2: Choose Update & Security.
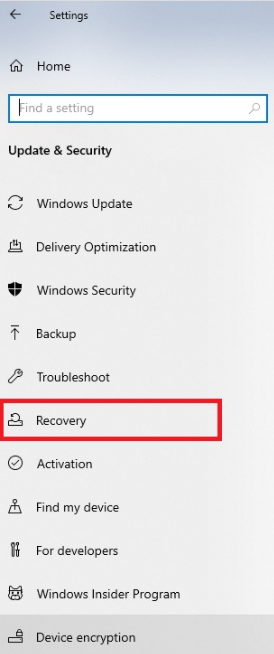
Step-3: Choose the Recovery option on the left side of your screen.
Step-4: Choose Restart in Advanced start-up.
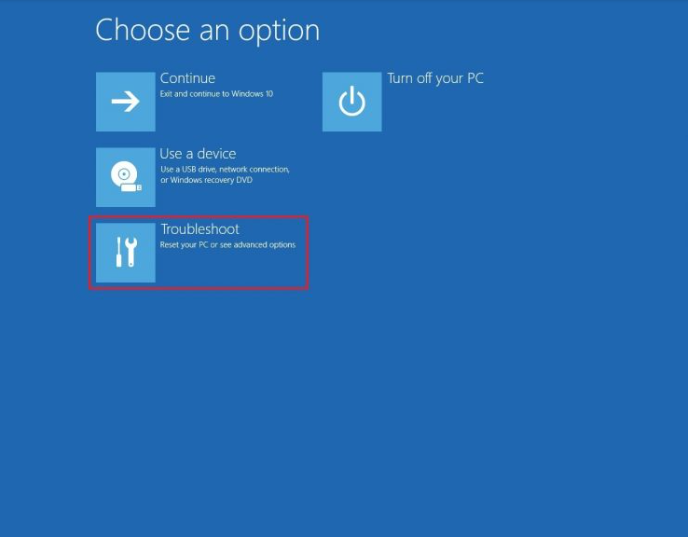
Step-5: Choose Troubleshoot.
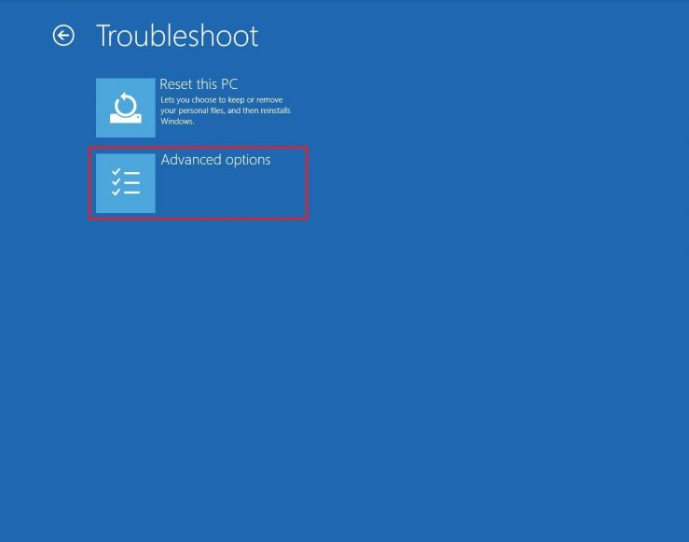
Step-6: Choose Advanced options.
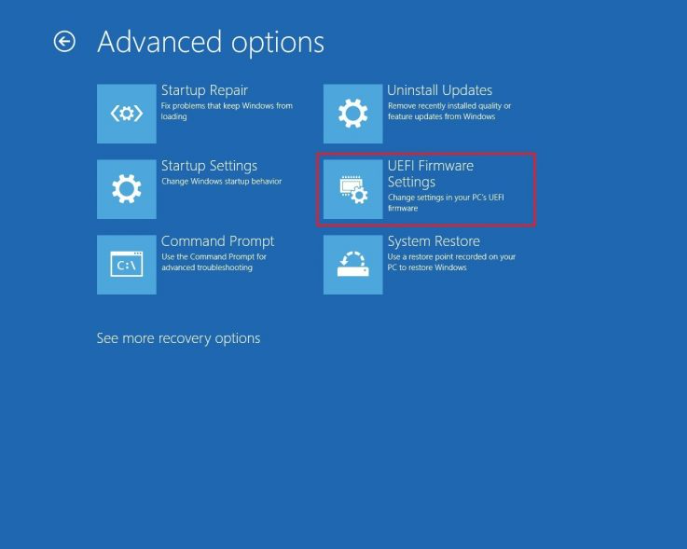
Step-7: Choose UEFI Firmware Settings.
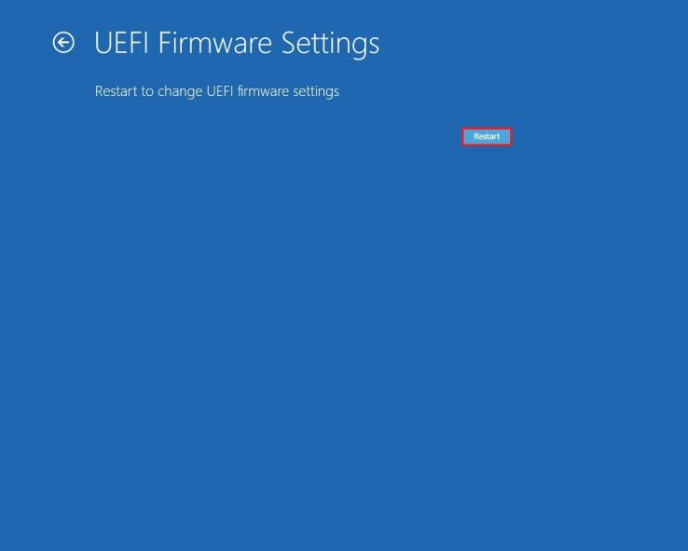
Step-8: Choose Restart.
Step-9: Find Security Settings.
[TPM settings may differ depending on the manufacturer of your UEFI. To locate the TPM settings, go to the support page of the device maker. You can discover the support website for your computer by clicking on this link.]
Step 10: Go to the TPM settings configuration option and select it.
Step 11: If TPM is disabled, enable it.
Step 12: Close the settings window and restart your computer.
Boot Sequence
1. Tap the Power button.
2. When you boot your computer, you can select UEFI mode by hitting a few dedicated keys. The manufacturer of the motherboard determines which keys are used. The following are the keys to some well-known brands:Dell: F2 or F12.
HP: ESC or F10 Acer: F2 or Del MSI: Del Lenovo: F1 or F2 ASUS: F2 or Del Samsung: F2 Toshiba: F2 Microsoft Surface: Press and hold the Volume Up button
3. Navigate to the Security Settings page now.
4. Look for the option to configure TPM settings.
5. If the TPM is deactivated, enable it.
6. Restart your computer after exiting the settings.
[If your computer boots too quickly and you don’t have time to enter the keys to enter the UEFI mode in this 2nd method, restart your computer and as soon as the booting process begins, continually press the dedicated key until you reach the UEFI mode. Personally, I like the first way since it is simpler and more fluid, and it eliminates the need to search for computer-specific keys.]
– It’s easy to do with AirPods, AirPods 2 or AirPods Pro
While the Apple Watch remains only for iPhones and iOS, Apple chose a different route with its earphones, making them compatible with any device with a Bluetooth connection.
As a result, Apple AirPods or AirPods Pro can be used with an Android phone just like any other set of Bluetooth earphones.
The pairing process isn’t as aesthetically appealing or convenient as using your AirPods Pro with an iPhone, but it’s still simple enough, and you don’t lose too many capabilities once you’re linked. Or, at the very least, none of the important ones.
Here’s how to pair your Apple AirPods or AirPods Pro with an Android handset, as well as the functions they provide.
How to connect Apple AirPods or AirPods Pro to your Android phone
The Apple AirPods connect to an Android handset in the same manner that any other Bluetooth device does. Simply follow the procedures below to pair them:
When you’ve finished these steps, your AirPods should be connected to your device and will reconnect automatically whenever you open the case and insert them into your ears.
1. Open your Android device’s Bluetooth settings.
2. Choose Pair a New Device.
3. To pair your Apple AirPods, open the case.
4. When the AirPods appear on the screen, tap them to confirm pairing them.
5. If they don’t appear, press and hold the back of the AirPods case’s button until the LED light between the AirPods flashes. This puts the AirPods in pairing mode, and you may go back to step 4 to complete the process.
When you’ve finished these steps, your AirPods should be connected to your device and will reconnect automatically whenever you open the case and insert them into your ears.
What features do Apple AirPods offer when connected to an Android device?
Apple AirPods work in the same way as other Bluetooth headphones once they’re linked. The following features will be available to you:
Play and pause control by double-tapping an AirPod whilst it’s in your ear
Music and film audio
Call audio
Any other audio that would normally play through your phone’s speakers
The functionality of AirPods Pro is significantly different, although all of the important functionalities are available:
Play and pause music by pressing the AirPod Pro stem once
Skip forwards by pressing twice quickly
Skip back by triple-pressing
Press and hold the stem to activate/de-active noise cancelling or ambient listening mode
Call audio does not automatically transmit back to your phone when you pull the AirPods out of your ears, unlike when linked to an iPhone. Similarly, the AirPods’ battery indicator will not appear on your Android device, so you’ll have to keep track of how many hours you’ve been listening in order to know when to charge them.
Alternatively, you can use the Google Play Store to download an app called Assistant Trigger. This will display the battery life of your AirPods on your phone and allow you to double-tap an AirPod to start Google Assistant or Bixby.
If you really want to use AirPods with your Android phone, there’s nothing stopping you. The Samsung Galaxy Buds or OnePlus Buds, on the other hand, might tempt you.
How aggravating is it when you try to join a Google Meet meeting and get a Camera Failed error on a dark screen? Don’t worry if this happens to you; we’ll help you get back on your feet.