SD Card Not Recognized and Won’t Show Up: The Best Fixes
Smartphones have earned the moniker “smart” for a reason. They are capable of more than just making and receiving phone calls and texts. Accessing photos and data from your SD card is one of the many things your Android smartphone can accomplish. However, you’ve certainly run across this problem before: you plug in your SD card, but it doesn’t appear on your phone. This can be aggravating, and unfortunately, it’s a common problem.
You don’t need to be concerned since, much like when your phone meets the no SIM card error or fails to recognize a USB device, there are a number of solutions available. In reality, the majority of the fixes for one will also work for the other. In this article, we’ll go through the most common reasons why your phone won’t recognize your SD card, as well as some possible solutions.
Why Is an SD Card Not Recognized on an Android Phone?
You must first determine what is causing the problem before you can figure out how to fix an SD card that is not recognized by your phone. The following are some of the most typical reasons why your SD card does not appear on your phone:
1. Your SD Card Is Damaged
Physical damage to your SD card is a common reason for it not being recognised by your phone. SD cards are frequently made of fragile, and sometimes inexpensive, materials. That means they’re vulnerable to physical harm, especially over time; repeated use and insertion and removal of your SD card might cause wear and tear. When this happens, your SD card’s springs may become loose, cracks may emerge, or its wires may become worn out, rendering it unreadable.
Make sure you carefully insert and remove your SD card from any device to avoid any kind of disfigurement and to extend its life. When it’s not in use, make sure it’s in a secure location (such as an SD card holder).
2. Your SD Card Needs Some Cleaning
Another reason your SD card isn’t being recognized by your phone could be because it’s dirty. Dust settles in every crevice of your gadgets, including the slots where you put your memory cards; it’s not uncommon for your SD card to collect some of that dust and filth as well. And if the metal contacts on your SD card become clogged with dust, your card may become illegible.
3. Your SD Card Is Locked

It’s also possible that your SD card isn’t readable since it’s locked. On the side of most SD cards is a little lock slide mechanism that you may adjust up or down. When the lock slide is on top, your memory card is write-protected; when write protection is on, no device can read or detect your memory card. Make sure the lock mechanism is moved down so your phone can identify the SD card.
4. Your SD Card Is Not Compatible With Your Phone
Another typical reason for your phone failing to recognize your SD card is that your smartphone and SD card are incompatible. SD cards come in a variety of formats, including SD, SDHC, SDXC, and SDUC, with storage capacities ranging from 2 GB to 128 TB. SD cards can only hold a specific amount of data on most Android phones. Whether your older Android phone doesn’t identify your SD card, try adding a more basic SD card (either SD or SDHC) and see if it works.
SD cards differ in terms of speed, also known as transfer rate, in addition to the format. SD cards have transfer rates ranging from 2 MB per second to 90 MB per second. Different phones, like varying SD card types, can support different SD card speeds.
Check your phone’s specifications in the handbook or go to the manufacturer’s website to see which SD card format and speed it supports.
5. Your SD Card Is Not Formatted for Your Phone
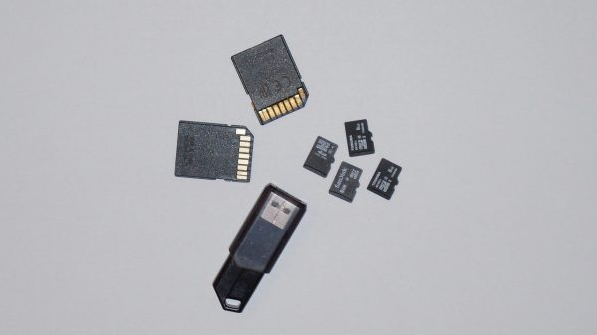
One of the most common problems that Android customers have with their SD cards is that their computers can see them but their phones can’t. This is most likely due to the file system on their SD cards not being compatible with their phones.
Note that most Android phones can only read SD cards with the FAT32, Ext3, or Ext4 file systems; however, the latest Android phones can also handle exFAT-formatted memory cards of up to 64 GB. If the file system on your SD card is NTFS, your Android phone will not detect it.
6. Your SD Card Is Infected With Malware
Malware, often known as a virus, is capable of infecting any device, including your SD card. Your SD card may become unreadable as a result of this.
There are several scenarios in which malware might infect your SD card. You may have linked your card to a virus-infected laptop or PC. It’s also possible that you copied virus-infected files to your SD card or acquired malware-infected files from another device. If you browse harmful websites while using your memory card, you may infect it with malware. Furthermore, downloading files from these dangerous or compromised websites can infect your SD card with malware.
7. Your SD Card Is Corrupted
Another reason your SD card isn’t showing up on your Android phone could be because it’s infected. An SD card, like a flash drive, can be corrupted if it isn’t removed or ejected properly. If you formatted your SD card incorrectly, it could get corrupted. To avoid corruption, make sure nothing interrupts the operation when formatting your SD card. When you’re done using your memory card, make sure you carefully eject it from your device.
8. The SD Card Driver Is Outdated
An outdated SD card driver is a possible cause of your phone’s inability to recognize your SD card. Simply explained, an SD card driver is a piece of software that tells your memory card how to interact with the operating system on your device. If the driver for your SD card isn’t up to current, it won’t be able to keep up with your phone and may become corrupted more readily. As a result, it won’t work with your phone or any other device you try to use it with.
9. The Memory Card Reader or Adapter Is Damaged
It’s also conceivable that your SD card isn’t recognized by your phone because of the device you’re using to access it, rather than the SD card itself. Your phone may be unable to recognize your memory card because the card reader or adapter (or both) is damaged. Try connecting a different SD card to another phone using the same reader and adapter to see if your card reader or adapter is the problem. If the phone still doesn’t identify the SD card, it’s possible that the reader and/or adaptor are to blame.
Best Fixes for an SD Card Not Recognized by Your Phone
If your phone doesn’t identify your SD card, you don’t have to throw away your memory card or the photos on it just yet. Fortunately, you have various options for resolving the problem, the majority of which are rather simple. You can try some of the ways listed below.
Before trying any of the options below, make sure you know where the problem is—whether it’s in the SD card, phone, or card reader. You can save time, energy, and resources this way.
1. Restart Your Mobile Device
If your SD card isn’t showing up, the first thing you should do is restart your phone. Because restarting your phone allows your system some time to relax and recollect itself, this solution works for practically any issue you have with your mobile device (much like how we need rest to function). You can expect your phone to operate significantly better after restarting it.
It’s really simple to restart your phone. All you have to do is follow these steps:
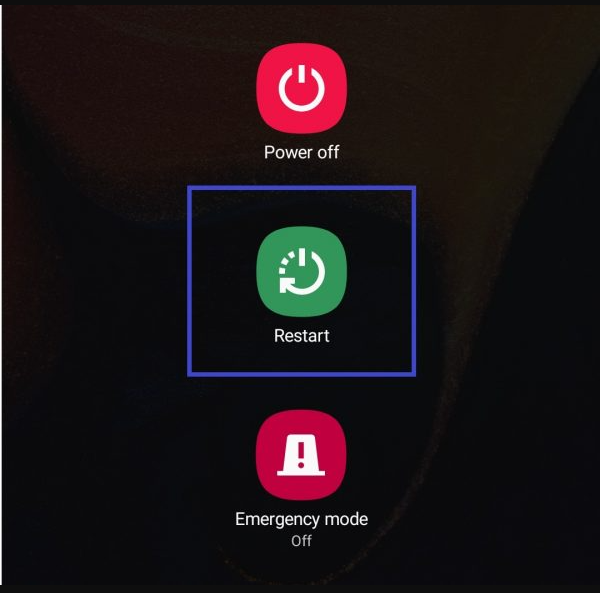
1. Find the power button on your Android device, which is usually on the top, left, or right side. For at least 20 seconds, press and hold this button.
2. Your screen will show a power menu after at least 20 seconds. Tap the “Restart” option if it appears.
3. Wait for your phone to totally turn off before turning it back on.
It’s also possible that an Android smartphone lacks the ability to restart. If this is the case, you can manually restart your phone by following these instructions:
1. Press and hold the power button on your device for at least 20 seconds.
2. When your phone’s power menu displays, select “Power off” or a similar option.
3. Wait for your phone to turn off fully.
4. Press and hold the power button for at least one minute to turn your phone back on.
2. Update Your Phone’s Apps and OS
You can also try updating your phone’s apps and operating system. This ensures that your phone’s SD card isn’t being ignored due to problems in your programs or operating system.
Let’s start with how to update the apps on your phone. Installing updates automatically is the simplest way to keep your programs up to date. To do so, take the following steps:
1. Open your phone’s Google Play Store app.
2. Tap the “Menu” symbol (it looks like three parallel lines piled on top of each other) in the upper-left corner of your screen.
3. Click on the “Settings” button.
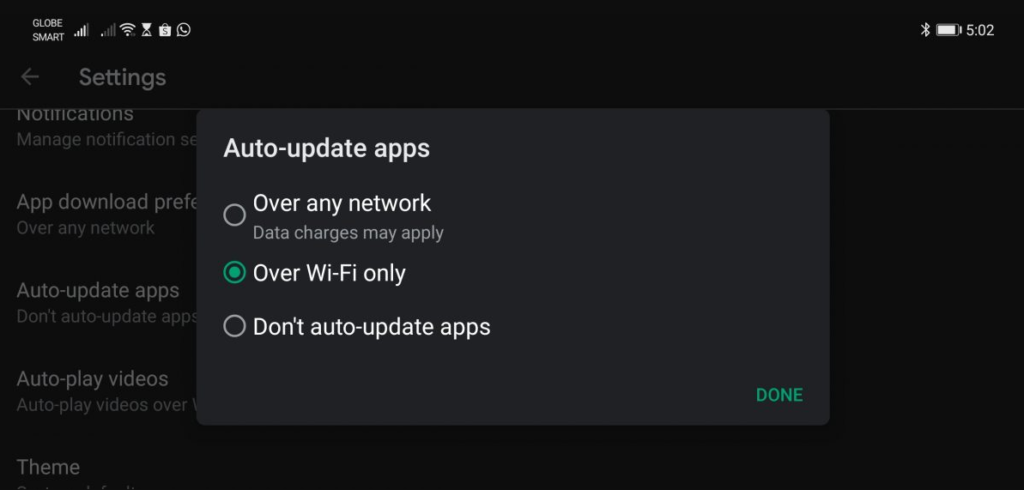
4. Select “Auto-update apps” from the drop-down menu, then “Auto-update apps at any time” or “Auto-update apps over Wi-Fi only.”
You can manually update your apps if you choose by following these steps:
1. Open your phone’s Google Play Store app.
2. Select the “Menu” symbol from the drop-down menu.
3. Select “My apps & games” from the drop-down menu.
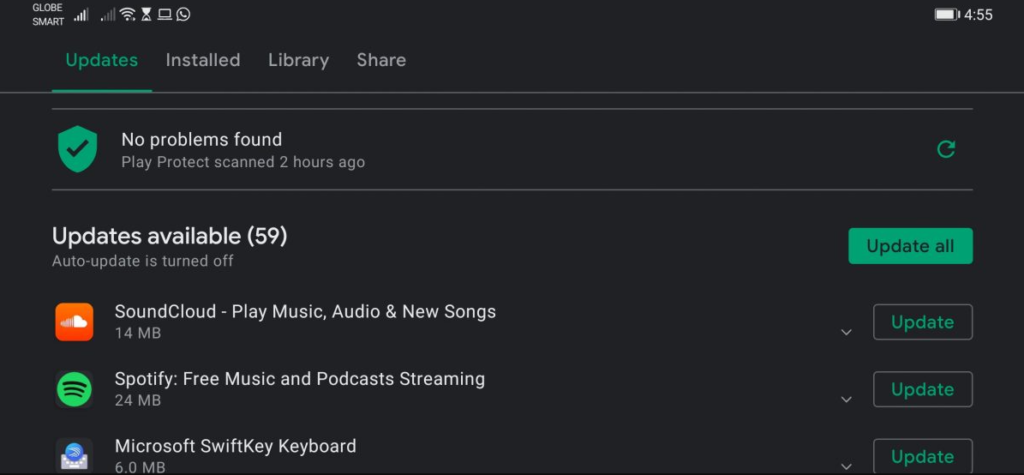
4. A list of the apps installed on your phone will appear here. If an app has a “Update” button alongside it, you know it needs to be updated. Simply press the update button next to the apps that need to be updated to get them updated. Alternatively, you can select “Update all” to download and install all available updates.
5. To continue updating your apps, select “Accept” if you need to provide app access.
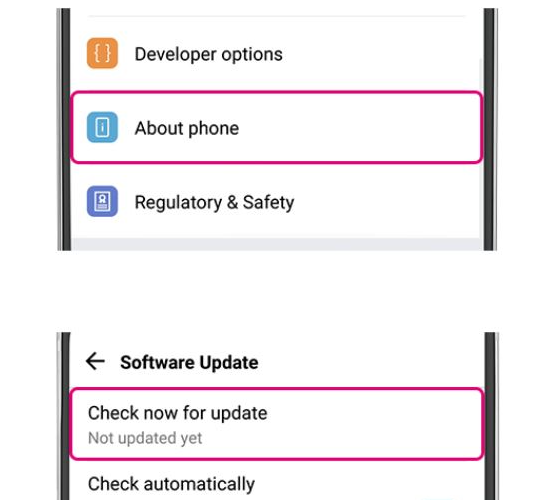
It’s also simple to update your operating system. However, it is possible that the process will take longer, perhaps 20 to 30 minutes. If you need to update your phone’s operating system, follow these steps:
1. Join a Wi-Fi network with your device. Ascertain that the connection is stable so that the update procedure is not disrupted.
2. Select “About Phone” from the Settings app on your phone. You’ll find all of the information about your device here, including the Android version.
3. Locate and hit the “Check now for update” button.
4. Click “Install now” or a similar option and the update procedure will begin.
3. Reinsert the SD Card
Re-inserting the SD card into your card reader or phone is another quick and easy cure for this problem. If your SD card isn’t identified by your mobile device, it’s possible that you didn’t fully or correctly insert it. To fix this, simply follow these simple steps:
1. Turn off your cell phone.
2. Take the SD card out of your phone, tablet, or card reader gently.
3. Re-insert your SD card into your phone, tablet, or card reader gently and correctly.
4. Turn on your phone and see if your SD card is now recognized.
4. Gently Clean the SD Card
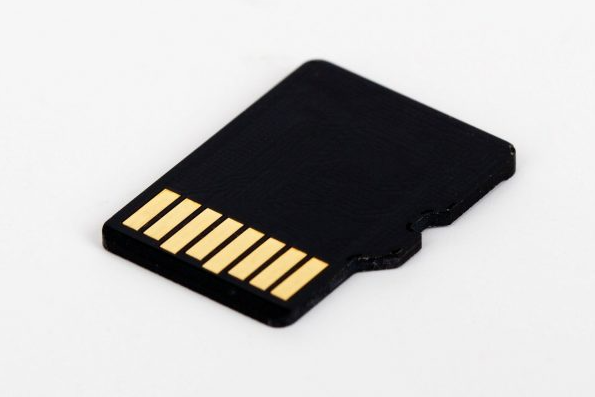
It’s possible that dust and debris on the metal contacts of your SD card are causing the issue. In that scenario, a good old (soft) cleaning is all your SD card need. Simply follow the steps below to clean your memory card:
1. Take the SD card out of the reader.
2. Gently brush the dirt off your SD card’s metal contacts with a rubber eraser, preferably one that is white in color.
3. If your SD card still has dirt on it, use a clean cotton swab dipped in nail paint remover to clean it. To avoid entirely dampening your memory card, only use a small amount.
4. To remove any remaining dirt, gently touch the metal contacts of the SD card with the cotton swab.
5. Allow your SD card to completely dry before using it. Connect it to your mobile device once it’s entirely dry.
5. Get a New Card Reader and/or Adapter
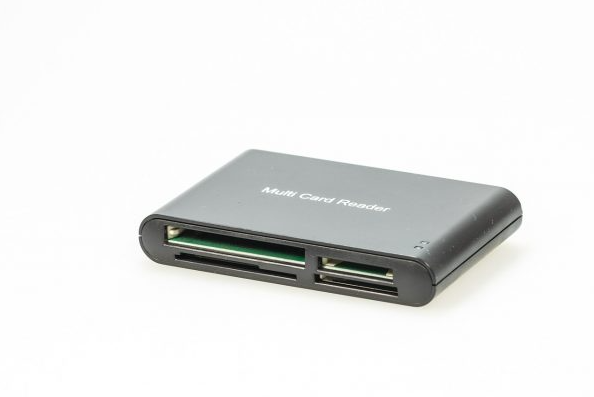
As we explained in the last part, your phone and SD card may be in perfect working order, but the issue is with your card reader or adapter, or both. If you’ve tried attaching your card reader and adapter to another mobile device and it still won’t read your SD card, it’s time to part ways with it. It’s common for card readers to stop working over time, particularly if you’ve owned yours for a long time.
It’s not difficult to locate a new card reader and converter. A good-quality card reader and converter can be found at a variety of stores, like Amazon and Walmart.
6. Update the SD Card Driver
Now we’re getting into the more technical aspects of things. Try updating your SD card driver if none of the other techniques have worked so far. You’ll need a laptop or a PC for this. You have the option of updating your SD card driver automatically or manually. If you wish to do it manually, go through the procedures below:
1. Use a card reader to connect your SD card to your laptop or PC.
2. On the taskbar, click the search button and type “Device Manager.”
3. To enlarge the list, click the arrow next to “Disk drives.”
4. Locate and right-click on the name of your SD card in the list.
5. Choose “Update driver” from the drop-down menu.
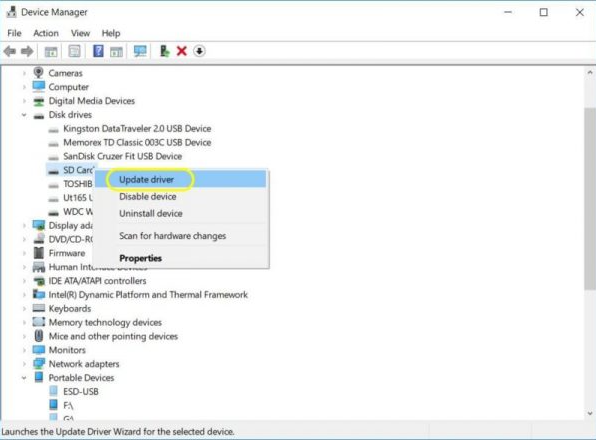
6. When you click, a dialog box will display on your screen asking how you wish to search for drivers. “Automatically search for updated driver software” is selected.
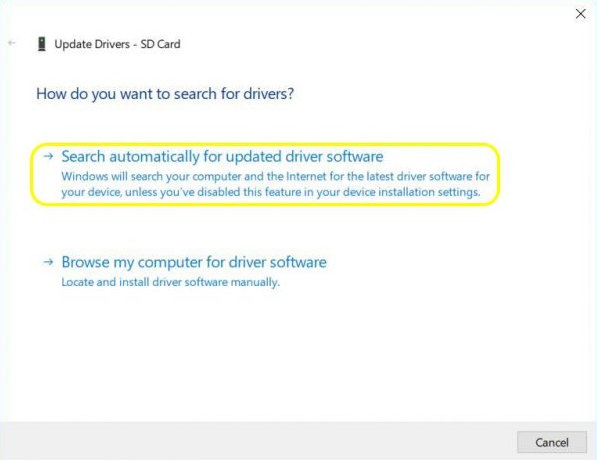
7. Wait for the driver installation to complete.
8. Remove the SD card from your computer and place it in your mobile device safely. Check if your mobile device now recognizes your SD card by restarting it.
If updating the SD card driver automatically doesn’t work, try the manual way. You’ll need some information about your SD card, such as its specific model, to do this. Once you have that information, follow these steps to manually upgrade your SD card driver:
1. Go to the manufacturer’s website for your SD card and look for the appropriate driver.
2. Save the SD card driver to your computer, which is generally a zip file.
3. Once the download is complete, unzip the file.
4. Expand the list by going to “Device Manager” and clicking “Disk drives.”
5. Select “Update driver” from the context menu when right-clicking on your SD card.
6. Your screen will display the same dialog box as in the prior manner. Select “Browse my computer for driver software” this time.
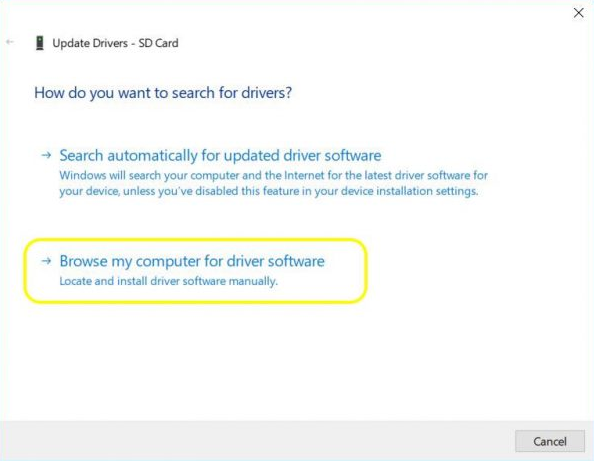
7. Locate and pick the SD card driver you just downloaded.
8. Once the update is complete, remove your SD card from your laptop or PC safely.
9. Check to see if your SD card is now detectable by connecting it to your phone.
7. Format Your SD Card Using Your Laptop
You can also format your SD card as an alternative. When you format your SD card, all of the files and data on it are permanently erased. This procedure aids in the removal of any difficulties with the SD card and restores it to its original state.
Before you format your SD card, make a backup of your files. Then take the following steps:
1. Make sure your SD card is connected to your computer (either through a card reader or through the SD card slot).
2. Select File Explorer from the menu bar.
3. From the left-hand navigation pane, choose “This PC.”
4. Under “Devices and drives,” right-click on your flash drive. Choose “Format.”
5. After that, you’ll be given the option of either a quick format or a full format. Select “Full format,” since this will totally wipe your SD card clean, erasing all of the issues on it.
6. When a warning dialog box displays, click “OK.”
8. Change Your SD Card’s File System
If your phone won’t identify your SD card because it’s not in an Android-friendly format, try changing the file system on your SD card. As previously stated, Android devices can only recognize FAT32, Ext3, or Ext4 file systems on SD cards; however, if you have a more current Android smartphone, it can also read exFAT SD cards.
If your SD card’s file system isn’t in one of these formats (for example, NTFS), here’s how to convert it:
1. Plug your SD card into your laptop or computer.
2. Select File Explorer from the menu bar.
3. From the navigation pane, choose “This PC.”
4. Right-click on your SD card, and select “Format.”
5. Select “Quick format” from the drop-down menu.
6. Choose one of the following formats from the “File system” drop-down menu: FAT32, Ext3, Ext4, or exFAT.
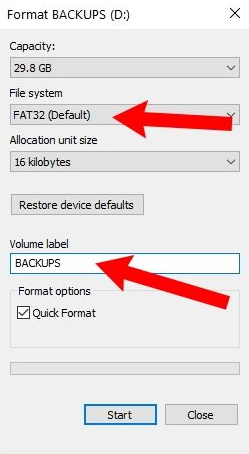
7. If you want, you can even rename your SD card. This can be done under the “Volume label” section.
8. When you click “Start,” the formatting procedure begins.
9. Factory Reset Your Android Device
Because of software difficulties, your phone may not be able to identify your SD card. If this is the case, you might consider doing a factory reset on your phone. Keep in mind, though, that factory-resetting your phone erases all of your data, including files, non-default apps, settings, and passwords. Before factory resetting your phone, make a backup of any data that can be saved. Then take the following steps:
1. Open the Settings app on your device.
2. Select “General Management” from the drop-down menu.
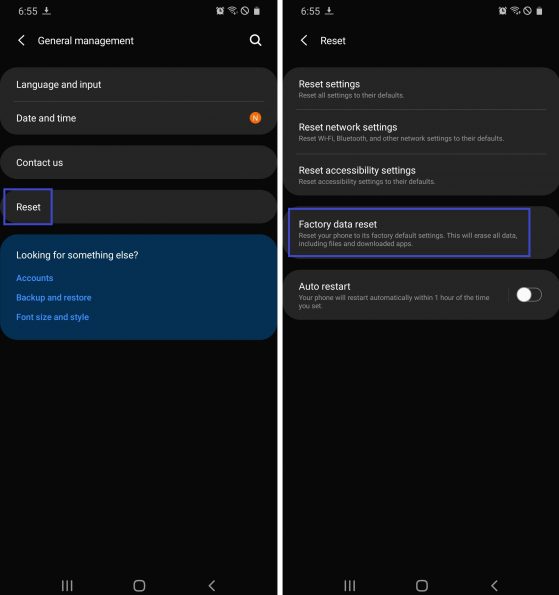
3. Look for the word “Reset” and tap it.
4. Choose “Factory data reset” from the drop-down menu.
5. When you reset your phone, it will warn you of the apps and accounts that will be erased. Choose “Reset.”
6. Allow for a reboot of your device.
Takeaway
Your mobile device may not identify your SD card for a variety of reasons. The good news is that there are numerous options for resolving the problem. We hope that this advice has assisted you in finding the right option for your needs.