In this tutorial, learn how to download and install World Flipper on Windows PC or Laptop. You can install World Flipper on PC for free if you use Bluestacks. This emulator allows you to play the free Android version on your computer. » Read more
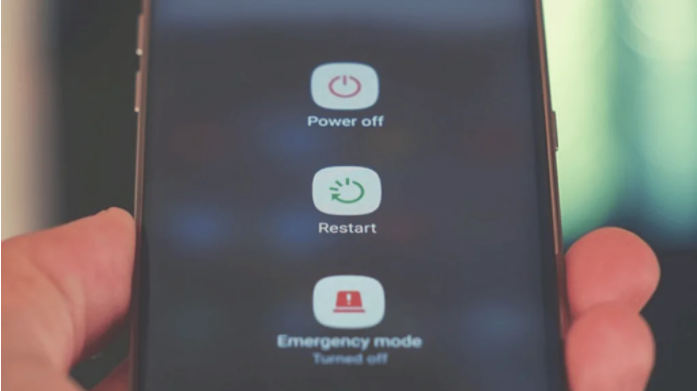
When your phone receives an incoming call, the screen may or may not turn on. The phone continues to ring, but you are unable to see who is calling since the display does not turn on. This is a typical problem on Android, and users must launch the Phone app to see who is calling. When it receives a call, the screen may not even wake up for a few seconds, or it may not even show anything at all. If you’re having trouble with incoming calls not showing up on your Android phone’s screen, we’ve got six solutions for you. Continue reading!
As we’ve indicated in most of our Android tips and tricks, a simple restart of the device can occasionally solve the problem. If your calls aren’t showing up on your screen, restart your phone; the problem may go away.
Check DND Mode
If the restart doesn’t fix the problem and you still can’t see calls on your phone, it’s possible that the DND mode is to blame. Unless you’ve authorized some apps to override this, DND mode disables all notifications. To double-check, go to:
1. Go to Settings and choose Sound.
2. Press on “Do Not Disturb”. Switch it off by pressing “Turn off now” if it is on.
3.
3] If you need DND mode for some reason, tap on “Calls” and select “Allow calls in DND mode.”
So, if you wish to use DND mode while still being able to see calls on your phone, you’ll need to follow the method described above.
Enable Call Notification
On all cellphones, notifications are enabled by default for all incoming calls, and no one normally changes this setting. However, it is possible that an update will alter it. Follow these procedures to re-enable the notification:
1] Go to Apps & Notifications in Settings.
2] Locate the default Phone app and tap it.
3] Next, go to Notifications and make sure the “Show notifications” toggle is turned on.
That concludes our discussion. By pressing on Incoming Calls, Behavior, and changing it to Make Sound and Pop Up on Screen, you can change the behavior of call alerts.
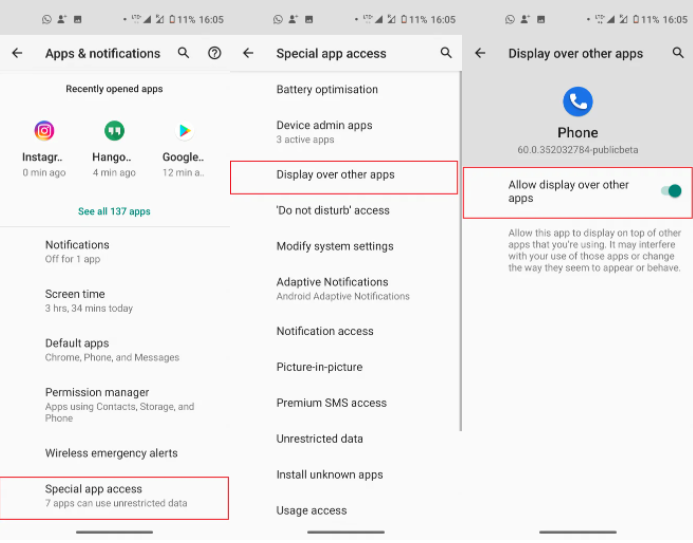
Give Special App Access
Permissions are required for any software to function effectively, as we all know. It could be a question of permission access if your display doesn’t show the incoming call notifications. To see if your phone has special app access, follow these instructions.
1] Navigate to Apps & Notifications in Settings.
2] Go to the bottom of the page and select Advanced, then Special app access.
3] Select ‘Display over the other apps’ from the drop-down menu.
4] Find the Phone app and enable “Display over other apps” for it here.
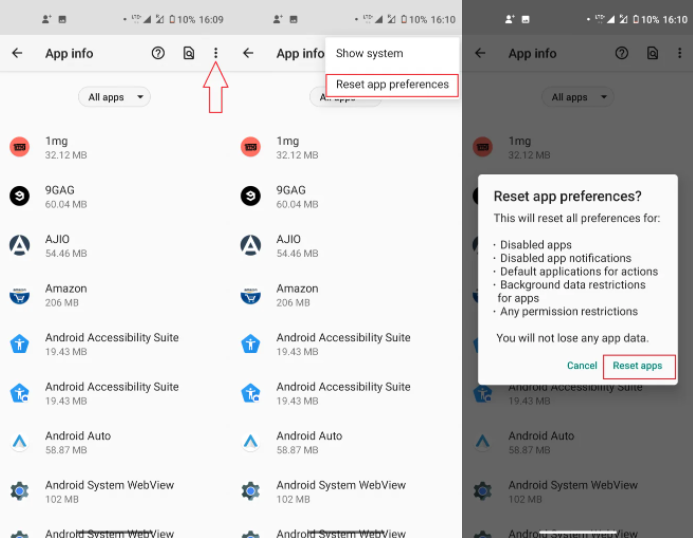
Reset App Preferences
When we reset an app’s preferences, it may revert to its default settings and begin to function normally. This also applies to apps that do not display notifications on the screen.
1] Go to Apps & Notifications in Settings.
2] Tap the three-dot icon in the top right corner of All Apps.
3] A pop-up will appear once you hit on “Reset app preferences.” That’s it! Tap on Reset applications and you’re done!
It’s important to know that resetting app preferences will not remove any data from your apps.
Clear Cache and Data
Clearing the cache in any program can help with a variety of difficulties. If your Phone app isn’t displaying calls, try emptying the cache. It should be noted that your data is not deleted. However, if it doesn’t work, you might try deleting your data.
1] Go to Settings > Apps & Notifications.
2] Locate the Phone App and press it, then select Storage and Cache.
3] Tap the Clear cache button on the next page, then restart the device.
4] If the problem remains, repeat the steps above, but this time hit Clear data.
You should be aware, however, that wiping data will also remove your call logs.
So those were some solutions for incoming calls not showing up on your phone’s screen. If you have any questions, please let us know in the comments section. Stay tuned for more similar hints and tips!
In this tutorial, learn how to download and install Goodnotes 5 on Windows PC or Laptop. You can install Goodnotes 5 on PC for free if you use Nox App Player. This emulator allows you to play the free Android version on your computer.
The majority of the time, Instagram does not collapse. However, all platforms have problems, which is why we sometimes get the “Instagram Couldn’t Refresh Feed” error for no apparent reason.
In this tutorial, learn how to download and install MARVEL Future Revolution on Windows PC or Laptop. You can install MARVEL Future Revolution on PC for free if you use Bluestacks. This emulator allows you to play the free Android version on your computer.
In this tutorial, learn how to download and install MIR4 on Windows PC or Laptop. You can install MIR4 on PC for free if you use Nox App Player. This emulator allows you to play the free Android version on your computer.
The flashlight, which uses the camera’s LED flash to assist you traverse dark situations, has long been a feature of phones. Android has a flashlight feature, but it requires a few swipes to access. Continue reading to find out how to turn your phone’s flashlight on and off faster.
Fortunately, there are a number of quick ways to activate the flashlight on your Android phone, ranging from shaking the phone to using your voice, and we’ve compiled a list of them here.
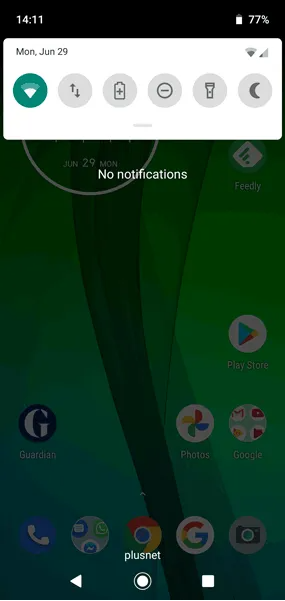
Add Flashlight to Quick Settings
When you swipe down from the top of your screen one time, the Flashlight symbol appears in the menu on many phones. If it isn’t, slide down once more to reveal all of the quick-launch icons, then tap the pen icon beneath them.
Hold and drag the Flashlight symbol to a location in the icons list where it will appear among your default notifications from here.
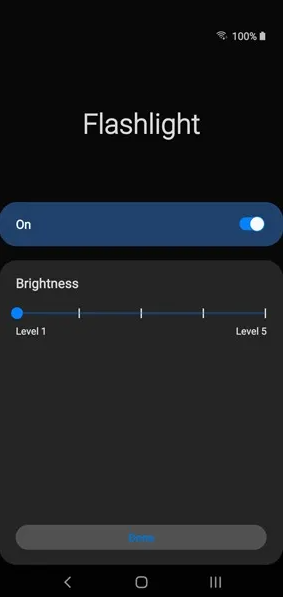
You can even alter the brightness of your built-in flashlight on some phones, like as the Galaxy series. To do this on a Galaxy phone, pull down the Quick Settings menu until you find the Flashlight icon, then hit the text beneath it that says “Flashlight” instead of the actual icon.
When you switch on the flashlight, this will take you to a hidden menu where you can control the brightness. After you’ve made your changes, click “Done,” and you’re ready to go.
Tap Back of Phone to Turn Flashlight On
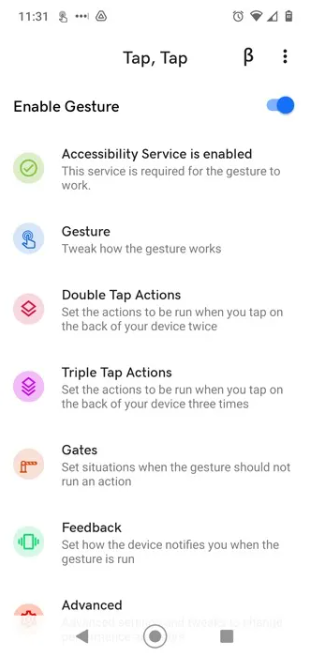
We’ll go through how to shake your phone to turn on the flashlight later, but from my experience, this can result in the flashlight coming on while your phone is in your pocket. This wonderful program from XDA Developers makes the same feature work on earlier devices. Android 11 has a function where you can tap the back of your phone to activate various functions, but this excellent app from XDA Developers makes the same function work on older devices.
To install and set it up, you’ll need to enable different permissions, such as unknown sources. When you first launch the app, there’s a helpful tutorial that walks you through the permissions you’ll need to grant.
After that, tap “Double Tap Actions” or “Triple Tap Actions” from the main Tap, Tap menu (depending on how you want to turn on your flashlight).
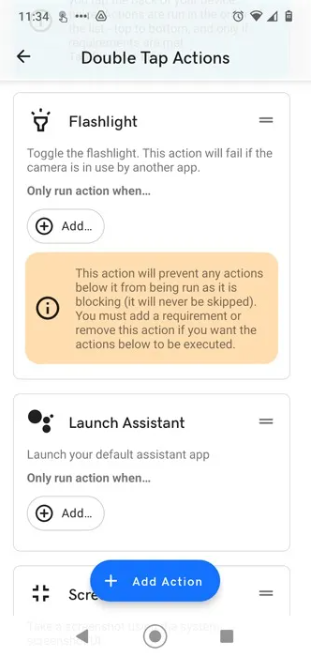
Tap “Add Action -> Utilities -> Flashlight,” then “Allow” on the next screen.
Back on the “… Tap Actions” page, drag your gesture to the top so that it always takes precedence over the other default actions.
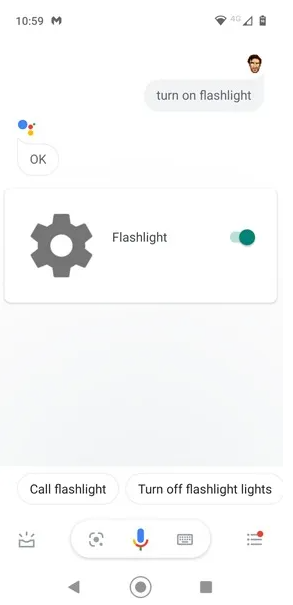
Tell Google to Turn on Flashlight
Remember to use “OK Google” to activate the Flashlight. Tap the microphone icon or say, “OK Google, turn on the flashlight” (or “OK Google, Flashlight on“). To turn it off, say “OK Google, turn off Flashlight” or “OK Google, Flashlight off.” If you already have too many apps on your phone and don’t have enough room for another, this is a great solution.
Another option is to press and hold your phone’s Home button until Google Assistant appears, then say “Turn on Flashlight.”
Use Gestures
Gestures are supported by most recent Android phones, allowing you to enable and activate certain functions with particular button pushes or motions.
The specific motions vary by the device manufacturer, but to use them, go to “Settings -> Gestures,” then look for and enable the Flashlight option.
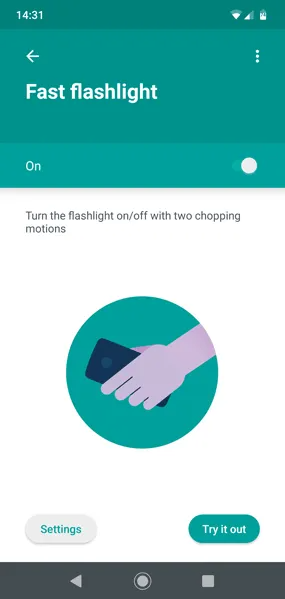
Shaking your phone in a chopping motion on Motorola phones will switch on your flashlight instantaneously. (This prevents it from being mistakenly turned on.) When your OnePlus phone is shut off, it draws a “V” on the screen. The exact gesture may differ if you use a different phone, but it will most likely be just as quick!
Turn on the Flashlight with the Volume Buttons
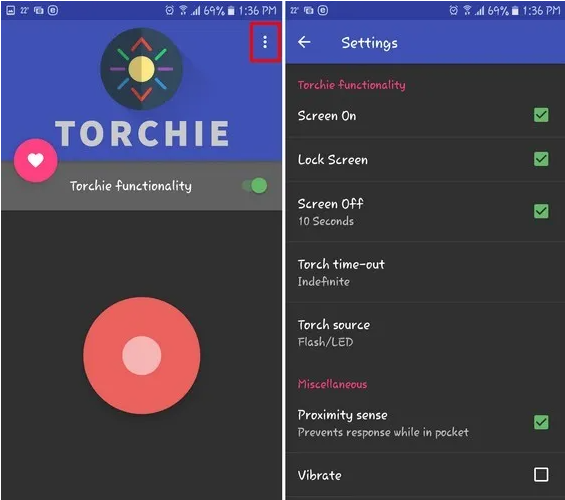
Torchie – Volume Button Torch is a free app that lets you turn on the flashlight on any Android device using the volume buttons. The app will take up 4MB of storage on your phone and will not overwhelm you with advertisements.
You must provide the app the “Accessibility Service” permission in order for it to work in the background.
You may even use the Flashlight from your lock screen, but you must first enable it in the app’s settings. Simply open the app and press the three vertical dots on the upper right of your screen to reach Settings.
Shake the Flashlight On
If your phone lacks the built-in Gesture functionality described previously, you can install a third-party software to replace it.
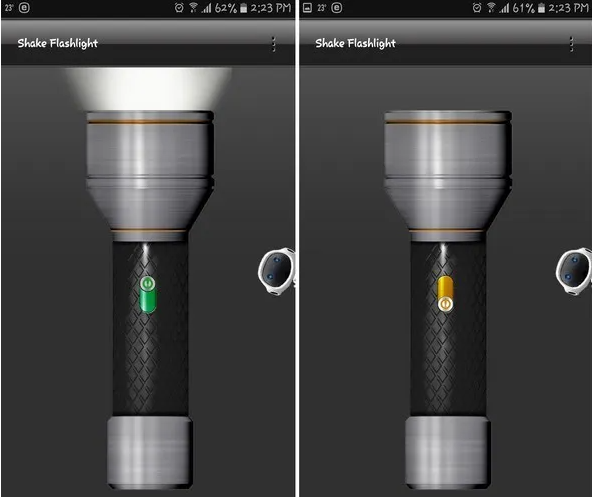
You’ll need to download the Shake Flashlight app. The Flashlight will turn on when you shake your phone. Even if your Android device’s screen is off, you can switch on the flashlight by shaking it, then shaking it again to turn it off.
If you find that shaking your phone too hard is necessary, you can adjust the sensitivity in the app’s settings. Select “Shake Sensitivity” from the three vertical dots in the top-right corner. If you set the sensitivity too high, the Flashlight may switch on accidentally, according to the app.
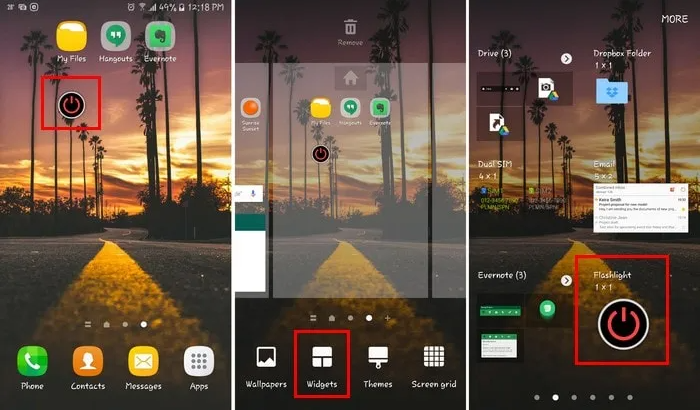
Use a Flashlight Widget
Last but not least, the Flashlight Widget app might help you obtain some light. The widget will not appear on its own; instead, you must long-press on a spot on your home screen where you want it to appear.
The widget should be on the first page if you select the Widgets option at the bottom. Long-press and drag the widget to an empty spot on your screen. The program doesn’t have a Settings page; you’ll only know if it’s installed if the widget appears. There will be no app icon displayed.
While the Flashlight’s original purpose was to brighten your surroundings so that the camera app could take better night shots, it has since developed into a handy and practical torchlight. Isn’t it lovely?