How to Number Your Microsoft Word Document


In Microsoft Word, page numbering might be difficult. With these hints, you’ll be able to apply page numbers and personalize your document.
When you need your document to fit a specific formatting standard, page numbering in Microsoft Word can be difficult. Microsoft Word allows you to format your page numbers in a variety of ways, depending on your needs.
You may want to change the numbering format of your pages, change the position of your page numbers, or orient page numbers in a specific way. Let’s have a look at some Microsoft Word page numbering guides to clear up any confusion.
Number the Entire Document
This trick works well for numbering a single document that is not divided into sections. It is also the most expedient method.
On the Microsoft Word ribbon, select the Insert option. Select your preferred page number location in the Header and Footer group by clicking the Page Number option.
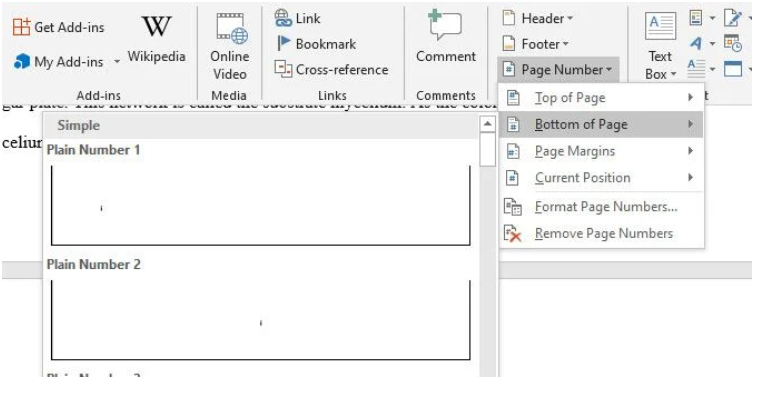

The Top of Page and Bottom of Page options in the dropdown menu feature a number of extra styles that help you customize the location and appearance of your page numbers. By selecting the Page Margins option, you can also insert your page numbers on the document margin.
Place a Page Number Anywhere Within a Page
You may put the page number anywhere on the page by moving your typing cursor to the desired location. To do so, select one of the alternatives in the Current Position option on the Page Number tab.
You can also open a curly brace by pressing Ctrl + F9 if you don’t want to utilize the automated Current Position option. Then, inside the curly brace, type PAGE. To display the page number, right-click on the curly brace and select Update Field.
You can also open a curly brace by tapping Ctrl + F9 if you don’t want to utilize the automated Current Position option. Then, inside the curly brace {}, type PAGE. To display that page number, right-click on the curly brace and choose Update Field.
It’s worth noting that placing your numbers somewhere other than the header, footer, or margin can cause your numbering to become disjointed. As a result, either of these three positions is the appropriate spot to put your page numbers.
Click the Format Page Numbers option if you wish to change the format of your page numbers from integers to alphabets or Roman numerals. You may also specify where to begin your page numbering with this option.
Number Pages in Different Sections
You must number each section separately if you want to break your document into sections. In Microsoft Word, there are a few options.
To begin, position your typing cursor on the line where you want to begin the separation and follow the steps below:
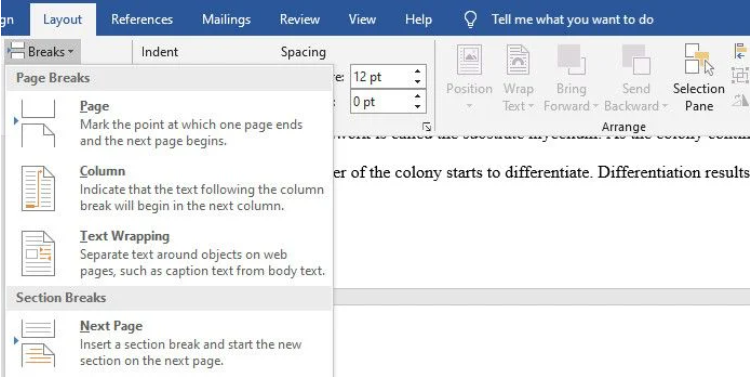
Open the Layout tab of the ribbon.
Tap on Breaks in the Page Setup group, then on Section Breaks, then on the Next Page option in the dropdown menu.

Double-click on the footer or header of the following page that begins the divided section (depending on where you want to place your page numbers).
To unlink the current part from the previous one, go to the Navigation group on the Ribbon and choose Link to Previous.
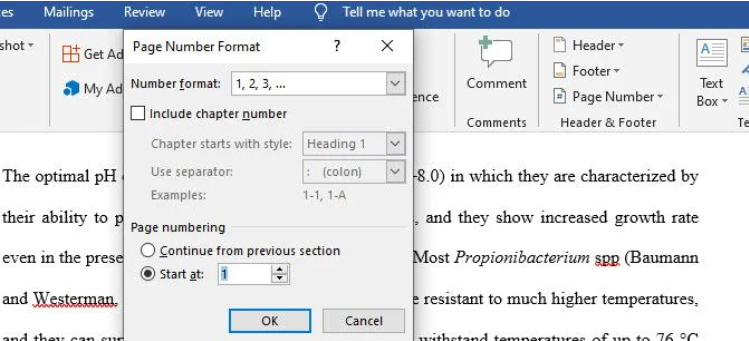
When the unlinking is completed, tap on the Page Numbers in the dropdown menu, then navigate to Format Page Numbers and check the Start at option to start numbering your section pages at your preferred value.

Place your cursor anywhere on the first page of that portion and select the Insert tab to give the upper part an alternative number format.
Then, select Format Page Numbers from the Page Numbers option.
You can alter the number format to numerals, alphabets, or keep the traditional numbering in the format part. However, make sure that the Start at option is set to “1” or whatever character that applies to your format.
Select your favorite page numbering choice when you go back to the Page Numbers dropdown menu.
Any extra blank pages that result from the customization process should be deleted.
Tip: Swap Between Sections to Number Pages Quickly
It’s possible that you’ll need to change the page numbers in some areas. Of course, you can always manually scroll from one page to the next in your document to accomplish this. However, switching between the footer and header of each section automatically is a more convenient option.
To do so, simply double-click on the bottom or header of any section of your document (depending on where you place your page numbers).
Find the Navigation group on the Ribbon. Then press on either Next or Previous to swap sections.


Apply Page Numbers to Chapters in Word
You could choose to separate a part into chapters and number each page in relation to those chapters to modify the look of your Word document. The chapter header becomes a dropdown once this option is applied, allowing you to toggle between hiding and exposing the content of a chapter in a section. It’s also a terrific method to make your Word pages look nicer and more organized.
Go to the Insert tab to use the chapter numbering option. After that, go to the Page Number option and select Format Page Numbers.
To choose your header type, click the Include chapter number box in the Page Number Format dialog box. By clicking the Use separator dropdown menu, make sure you select your desired separator option. Then choose Ok.


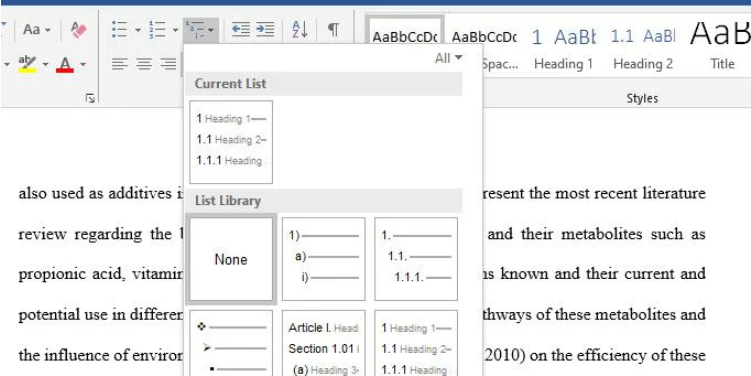
Then, choose a chapter heading you want to highlight. Locate the Paragraph group under the Home tab.
To insert the content in that chapter in a dropdown, locate the Multilevel list option and click on the sixth option inside the List Library. With this option, you can also number your chapter headers and pages in relation to them.

Your chapter headings, on the other hand, maybe on the same page. You can relocate the header of a chapter to a new page to better organize the pagination in this scenario.
To do so, position your typing cursor in front of the header you want to move. Then, under the Break dropdown menu, select Next page from the Page Layout option.
Number Even and Odd Pages in Word
If you want to use distinct page number styles on various pages, treating odd and even pages individually is a great idea. Surprisingly, Microsoft Word also has this feature.
To do so, double-click on a footer to open both the footer and the header to alter.
Then, on the Ribbon, go to the Design tab and look for the Options group. Then check the box for Different Odd and Even Pages. Before you begin, double-check that your pages have been numbered.
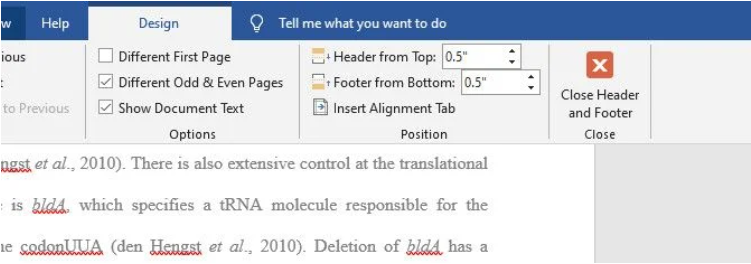

When you tick the box, page numbers on even pages are removed. As a result, only the odd pages with numbers remain. Double-click a footer on any of the even pages and follow the procedures we mentioned earlier to adjust the even page numbers to a different number format.
Remove the Page Number From the First Page
You might want to modify the opening page of each section as well. Removing the numbers off the first page of each section is a reasonable approach to do it.
To do so, go to the Design tab and tick the Different First Page box on any page within a section’s footer. The page number on the first page is removed with this option. After that, you can manually configure the first page to your liking.


By double-clicking on a section’s footer or header, you can troubleshoot mismatched page numbers. Also, make sure it is linked to a previous part by making sure that it doesn’t have “Same as Previous” stated at the top.
Customize Your Word Document Before You Share It
Depending on your goals, the techniques outlined in this article should resolve your page numbering issues. Customizing your document, however, does not end here. Different Word tips can be used to make a slew of other changes.